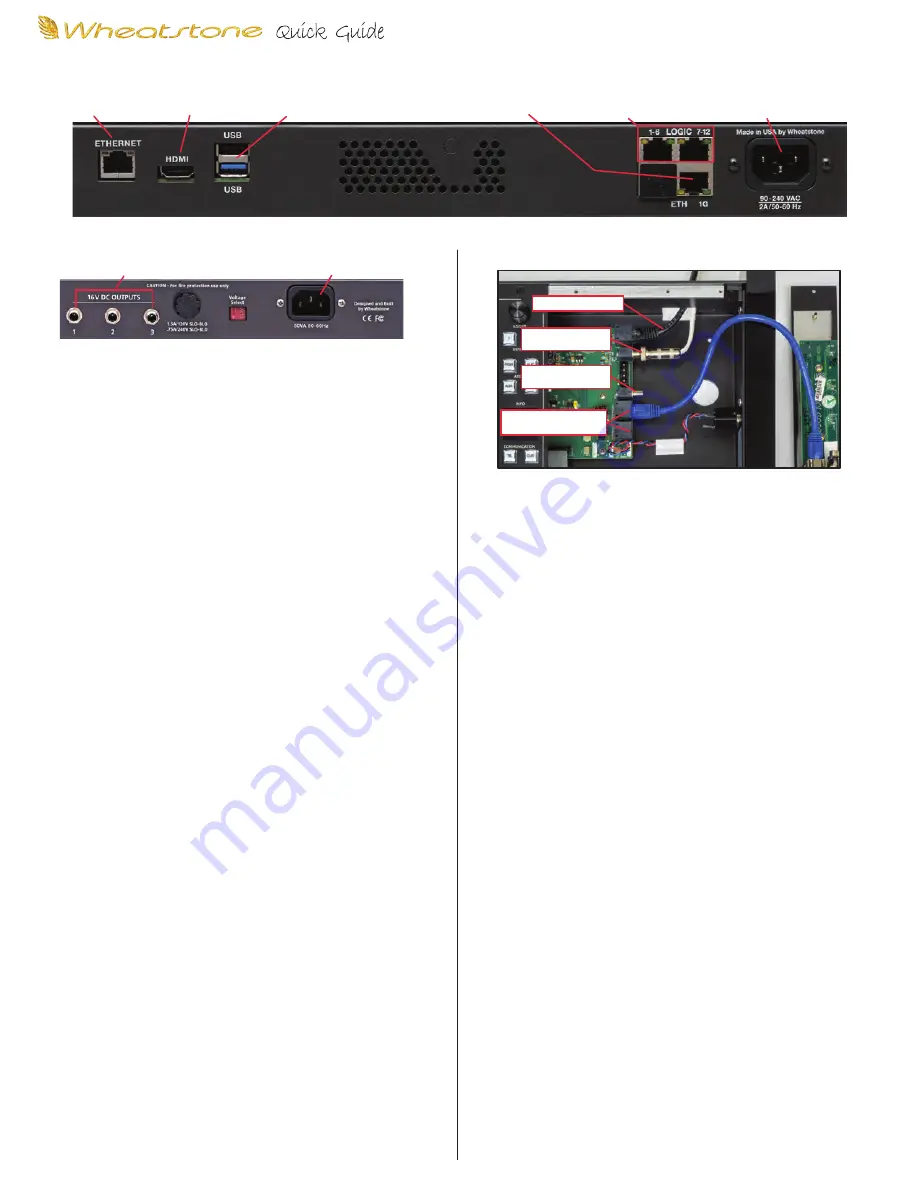
PS-1600, REAR PANEL
3 of 3 rA
MIX ENGINE BLADE, REAR PANEL
HDMI 1080p MONITOR
(CUSTOMER-SUPPLIED)
USB MOUSE / TOUCHSCREEN
(CUSTOMER-SUPPLIED)
SURFACE HOST PC
(TO WNIP SWITCH PORT)
LOCAL LOGIC I/O
(12 PORTS & GND, +5 VDC)
IEC AC INPUT
90-240 VAC 50/60 Hz
MIX ENGINE BLADE
(TO WNIP SWITCH PORT)
GSX SURFACE WIRING
ETHERNET CABLE
DC CABLE
(FROM PSE-1600)
2ND DC JACK
(FROM PSE-1600)
ACCESSORY PANEL
POWER & SIGNAL
GSX CONNECTION SUMMARY
GSX CONNECTIONS
The GSX console has three main parts: Mix Engine Blade, GSX
Surface, and PS-1600 power supply. Their physical connections
are summarized in the above illustrations. A customer-supplied
1080p HDMI monitor (either a touchscreen or with a USB mouse)
are required to display the level meters and to allow board
operators access to the advanced GSX console features. Three
customer-supplied Ethernet cables (CAT5e or better) are
required to network the Mix Engine, the Surface Host PC, and
the Surface to access ports on a WheatNet-IP (WNIP) network
switch.
Rack mount the PS-1600 and Mix Engine near the Surface and
HDMI monitor so the interconnecting cables are not under
strain. The Mix Engine has front panel displays and controls so it
should be placed accordingly. The power supply has no user
controls. Connect the Surface Host PC, Mix Engine, and Surface
Ethernet jacks to three WNIP network switch ports.
Once the Surface and HDMI monitor and USB mouse are set in
place on the countertop, the HDMI and USB cables can be
plugged into the Surface Host jacks on the back of the Mix
Engine. To connect the Surface’s Ethernet and a DC cables, the
Surface’s Master Panel must be removed (four hex screws) to
access those jacks, as shown above, right. The Ethernet and DC
cables can enter the Surface from the rear or, for the cleanest
installation, come up thru a countertop hole drilled below the
cable access opening in the frame.
A 16-foot locking DC cable (supplied) connects the Surface’s DC
jack to one of the 16V DC jacks on the PS-1600 supply. Connect
a CAT5e cable from the Surface’s Ethernet jack to an access port
on a WNIP network switch. If a redundant PS-1600 supply is
used, connect its DC cable to the second DC jack.
Reinstall the Master Panel into the frame, unless you’re install-
ing one or more Accessory panels (SS4-GSX, SS8-GSX, and/or a
pother panel) into the Surface. In that case, connect short CAT5
cables from the Accessory panels to either, or both, Accessory
Panel RJ45 jacks, then fasten those panels into the chassis and
reinstall the Master panel. The panels’ Ethernet signals are
carried over the Surface’s Ethernet cable, and power is supplied
by the Surface, so no other external connections are required.
Once wiring is connected, the Mix Engine, HDMI monitor, and
PS-1600 supply can be connected to AC power. It takes roughly
90 seconds for the various parts to boot up and be ready for use.
The Mix Engine, at first power up from the factory, comes up in
Setup Mode
so that the System Size (typically 1-99 Blades), its
Blade ID (start with 1), the system sample rate (typ. 44.1), and its
I/O template (typ. stereo) can be set using the front panel
controls on the Mix Engine.
The
Blade-3 User Manual
, included on the USB thumb drive that
ships with the GSX, covers the Mix Engine setup procedure in
detail in its
Setup and Configuration
section.
GSX CONFIGURATION
The
GSX Surface Setup
and
Navigator
apps are also included on
the USB thumb drive, along with the
GSX Installation Guide &
User Manual
PDF file which covers their installation and usage.
The two apps are used to first configure the Surface and other
system components (Blades, control panels, etc.) and then
manage system signal connections. The two Windows® apps are
installed on an “admin PC,” any modern PC with at least 1 GB of
RAM, a 1.8 GHz or faster CPU, and two NICs: one to network that
PC with your WNIP network, the other to your facility LAN for
remote access to Navigator and the Surface Setup apps.
The GSX’s default subnet is 192.168.87.0. If you’ll use that subnet,
set the admin PC to 192.168.87.21 and use an Ethernet cable
(CAT5e or better) to connect the PC to an access port on the
WNIP network switch.
The
GSX Surface Setup
app configures the Surface for a specific
application (on-air, production, newsroom, etc.) by setting
options using several tabs and page tabs. It’s initially used to
match the Surface to the Host PC in the Mix Engine. Once that’s
done, the app’s used to set which sources are visible on each
Surface source selector, assign monitor attributes, assign VDIP
(virtual DIP switches) attributes, add logic control capabilities to
audio sources, etc.
Navigator
is a licensed app but a new GSX includes a 30-day
demo license so you can configure your GSX and other WNIP
devices. Navigator is first used to edit the default signal names,
to set their formats, and to add channel logic control to audio
sources. Once the system is configured, Navigator is primarily
used to manually connect sources to destinations using an XY
Crosspoint Grid, or by using Salvos to setup shows, remotes, or
dayparts. Other app features include keeping track of system
operations in a Log tab and uploading new Blade software using
the Version Manager tab. Details on using the
GSX Surface Setup
and
Navigator
apps are in the
GSX Installation Guide & User
Manual
.
IEC AC INPUT
90-240 VAC 50/60 Hz
DC OUTPUT TO GSX SURFACE
(CONNECT TO ANY OUTPUT)
GSX D
IGITAL
A
UDIO
C
ONSOLE


