background image


13 

Set-up and Operation 

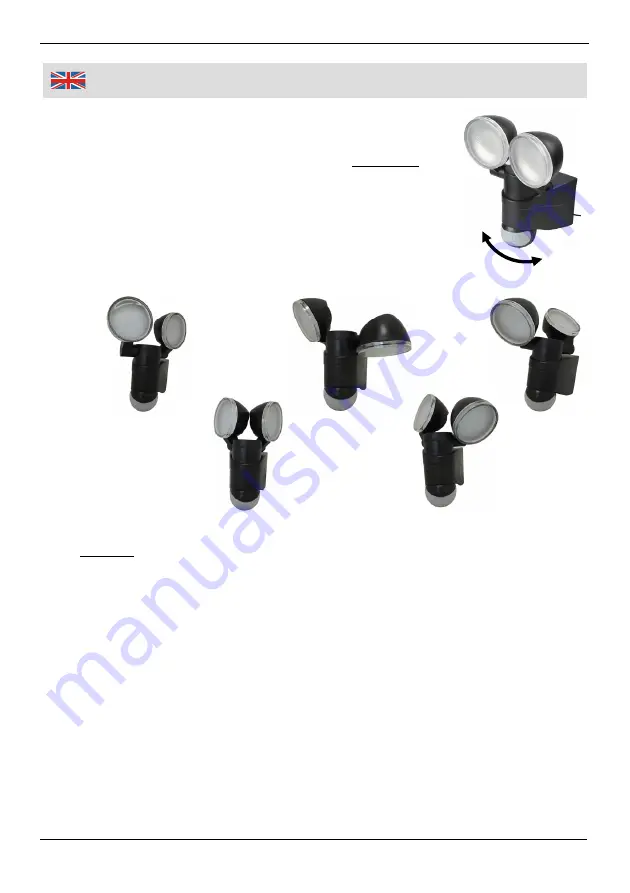
2.  The  motion  sensor  can  be  adjusted  horizon-

tally  in  an  angle  of  270°.  When  you  want  to 
adjust  the  motion  sensor,  turn  it  carefully  up 
to the end to the right resp. to the left. 

3.  Now position the spotlights the area you want 

to  illuminate.  The  spotlights  can  be  adjusted 
both horizontally and vertically. 
Applications: 


Be careful when turning the spotlights to the desired position! 

Adjusting the Solar Module 

1. Always  align  the  front  side  of  the  solar  module  horizontally 

pointing  to  the  sun  at  noon  –  this  means  to  the  south  on  the 
northern  hemisphere  and  to  the  north  on  the  southern  hemi-
sphere. If necessary, use a compass. 

2. The  vertical  angle  of  the  module  should  correspond  to  the 

degree  of  latitude  of  your  position.  This  ensures  the  best 
energy efficiency during the whole year. 


  Alternatively  to  the  method  described  above  you  can  use  the 

following formula to calculate the angle for winter or summer: 
Summer = Latitude - 22.4° / Winter = La 22.4°. 

Summary of Contents for 88 11 76

Page 1: ...Doppel Solar Strahler mit Bewegungsmelder Artikel Nr 88 11 76 Dual Solar Spotlight with Motion Sensor Article No 88 11 76 Bedienungsanleitung Instruction Manual...

Page 2: ...nd keep it for future reference Bedienungsanleitungen enthalten wichtige Hinweise f r den Umgang mit Ihrem neuen Produkt Sie erm glichen Ihnen alle Funktionen zu nutzen und sie helfen Ihnen Missverst...

Page 3: ...III bersicht Overview bersicht Overview 1 2 6 3 4 5 7 8 3 9 4 10...

Page 4: ...tch 4 Netzkabelbuchse Power Cord Plug 5 Bewegungsmelder Motion Sensor 6 LED Strahler LED Spotlights 7 Halteplatte Mounting Plate 8 Leuchtzeitregler TIME Illumination TIME Setting Knob 9 D mmerungsregl...

Page 5: ...eite 7 Funktionstest Seite 7 Ausrichtung des Solarmoduls Seite 8 Fehlfunktion Seite 9 Reinigung Seite 9 Technische Daten Seite 10 Safety Notes Page 3 Mounting Page 11 Start up Page 11 Motion Sensor Pa...

Page 6: ...ne starke mechanische Beanspruchung Schauen Sie nicht direkt in die LEDs und richten Sie den Lichtstrahl der Leuchte nicht direkt gegen die Augen von Menschen oder Tieren Akkus d rfen nicht auseinande...

Page 7: ...ose the LED lamp with solar panel to excessive temperatures or to strong vibrations Do not expose the device to strong mechanical stresses Do not directly stare into the LEDs and do not direct the lig...

Page 8: ...itez toute contrainte m canique sur la lampe Ne regardez pas directement dans le LED et le faisceau lumineux de la lumi re n est pas directement dans les yeux des humains ou des animaux Les piles ne d...

Page 9: ...e forti sollecitazioni meccaniche sulla lampada Non guardare direttamente i LED e il fascio di luce di luce non direttamente verso gli occhi di esseri umani o animali Le batterie non devono essere smo...

Page 10: ...en Sie die Zuleitung nicht 1 Schrauben Sie die Feststell schraube 10 auf der Unterseite der Halteplatte 7 ab 2 Dr cken Sie den gefederten Stift auf der Halteplatte nach unten und ziehen Sie die Haltep...

Page 11: ...mit einer Fotozelle die Tageslicht und Dunkelheit unterscheiden kann Drehen Sie den Regler in die Richtung damit der Bewegungsmelder die Strahler auch bei Tag einschaltet Drehen Sie den Regler in die...

Page 12: ...in die gew nschte Position Ausrichtung des Solarmoduls 1 Richten Sie die aktive Vorderseite des Solarmoduls immer horizontal in Richtung Mittagssonne aus das bedeutet auf der n rdlichen Halbkugel exak...

Page 13: ...melders kommen Starke Sende anlagen k nnen z B Amateurfunker in Ihrer Nachbarschaft oder Sendemasten f r Mobilfunk oder Rundfunkstationen sein In diesem Fall kann es passieren dass sich die Leuchte ge...

Page 14: ...IP44 Lichtstrom 550 lm Lichteffizienz 91 60 lm W Leuchtdauer bei vollem Akku Bis zu 8 Stunden Eingang LED Leuchte 9 V max 0 27 A Akkupack Li Ionen 7 4 V 2000 mAh 2x 3 7 V Solarmodul P mpp 2 5 W U mpp...

Page 15: ...ot bend the power cord too much and do not jam the cord or pull it around edges Main Unit 1 Unscrew the mounting screw 10 from the bottom side of the mounting plate 7 2 Push down the spring loaded pin...

Page 16: ...has been triggered by the sensor any subsequent detection will start the timed period again from the beginning LUX 9 Lux Control Level Ambient Light Adjustment The lux control module has a built in p...

Page 17: ...desired position Adjusting the Solar Module 1 Always align the front side of the solar module horizontally pointing to the sun at noon this means to the south on the northern hemisphere and to the no...

Page 18: ...may be amateur radio operators in the neighbour hood or transmitters for mobile communications or broadcast stations In this case it is possible that the lamp will turn on although no one is in the f...

Page 19: ...ing Current 550 lm Light Efficiency 91 60 lm W Illumination Time with fully charged Battery Up to 8 hours Input LED Spotlight 9 V max 0 27 A Battery LiIon 7 4 V 2000 mAh 2x 3 7 V Solar Module P mpp 2...

Page 20: ...Notizen Notes 16...

Page 21: ...ungen gen gt die in den Europ ischen Richtlinien und deren nderungen festgelegt sind is according to the basic requirements which are defined in the European Directives and their amendments 2011 65 EU...

Page 22: ...se keep in mind that many of its components consist of valuable materials which can be recycled Please do not discharge it in the garbage bin but check with your local council for recycling facilities...

Reviews: