background image

BANK OF MELBOURNE EFTPOS 1i TERMINAL USER GUIDE

6

BANK OF MELBOURNE EFTPOS 1i TERMINAL USER GUIDE

7

2.8 

Terminal configuration

Once the EFTPOS 1i terminal is connected, the Merchant ID and Terminal ID will need to be 
entered into the PC-EFTPOS EFT Client�
This is done via the Control Panel Your POS Vendor or PC EFTPOS support desk may be able to 
assist you if required�
You can use the function on the keypad from the terminal idle screen to configure the primary 
communications method� To do this, press the # key at the idle screen and enter 998 to proceed 
to communications selection�
 The following configuration options will be displayed:

1� 

Bluetooth Base:

 View the details of the connected Bluetooth base hardware, and press “1” 

to unpair from the base so that your terminal can be paired with another base�

2� 

Bluetooth Base Version:

 View the firmware version of the connected Bluetooth base, and 

press “2” to update the base firmware if required�

3� 

POS Details:

 View details on the POS interface methodology (such as RS232)�

4� 

SIM:

 Press “4” to verify the SIM details (if installed)�

5� 

PSTN Details:

 Press “5” to verify the PSTN phone number (if in use)�

6� 

Power off timer:

 Press “6” to configure the power-off timer duration�

7�  (not in use)�
8� 

Internal Modem:

 Press “8” to configure which communications method should be used 

to communicate with the bank in the event that POS Communications are down� The 
available options are GPRS, PSTN, and None�

Note that these communications method configurations are for the handset communicating 
directly with the host (via GPRS or PSTN) in the event that the POS-to-Bank link is down�
The host communications (GPRS or PSTN) will only be used in the event that the POS 
communications to the bank are (and/or the terminal is in standalone lite mode), and this process 
should be seamless during a transaction�

3.0  Procedures

3.1 

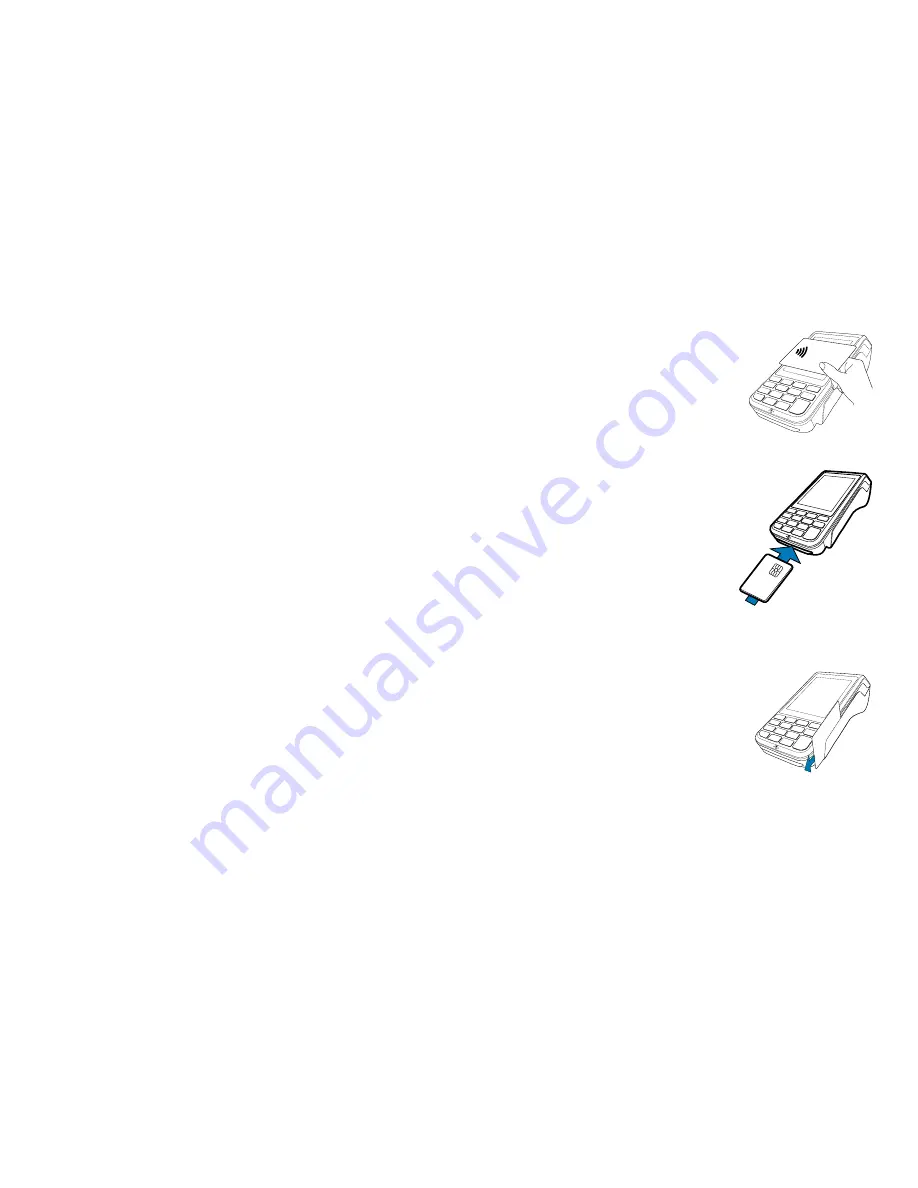
Conducting Contactless Transactions

The EFTPOS 1i terminal supports contactless transactions�

Instructions:

1�   Your customer should position the contactless enabled card 

above the terminal screen�

2�  Await the confirmation beeps before removing the card� The 

screen status LEDs will also indicate the progress of the read�

3.2 

Inserting a Chip Card

The EFTPOS 1i terminal supports credit or debit card 
transactions�
The chip card reader is located at the bottom of the terminal 
below the keypad�

Instructions:

1�  Position the chip card with the chip facing upward and 

toward the terminal�

2�  Insert the chip card into the chip card reader slot as far as 

it will go in a smooth, continual motion�

3�  The card should remain inserted in the terminal until 

the transaction is complete and the terminal prompts to 
remove it�

4�  If there is an error with reading the chip on the card the terminal may prompt you to swipe the 

card�

3.3 

Swiping a Magnetic Stripe Card

The EFTPOS 1i terminal supports credit or debit card 
transactions�
The magnetic stripe reader is located on the right hand side of 
the terminal� 

Instructions:

1�  Position a magnetic stripe card in the card reader with the 

stripe facing inward, towards the keypad�

2�  To ensure a proper read of the magnetic stripe card, the 

merchant should insert the magnetic stripe card from the 
top of the unit�

3�  Swipe the card smoothly through the magnetic card reader�
4�  If there is no response from the terminal, or CARD ERROR message is displayed, swipe the 

card again� You may be required to swipe faster or slower�

5�  If you swipe a chip card the terminal will prompt you to insert the card�

Summary of Contents for EFTPOS 1i

Page 1: ...EFTPOS 1i Terminal User Guide Learn how to use your new terminal with this easy to follow guide ...

Page 2: ...CCV Security Codes 8 4 0 Everyday Functions 9 4 1 Purchase Sale 9 How to process a Purchase transaction 9 How to process a Purchase with Cash Out transaction 11 4 2 Cash Out 13 How to process a Cash Out only transaction 13 4 3 Refund 15 How to process a Refund transaction 15 4 4 Void a transaction 17 How to Void a transaction 17 4 5 Tip Adjustment 18 How to process a Tip Adjustment 18 4 6 How to P...

Page 3: ...onal processes to ensure a smooth transition to your new terminal A brief overview of what your terminal can do Your new terminal enables online transactions to be processed for Debit Cards Savings and Cheque accounts Credit Cards Visa and MasterCard and Charge Cards American Express Diners Club and JCB Your EFTPOS 1i terminal can process Purchases Purchases with Cash Out for Debit Cards Refunds V...

Page 4: ...Desk on 1300 603 266 You must ensure that all equipment and materials are available to be returned within five business days of our request Fees and charges will continue to be incurred until the equipment is returned to the bank as instructed 1 3 Damaged lost or stolen equipment You are responsible for your equipment If equipment is damaged lost or stolen you will be charged for its replacement 1...

Page 5: ...minal 1 Ensure the terminal base is connected to power 2 Ensure the terminal base is connected to your Point of Sale POS via a supported communications method 3 Ensure the terminal is fully charged or is sitting on the terminal base for power 4 Ensure that your POS software is running on your Point of Sale Please contact your Point of Sale provider or refer to your POS Guide if further information...

Page 6: ...or PSTN will only be used in the event that the POS communications to the bank are and or the terminal is in standalone lite mode and this process should be seamless during a transaction 3 0 Procedures 3 1 Conducting Contactless Transactions The EFTPOS 1i terminal supports contactless transactions Instructions 1 Your customer should position the contactless enabled card above the terminal screen 2...

Page 7: ...and secure Westpac and MasterCard or Westpac and Visa networks No accidents To make a purchase your card needs to be within 4cm of the contactless terminal for more than half a second the merchant must have already entered the transaction amount into the terminal and it must be approved So you will not be billed twice even if you accidentally hold your card against the terminal more than once Frau...

Page 8: ...signature only cards payment cards that do not have a chip and some international cards Your terminal will be able to process these cards as normal How to process a Purchase with Cash Out transaction If Cash Out is enabled on the terminal customers can be given cash out Cash is available from cheque and savings accounts only Terminal Screen Next Step READY 14 35 29 10 13 Start by initiating the tr...

Page 9: ...sh Out How to process a Cash Out only transaction If Cash Out is enabled on the terminal customers can be given cash out Cash is available from cheque and savings accounts only Terminal Screen Next Step READY 14 35 29 10 13 Start by initiating the transaction via the POS interface including entry of the cash out amount PURCHASE X XX Swipe or Insert Card Bring the card into contact with the termina...

Page 10: ...terminal and it must be approved So you will not be billed twice even if you accidentally hold your card against the terminal more than once Fraud protection The 24 7 Falcon fraud detection system gives you greater protection from card fraud by monitoring any unusual purchase activity Peace of mind The MasterCard and Visa Zero Liability policies protect you against any unauthorised purchase transa...

Page 11: ...oid function can be carried out on credit or charge cards to reverse a transaction that has not yet settled where available You should also know that debit card and pre authorisation transactions cannot be voided Terminal Screen Next Step READY 14 35 29 10 13 Start by initiating the transaction via the POS interface including optional entry of the ROC that is to be voided ENTER ROC NO ON POS If no...

Page 12: ...eed to be obtained if the receipt shows the original purchase as Approved and no Tip is added Terminal Screen Next Step READY 14 35 29 10 13 Start by initiating the transaction via the POS interface including entry of the Tip amount that is to be added to the original amount ENTER ROC NO ON POS Now enter the ROC number for completion into the POS To force ROC entry via the terminal just leave it b...

Page 13: ...will be liable for all chargebacks on MOTO ECOM transactions You must retain all merchant receipts for at least eighteen months from the transaction date Terminal Screen Next Step READY 14 35 29 10 13 Start by initiating the transaction via the POS interface Do not enter the card number on the POS It will be entered into the terminal shortly Enter Card Number XXXX XXXX XXXX XXXX Enter the card num...

Page 14: ...n Next Step READY 14 35 29 10 13 Start by initiating the transaction via the POS interface Swipe or Insert Card Physically present the card to the terminal by swiping or inserting Manual entry of card number via the terminal is also allowed PRE AUTH X XX MASTERCARD CR Press ENTER To Confirm If prompted press ENTER on the terminal to proceed Terminal Screen Next Step PRE AUTH X XX Processing Please...

Page 15: ...d details will be shown last four card number digits amount authorisation number Confirm via the POS whether the authorisation details shown are correct PRE AUTH Verify Checkout Correct Wait for the POS Scanning Batch message to complete This will occur when the ROC lookup completes If the ROC cannot be found the terminal will prompt for the ROC to be re entered into the terminal If this secondary...

Page 16: ...r digits amount authorisation number Confirm via the POS whether the authorisation details shown are correct If NO is selected the terminal will prompt for ROC re entry if the ROC was entered into the terminal or return to the idle screen if the ROC was supplied by the POS If YES is selected the completion will continue as expected CHECK OUT X XX Swipe or Insert Card If prompted physically present...

Page 17: ...setup via the PC EFTPOS EMS client to schedule an Automatic Settlement time Refer to your POS vendor or PC EFTPOS for assistance To process a Manual Settlement Terminal Screen Next Step Start by initiating the transaction via the POS interface SETTLEMENT Please Wait Wait for the Settlement processing screen to complete SETTLEMENT APPROVED A successful message will display when the settlement is ap...

Page 18: ...mount PURCHASE X XX PRESENT CARD Is it safe How does it work Using your Westpac MasterCard or Visa contactless card is simple Just follow these four easy steps Contactless technology offers a fast method of payment for your purchases and is as secure as using your current card in the usual ways Here are some of the ways it offers the same protection Trusted providers All contactless transactions a...

Page 19: ... be within 4cm of the contactless terminal for more than half a second the merchant must have already entered the transaction amount into the terminal and it must be approved So you will not be billed twice even if you accidentally hold your card against the terminal more than once Fraud protection The 24 7 Falcon fraud detection system gives you greater protection from card fraud by monitoring an...

Page 20: ...d the merchant must have already entered the transaction amount into the terminal and it must be approved So you will not be billed twice even if you accidentally hold your card against the terminal more than once Fraud protection The 24 7 Falcon fraud detection system gives you greater protection from card fraud by monitoring any unusual purchase activity Peace of mind The MasterCard and Visa Zer...

Page 21: ...al This option is on page 2 of the idle screen MERCHANT PASSWORD 1234 Enter your merchant password or contact the Merchant Helpdesk for assistance Once your password is accepted your settlement receipt will be printed 6 6 Standalone Lite Pre Settlement Report Terminal Screen Next Step SETTLEMENT PRE SETTLE LAST SETTLE MORE Select Pre Settlement on the terminal This option is on page 2 of the idle ...

Page 22: ...or ECI Debit Card A card that gives the customer access to a cheque or savings account The customer must be present when accessing these account types Details cannot be hand keyed into an EFTPOS terminal Merchant ID An eight digit number used to obtain an authorisation code for credit card transactions This number is unique to your terminal and can be found on any of the following A receipt printe...

Page 23: ...OVED With signature The transaction has been approved if the signature is correct Y1 APPROVED The transaction has been approved Y3 APPROVED The transaction has been approved 01 CALL FOR AUTH Unable to obtain electronic authorisation 02 CALL FOR AUTH Unable to obtain electronic authorisation 03 INVALID PPID Contact Merchant Business Solutions 04 CONTACT CARD ISSUER Obtain another form of payment Ad...

Page 24: ...different account If the transaction is declined again obtain another form of payment Advise cardholder to contact card issuer 53 WRONG ACCOUNT Retry the transaction selecting a different account If the transaction is declined again obtain another form of payment Advise cardholder to contact card issuer 54 EXPIRED CARD CANNOT PAY Check the card expiry date Obtain another form of payment Advise car...

Page 25: ...INV ROC NO 000553 BANK REF 001258 DATE TIME 23 JUN 09 11 35 AID A0000000041010 TC 244F234AC7FD7547 AMOUNT 20 00 TOTAL AUD 20 00 AUTH 182126 APPROVED 00 Remember to always check the receipt to verify if a transaction has been approved Where your terminal displays a response code not listed in this guide and you use an electronic terminal supplied by us you should phone the Merchant Help Desk on 130...

Page 26: ...BANK OF MELBOURNE EFTPOS 1i TERMINAL USER GUIDE 46 BANK OF MELBOURNE EFTPOS 1i TERMINAL USER GUIDE 47 This page has been left blank intentionally This page has been left blank intentionally ...

Page 27: ...Bank of Melbourne A Division of Westpac Banking Corporation ABN 33 007 457 141 AFSL 233714 ACL 233714 BOMEFT001I ...

Reviews: