background image

INSTALLATION

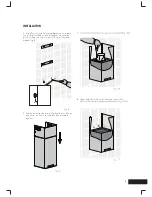
3. Install flue cover wall mounting brackets with suitable

fixings. Install suitable screws for rangehood mounting

points (to support a total weight of 30kg) to the wall as

2mm

A

B

6. Hang the body hood on the mounting screws then

A

B

4. Remove the protective plastic film from the hood body

    and telescopic flue cover carefully, then assemble

    together.       

9

B

marked (Fig. 8)

Summary of Contents for WRCG932SB

Page 1: ...INSTALLATION AND USER MANUAL WRCG932SB WRCG933SB Canopy Rangehood WRCG943SB Canopy Rangehood ...

Page 2: ...ents Record model and serial number here Model Serial No TIPS INFORMATION IMPORTANT CHECK FOR ANY DAMAGES OR MARKS If you find the rangehood is damaged or marked you must report it within 7 days if you wish to claim for damage marks under the manufacturers warranty This does not affect your statutory rights UNPACKING Check that the cooker hood has no damage Transportation damage should immediately...

Page 3: ... of the room when the canopy rangehood is used at the same time as appliances burning gas or other fuels Always cover lit gas burners with pots or pans when canopy rangehood is in use Always switch off gas burners before you remove pots or pans Do not leave lit gas burners exposed due to the risk of fire Fig 2 The hood must always be disconnected from the electricity supply before beginning any ma...

Page 4: ...l cavity unless the cavity is designed for that purpose The exhaust from the cooker hood must not be discharged into any heating flue which may carry combustion products from other sources NOTE Some installations may require the telescopic exhaust cover to be cut to length Cut with sharp tin snips or a fine tooth hack saw blade taking care not to distort or dent the exhaust cover 1 2 ELECTRICAL CO...

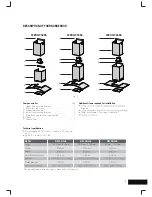
Page 5: ...items required for installation tilt points Worm drive clamps Duct tape or cable ties Technical specification point MODEL Width Depth Lighting Outlet diameter WRCG932SB WRCG933SB WRCG943SB 338 W V 338 W V 338 W V The manufacturer reserves the right to make technical changes Fig 3 1 2 3 4 1 2 3 4 5 6 7 1 2 3 4 5 6 7 5 Qty 1 1 1 1 1 1 1 5 6 7 750 mm 1100mm 570 mm 900mm 750 mm 1100mm Power supply 240...

Page 6: ...RANGEHOOD DIMENSIONS 6 B S 3 3 9 G C R W B S 2 3 9 G C R W 5 g i F 4 g i F 320 290 480 900 90 400 Min 570 Max900 216 290 296 320 320 290 480 900 90 600 Min 750 Max1100 216 290 296 320 ...

Page 7: ...RANGEHOOD DIMENSIONS WRCG943SB Fig 6 320 290 480 900 600 Min 750 Max1100 216 290 296 320 35 7 ...

Page 8: ...d mounting points and anti tilt fixing points above the hood base using the hood base as a reference point 130 mm 250 mm 230 mm 286 mm 587 mm WRCG933SB WRCG943SB 40 mm 250 mm 250 mm Max 1100 mm WRCG933SB WRCG943SB An g po n Range hood moun ng po n s F e cover w moun ng bracke ng M 600 mm Max 800 mm Top of hob 8 LOCATION The hood is to be mounted on the wall When installed the hood must be not less...

Page 9: ... suitable screws for rangehood mounting points to support a total weight of 30kg to the wall as 2mm A B 6 Hang the body hood on the mounting screws then A B 4 Remove the protective plastic film from the hood body and telescopic flue cover carefully then assemble together 9 B marked Fig 8 ...

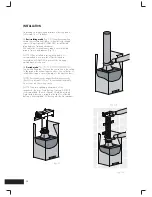
Page 10: ...e line to the ceiling suitable duct tape to secure flue pipe to the transition duct the roof to external roof cowl to vent exhaust externally Do not vent into the ceiling cavity NOTE To ensure optimum performance of the rangehood the use of rigid ducting optional AR150F is recommended The use of bends should be avoided Rigid flexible ducting is suitable although loose flexible ducting is unaccepta...

Page 11: ...readed when attaching the upper flue cover If installed in recirculating mode insert the optional carbon filter inclued in recirculation kit AR610RK To complete the cooker hood installation insert the three filters to the underside of the hood body Place back edge of filter into position and push up front edge so that the filter clips into place Your Electrolux cooker hood is now ready to use IMPO...

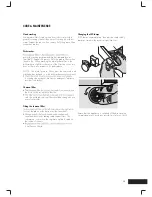
Page 12: ...quid Clean stainless steel surfaces using non abrasive cleaning products that are specifically for use on stainless steel To ensure the best results also use an even pressure and follow the grain of the stainless steel Use of a soft cloth reduces the risk of scratching If the cloth is wet ensure that a dry soft cloth is used to wipe down the surface and apply stainless steel protector to reduce th...

Page 13: ...ed replacing they must be replaced by lamps as stated in the technical specifications NOTE The metal grease filters must be removed and washed either by hand or in the dishwasher every four weeks loosening cleaner never use caustic detergents abrasive powders or brushes Charcoal filter the hood in the recirculation function rule the activated charcoal filter should be changed once every four month...

Page 14: ...ty cut out device has been tripped turn off the hob and wait for the device to reset Check and clean filters If the hood has been installed below the heights indicated in the installation instructions the motor will cut out frequently which will damage the hood The cooker hood is not working The cooker hood has switched off during operation If you have completed all of the above checks and are sti...

Page 15: ...n AR150RC AR150WV 150mm G Bond Roof Cowl 150mm Wall Vent duct Replacement carbon filter Stainless steel exhaust cover extension 1200mm T piece carbon filters 15 AR610RK AR150FD AR125FDA 150mm aluminum flexible duct 125mm aluminum flexible duct 50mm wide aluminum tape 55m roll AR150FD AR125FDA 1438124 ...

Page 16: ......

Page 17: ......

Page 18: ......

Page 19: ......

Page 20: ...installation information call into your retailer phone or email our customer care team or visit our website Top Service encompasses the after sales service provided by The Electrolux Group to consumers including delivery home service and spare parts Part number 60901725 Issue B 2015 Electrolux Home Products Pty Ltd ABN 51 004 762 341 Print code WRCG932SB_WRCG933SB_WRCG943SB_CHJul15 Westinghouse We...

Reviews: