9 CONGLOMKB.COM
Please contact
or
1-877-333-0098
for further assistance.
ENGLISH
Installation (continued)
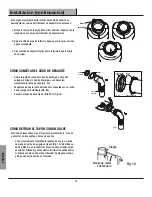
Turn the bottom supporting ring 1/3 of a turn counter-clockwise
and repeat the mounting procedure described above (see Fig 13c).
1/3 turn
Fig. 13c
-
Ensure the discharge elbow is not kinked and fits securely in
the trap. Adjust the assembly such that it slopes down and
towards the drain and tighten the slip nut of the trap (Fig. 14).
- Run water and check all connections for leaks.
Fig. 14
DISHWASHER CONNECTION
Fig. 15
*
Air Gap
Drain
Disposer
Rubber Hose
Dishwasher Hose
- Connect the dishwasher hose (see Fig. 15) using a hose clamp.
Make sure all plumbing connections are tight. Run water and
check for leaks.
*Air Gap may not be required for all installations, verify your
local plumbing codes.
ELECTRICAL CONNECTION & GROUNDING
- Connect the disposer to the appropriate household current only.
WARNING:
Improper connection of the equipment-
grounding conductor can result in a risk of electric shock.
Check with a qualified electrician if you are not sure. Do
not modify the plug provided with the appliance if it
does not fit the outlet. Have a proper outlet installed by a
qualified electrician.
NOTE:
This waste disposer is intended to be plugged
into a grounded receptacle that is controlled by a
dedicated switch (usually wall mounted).
- This appliance must be grounded. In the event of a malfunction
or breakdown, grounding provides a path of least resistance
for electric current to reduce the risk of electric shock. This
appliance is equipped with a cord having an equipment-
grounding conductor and a grounding plug. The plug, supplied
with this unit, must be connected to an appropriate outlet that
is properly installed, switched and grounded in accordance
with all local codes and ordinances. If the supply cord is
damaged it must be replaced by the manufacturer or a
qualified person in order to avoid a hazard.


