background image

ISSUED: 04-16-04  SHEET #: 090-9101-1

2 of 5

Visit the Westinghouse Web Site at www.westinghousedigital.com

                            For customer service call 

1-866-287-5555

.

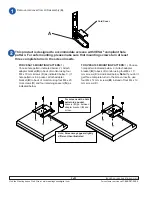
Remove cord cover from LCD assembly (

A

).

A

Cord Cover

FOR VESA 75 MOUNTING PATTERN:

 1.)

Choose hole pattern indicated below. 2.) Attach
adapter bracket (

B

) to back of monitor using four

M4 x 10 mm screws (

C

) as indicated below.


3.) If

hole pattern is in a pocket, attach adapter
bracket (

B

) to back of monitor using four M4 x 20

mm screws (

O

) and four retaining spacers (

N

) as

indicated below.

Note: Screen may appear slightly
different than illustrated

For screens with a hole
pattern in a pocket

,

spacers (

N

) go between

adapter bracket (

B

) and

screen.

B

B

FOR VESA 100 MOUNTING PATTERN:

 1.) Choose

hole pattern indicated below. 2.) Attach adapter
bracket (

B

) to back of monitor using four M4 x 10

mm screws (

C

) as indicated below. 

Note:

 If you don't

get three complete turns in the screen inserts, use
four M4 x 12 mm screws (

M

) instead of four M4 x 10

mm screws (

C

).

This product is designed to accommodate screens with VESA

®

 compliant hole

pattern. For safe mounting, please make sure that mounting screws turn at least
three complete turns in the screen inserts.

Summary of Contents for MT10 FLIP

Page 1: ...hillips L 540 9447 4 1 4 split washer M 504 2013 4 M4 x 12 mm phillips screw N 590 5003 4 198 x 313 x 437 retaining spacer O 504 2014 4 M4 x 20 mm phillips screw Some parts may not appear exactly as illustrated B C G D H Part Installation Assembly Under Cabinet Swivel Mount for LCD TVs L M O N F A Max Load 10 lb 4 5 kg This product is intended for use with 10 to 15 LCD TVs weighing up to 10 lb and...

Page 2: ...etaining spacers N as indicatedbelow Note Screen may appear slightly different than illustrated For screens with a hole pattern in a pocket spacers N go between adapter bracket B and screen B B FORVESA100MOUNTINGPATTERN 1 Choose hole pattern indicated below 2 Attach adapter bracket B to back of monitor using four M4 x 10 mm screws C as indicated below Note If you don t get three complete turns in ...

Page 3: ...m of your cabinet Make sure that there is enough clearance between the back of the TV and the wall to clear the back tab Drill four 1 4 holes to match the drawing to the right D F E G or or I A Back Tab 6 00 1 25 Back holes of LCD assembly Locate the bracket in the slot so that the top of the TV does not touch the round cover or go above it when the tilt is in the open position as shown in figure ...

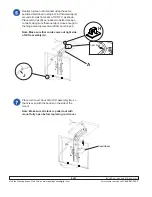
Page 4: ... from back of LCD TV as shown Place cord clips H as needed to better manage cords making sure that one clip is close enough to the hinge area to prevent cord from bunching up Note Make sure that cords come out right side of LCD assembly A Place cord cover back onto LCD assembly A so that it is even with the bends on the side of the mount Note Make sure all slack is pulled out with mount fully open...

Page 5: ...MA EXCLUSIONS TO WARRANTY This warranty does not cover damage caused by a service or repairs by anyone other than personnel authorized by Westinghouse Digital Electronics b the failure to utilize proper packing when returning the product c improper installation or the failure to follow Product instructions or warnings or d misuse or accident in transit or otherwise PROOF OR ORIGINAL PURCHASE A sal...

Reviews: