


11
Source
Resolution & Frequency
OSD Menu Functions
All the function settings for this multifunctional LCD monitor are controlled via the control
keys located on the side of the monitor. To display the OSD main menu, press and hold
the “Menu” keypad button on the control panel. (Note: The OSD menu display will
disappear automatically after approximately 10 seconds, if no action is taken.)
This LCD monitor has been adjusted to optimal settings before shipment. If needed,
adjustments to the monitor settings can also be made using the OSD menu.
•
Press and hold the “Menu”
button to display the OSD.
•
Press
the
ϧ
or
ϰ
button to scroll through the sub-menus (Image, Audio, Color,
Miscellaneous, and Information Sub-Menus).
•
Press
the
button to enter the sub-menu.
•
Press
the
ϧ
or
ϰ
button to select the function to be adjusted.
•
Press
the
or
buttons to change the current setting of the sub-function.
•
To go back to the previous menu, press the
button. Changes are saved
automatically.
•
To exit the OSD menu press "Menu"
again. It automatically will save any changes
that have been made.
•
To switch input, simply press "Menu”
.
NOTES:
•
Any changes are automatically saved in memory when the OSD turns off. Turning off
the power should be avoided while using the OSD menu.
•
Adjustments for clock, phase, and positions are saved for each individual signal timing.
Except for these adjustments, all other adjustments have only one setting, which
applies to all signal timings.
•
The icon color will change from gray to blue when a sub-menu is selected.
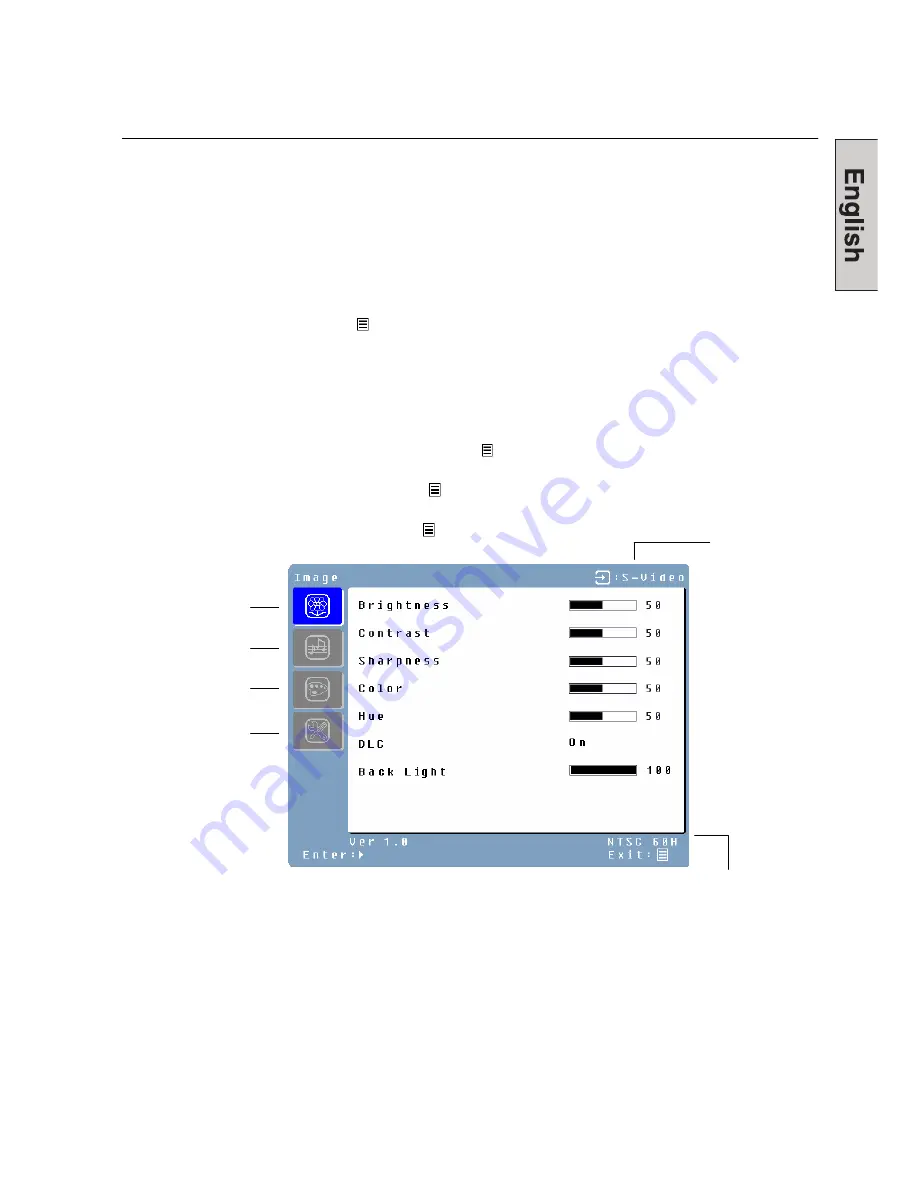
Color Menu
Image Menu
Miscellaneous Menu
Audio Menu
11
Summary of Contents for L2410NM - 24" LCD Monitor
Page 1: ......
Page 2: ......
Page 3: ...1...
Page 24: ......
Page 43: ...Menu d information entr es PC DVI avec c ble DVI HDMI Affiche l information syst me 19...
Page 70: ...x x x x x Westinghouse Digital x x x x x x Westinghouse Service Center x 2...
Page 72: ...x x 1 2 1 2 Westinghouse Digital Westinghouse Digital 4...
Page 75: ...2 A V 7...
Page 76: ...3 AC IN A B 8...
Page 77: ...4 A V LED 1920 x 1200 9...
Page 79: ...OSD OSD 10 OSD OSD OSD x OSD x x x x x x OSD x x OSD OSD x x 11...
Page 80: ...OSD A V HDMI DLC Dynamic Luminance Control 0 100 12...
Page 81: ...HDMI HDMI 3 5 13...
Page 82: ...9300K 7500K 6500K 14...
Page 83: ...A V HDMI OSD OSD OSD OSD OSD OSD 5 OSD 3 1 5 2 4 15...
Page 84: ...DVI HDMI DVI VGA VGA VGA VGA 16...
Page 85: ...DVI HDMI DVI OSD OSD OSD OSD OSD OSD 5 OSD Fill Normal 3 1 5 2 4 17...
Page 86: ...9 0 9 18...
Page 90: ......
Page 92: ...x x x x x Westinghouse Digital x x x x x x x Westinghouse x 2...
Page 94: ...x x 1 2 1 2 Westinghouse Digital Westinghouse Digital 4...
Page 97: ...2 PC not supplied 3 7...
Page 98: ...AC AC IN AC A B 3 8...
Page 99: ...4 PC LED LED 1920 x1200 PC 9...
Page 101: ...OSD OSD 10 OSD OSD x OSD x x X x x W X x x OSD x x OSD OFF OSD x x 11...
Page 102: ...OSD Image Menu A V HDMI Brightness Contrast Sharpness Color Hue DLC DLC Back Light 12...
Page 103: ...Audio Menu Volume Mute ON Treble Bass Balance Audio Select HDMI HDMI 3 5 mm 13...
Page 104: ...Color Menu Color temp User 9300K 7500K 6500K Red User mode Green User mode Blue User mode 14...
Page 107: ...17...
Page 108: ...INFO Menu PC DVI HDMI DVI 18...
Page 112: ......
Page 113: ......
Page 114: ......
Page 115: ......
Page 116: ......


