


Westin Automotive Products, Inc.
320 W. Covina Blvd
San Dimas, Ca. 91773
Thank you for choosing Westin products
for additional installation assistance please call
Customer Service (800) 793-7846
DATE: 1/4/17
11
P.N.: 75-XXXX-
RevX
ECO #: W16-
XXXX
WINCH OPERATION
Be sure to test your winch at home before you actually need to use it. Plan your test in advance. Remember you can hear your
winch as well as watch it operate. Learn to recognize the sound of a light steady pull, a heavy pull, and sounds caused by load
jerking or shifting. Soon you will gain confidence in operating your winch and its use will become second nature to you.
OPERATING:
Pre/post op check list:
1.
Check fasteners for adequate torque before each outing.
2.
Inspect wiring and make sure connections are tight. Verify that there is no chafing or damage to wires.
3.
Inspect rope for damage before and after each use.
4.
Inspect remote for damage and function. Check the range on the wireless remote, if applicable, replace battery if necessary.
5.
Keep winch clean, remote socket covered and steel cable lightly lubricated.
6.
Synthetic rope needs to be kept clean and free from any chemicals or dirt.
NEVER operate the winch with less than 10 wraps of synthetic rope or 6 wraps of steel cable around the drum. The terminal
end is to prevent the rope from unraveling, it is NOT a load bearing attachment point. Improper installation and/or spooling out
to the last layer will put a load on the terminal end and the rope will release from the terminal.
1.
Ensure the vehicle is secured by applying the parking brake or chocking the wheels.
2.
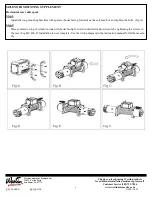
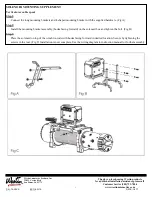
Pull out the winch cable to the desired length and connect it to an anchor point. The winch clutch allows rapid uncoiling of
the cable for hooking onto the load or anchor point. The shifter tab located on the gear housing of the winch operates the
clutch as follow:
(A)
To disengage the clutch, move the clutch shifter tab to the “OUT” po
sition. Cable may be free spooled off the drum.
(B)
To engage the clutch, move the clutch shifter tab to the “IN” position. The winch is now ready for
pulling.
3.
Recheck all cable rigging before proceeding.
4.
Plug in the winch hand control. It is recommended that the winching operation takes place from the driver's position to en-
sure safe operation.
5.
To commence winching operation, start vehicle engine, put the transmission in neutral, maintain engine speed at idle.
Remote
Control
Switch


