Sliding Gate Opener
Article No. 82 63 73
Instruction Manual
Nylon Racks not included in Delivery
Page 1: ...Sliding Gate Opener Article No 82 63 73 Instruction Manual Nylon Racks not included in Delivery...
Page 2: ...ructions for further reference This operating instruction contains important details for handling the device Please pass it on along with the unit if it is handed over to a third party Please read all...
Page 3: ...r Gate may move at any time 2 Do not allow children to operate the gate or play in the gate area 3 The gate area is for vehicles only 4 Read and understand the manual 5 Pedestrians have to use a separ...
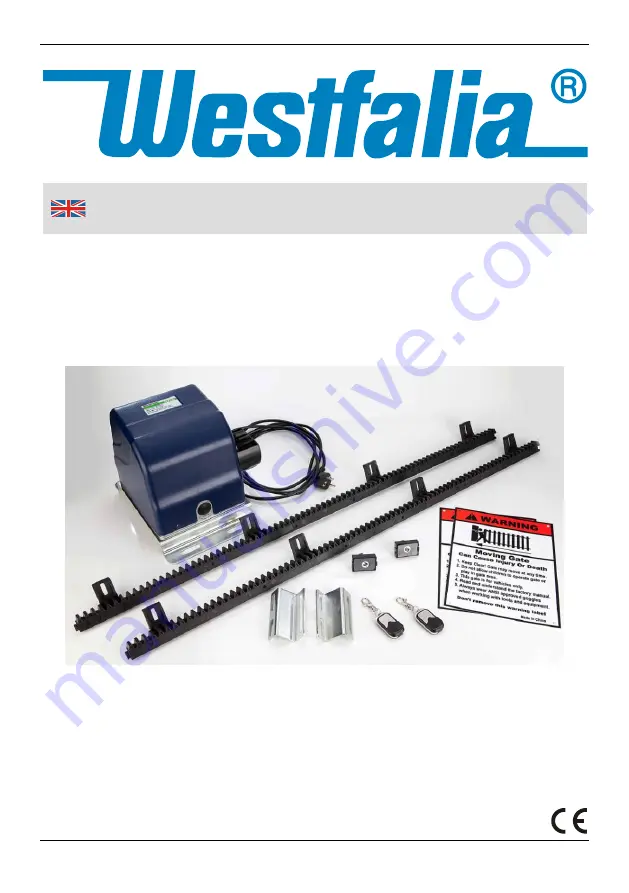
Page 4: ...ece 6 Warning Sign 1 Piece in German 1 Piece in English 7 Magnet Bracket 2 Pieces 8 M8 x 70 Screw 4 Pieces 9 Washer 8 mm 8 Pieces 10 Spring Washer 8 mm 8 Pieces 11 M8 Nut 4 Pieces 12 Magnet Limit Swit...
Page 5: ...8 Power Connection Page 11 Position of the DIP Switches Page 13 Programming Page 14 Position of the Magnets Page 16 Potentiometer Page 18 Hindrance Detection Page 19 Learning the Remote Control Page 2...
Page 6: ...proper installation of the sliding gate opener WARNING There is risk on injuries if the sliding gate opener is not mounted and operated correctly Incorrect mounting and operation of the sliding gate o...
Page 7: ...not completely opened or closed Do not allow children to stand or play in the gate s moving range Make sure movement of the gate and proper function of the sliding gate opener are not impaired by obs...
Page 8: ...own safety the sliding gate system has to be checked by a qualified person every 6 months for proper function The gate must reverse on contact with a right object If necessary existing errors resp da...
Page 9: ...be in good mechanical and trouble free condition and should not be damaged or has signs of wear It must be possible to open and close the gate by hand without any problems The mechanical gate lock mu...
Page 10: ...the gate system 5 Built a concrete pad of approx 50 x 32 x 35 cm see drawing on page 7 The concrete pad should be at least 10 cm over the ground Increase the pad height if necessary to protect the ga...
Page 11: ...Mounting Diagram 7 Sliding Gate Opener x x x Mounting Screws x Mounting Plate Cable Cable Channel Concrete Pad...
Page 12: ...er function of the sliding gate opener and the correct position of the magnet limit switch can be checked 1 For releasing the sliding gate opener first remove the cap 2 Insert the included releasing k...
Page 13: ...orizontal on the gearwheel Never use fat or other lubricating agents between the gearwheel and the rack 5 Adjust the other racks too Make sure the teeth of the racks engage the gearwheel throughout th...
Page 14: ...Magnet Bracket 7 Self securing Screws included in delivery or use screws and nuts that are suitable for the existing gate Magnet 12 Gate Opener 1 Magnet Limit Switch Mounting Plate Concrete Pad Rack...
Page 15: ...11 Connecting to Power Supply The connection cables must not be smaller than H05 3 x 0 75 mm 2 Connect the cable for live wire with L Connect the cable for neutral wire with N Connect the cable for e...
Page 16: ...m the motor has to be connected with terminal 1 Green cable from the motor has to be connected with terminal 2 When using Batteries Terminal of the batteries has to be connected with terminal 8 Termin...
Page 17: ...the sliding gate opener Disconnect power supply from the gate opener before changing the setting Always keep away from the moving path of the sliding gate opener in order to avoid injuries in case of...
Page 18: ...iding Gate Opener in Midway Mode 6 Seconds 2 4 Seconds DIP Switch 3 ON 0 5 Seconds OFF 0 Second DIP Switch 4 ON 1 Second OFF 0 Second DIP Switch 5 ON 2 Seconds OFF 0 Second Factory Default of the swit...
Page 19: ...fault of both switches is OFF Automatic Closing Time is disabled Open Opens to the right Open Opens to the left DIP Switch 6 7 Automatic Closing Time DIP Switch 8 Factory default of the DIP switch 8 i...
Page 20: ...osition them correctly the sliding gate opener must be mounted properly Disengage the gearwheel and disconnect power supply Mount both magnets on the desired positions on the gate See the drawing belo...
Page 21: ...not be more than 2 cm away from the magnetic limit switch otherwise proper function cannot be guaranteed The distance between the magnets and the sliding gate opener has to be between 10 15 mm If nec...
Page 22: ...the respective potentiometer clockwise for increasing the stall force and counter clockwise for decreasing the stall force The increase in the stall force is a percentage increase in relation to the...
Page 23: ...will be For checking the hindrance detection proceed as follows 1 Place a rigid object along the gate path and operate the sliding gate opener until it touches the rigid object while opening resp clos...
Page 24: ...ton A on the remote control for the following functions Gate open Stop Gate close Stop Gate open 2 If the DIP switch settings 1 and 2 for normal run are activated press the button B for the following...
Page 25: ...ure proper function of the gate opener Keep in mind that operating the sliding gate opener beyond the permissible operating temperature range of 15 C 40 C functional problems can result e g icing of t...
Page 26: ...Special Accessory 22 The special Accessory is not available at Westfalia...
Page 27: ...Diagram for Connecting Special Accessory 23...
Page 28: ...r Gate Moving Speed 17 cm per Second Self locking Gearbox Yes Max Gate Weight 400 kg Operating Temperature 15 C 40 C Protection Class IP44 Dimensions of the Gate Opener 20 x 20 x 20 cm Weight 5 3 kg T...
Page 29: ...ener Article No 82 63 73 is according to the basic requirements which are defined in the European Directives 2006 95 EC Low Voltage Directive LVD 1999 5 EC R TTE Directive 2011 65 EU Restriction of th...
Page 30: ...nternet www westfalia net Kundenbetreuung Customer Services is Werter Kunde bitte helfen Sie mit Abfall zu vermeiden Sollten Sie sich einmal von diesem Artikel trennen wollen so bedenken Sie bitte das...