background image


12 

Operation 

4.  Do not hold the work piece against the stone in a sharp angle against the 

rotating direction of the stone. A kickback may result. 

5.  The work piece may become very hot during grinding. This may lead to a 

change in the material properties of the work piece. Therefore, allow the 
work piece to cool down during work. 

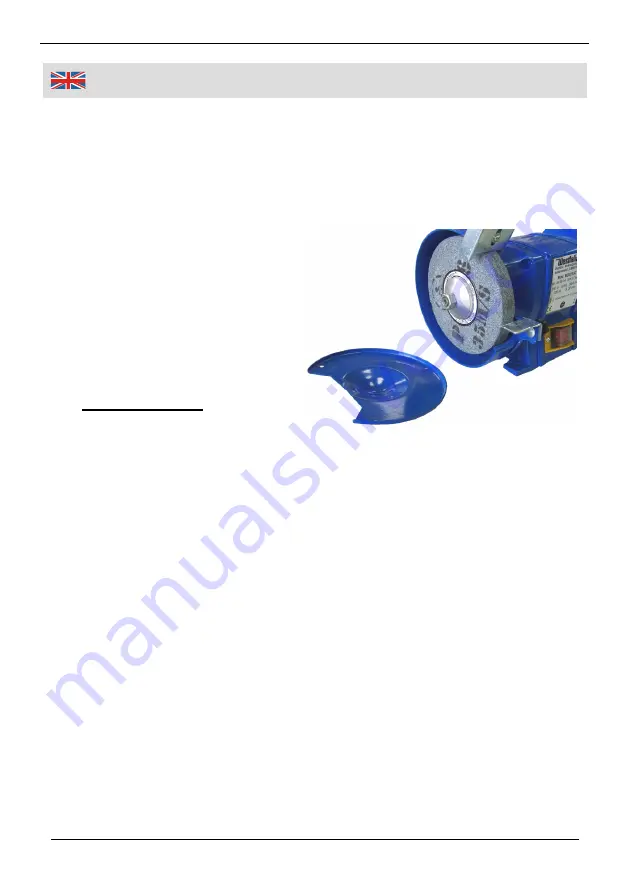
Replacing the Grinding Stones 

1.  To replace the stone, loosen 

the three cross-head screws of 
the outer side of the hood and 
remove the outer part. 

2.  Now loosen the main retaining 

nut of the stone with a suitable 
open end or ring spanner. The 
treads on the left hand side are 

left hand treats

; the nut is 

loosened by turning clockwise. 

3.  Be careful not to confuse the nuts when putting them down. Hold the 

stone in place to keep shaft and stone from turning and be able to loosen 
the nut. 

4.  After the nut has been removed, the outer flange and the grinding stone 

with the paper liners can be pulled off the shaft.  

5.  Before mounting, check the stone for damages visually and acoustically. 

Visually check for cracks. After the visual check, gently percuss the stone 
with a hard object. The sound must be clear and sound alike in all parts of 
the stone. If the sound is dull, the stone is probably cracked and should 
not be used. 

Do not use a cracked stone, it is not able to withstand the loads of use 
and may suddenly break up during use. 

Summary of Contents for 366914

Page 1: ...Westfalia Bedienungsanleitung Nr 108184...

Page 2: ...150 mm Doppelschleifer 200 W MD3215C Artikel Nr 36 69 14 150 mm Double Grinder 200 W MD3215C Article No 36 69 14 Bedienungsanleitung Instruction Manual...

Page 3: ...p these operating instructions for further reference Please pass it on along with the unit if it is handed over to a third party Der Doppelschleifer beinhaltet zwei Korund Schleifsteine unterschiedlic...

Page 4: ...III bersicht Overview 2 2 1 3 1 5 4 6 7 8...

Page 5: ...tor 2 Schutzscheibe Visor 3 Motorgeh use Motor Housing 4 Schleifstein grob Medium Grinding Stone 5 EIN AUS Schalter ON OFF Switch 6 Befestigungsbohrung 4x Mounting Hole 4x 7 Werkst ckauflage Work Piec...

Page 6: ...ssification Page 14 Maintenance Cleaning and Storing Page 15 Technical Data Page 16 Sicherheitshinweise Seite 2 Einrichten des Doppelschleifers Seite 4 Befestigen des Doppelschleifers auf der Werkbank...

Page 7: ...pindel des Elektrowerkzeugs passen drehen sich ungleichm ig vibrieren sehr stark und k nnen zum Verlust der Kontrolle f hren Die zul ssige Drehzahl des Einsatzwerkzeugs muss mindestens so hoch sein wi...

Page 8: ...des Doppelschleifers befinden sich vier Montagebohrungen die ein Anschrauben erm glichen Achten Sie bei anderen Personen auf sicheren Abstand zu Ihrem Arbeitsbereich Jeder der den Arbeitsbereich betri...

Page 9: ...ab weiser sollte so nah wie m glich am Schleifstein angebracht werden um seine Funktion erf llen zu k nnen Befestigen des Doppelschleifers auf der Werkbank 1 Verwenden Sie zum Befestigen vier passende...

Page 10: ...ln l sen Sie die drei Kreuzschlitzschrauben an der Au enabdeckung der Schutz haube und nehmen Sie die Abdeckung ab 2 L sen Sie nun die Mutter die den Schleifstein auf der Achse fixiert mit einem passe...

Page 11: ...Schleifsteins gehen Sie wie in der Skizze dargestellt vor Abrichten des Schleifsteins Nach l ngerem Einsatz k nnen die Schleifeigenschaften des Schleifsteins nachlassen oder es k nnen Riefen und Rill...

Page 12: ...Bedeutung der Zahlen Buchstabenkombination k nnen Sie der Tabelle ent nehmen Daten Beschreibung Bemerkungen A SCHLEIFMITTEL A F r Aluminium Oxide C F r Silicon Karbid 60 SCHLEIFKORNGR E 24 grob 30 36...

Page 13: ...n Faktoren die einen sicheren Betrieb beeintr chtigen Schalten Sie das Ger t sofort aus wenn ein ungew hnliches Ger usch oder Vibrationen entstehen Falls das Ger t Zeichen einer Besch digung zeigt ver...

Page 14: ...hutzart IP44 Schleifsteinma e 150 x 20 x 12 7 mm Innere Bohrung 12 7 mm Schleifstein fein A 60 PV Schleifstein grob A 36 PV Netzleitung H05VV F 3G 0 75 mm 1 8 m Kabell nge 180 cm Gewicht 8 5 kg Abmess...

Page 15: ...s of wrong size cannot be shielded or controlled Use only grinding stones which conform to the technical data in this manual and on the stones Regularly confirm whether the work piece support 7 is not...

Page 16: ...ch 1 To attach the grinder use nuts and M6 screws which are approximately 15 20 mm longer than your work top is thick 2 Attach the grinder with the provided mounting holes 6 and the screws to the work...

Page 17: ...the left hand side are left hand treats the nut is loosened by turning clockwise 3 Be careful not to confuse the nuts when putting them down Hold the stone in place to keep shaft and stone from turni...

Page 18: ...stones may deteriorate or the grinding surfaces may become untrue With the conditioner you can true the grinding stones 1 Turn on the double grinder and hold the conditioner against the grinding stone...

Page 19: ...code The meaning of that digit number code can be gathered from the table below Data Meaning Comment A GRINDING MATERIAL A For Aluminium Oxide C For Silicon Carbide 60 GRAIN SIZE 24 coarse 30 36 46 5...

Page 20: ...tors which might interfere with safe operation Turn the unit off immediately if an unusual sound is noticed or unusual vibrations occur If the double grinder shows any kind of damage do not continue u...

Page 21: ...e of Protection IP44 Grinding Stone Size 150 x 20 x 12 7 mm Bore 12 7 mm Grinding Stone fine A 60 PV Grinding Stone middle A 36 PV Main Cable H05VV F 3G 0 75 mm 1 8 m Cable Length 180 cm Weight 8 5 kg...

Page 22: ...2006 EN 61000 3 3 2008 Hagen den 25 M rz 2009 Thomas Klingbeil Qualit tsbeauftragter We the Westfalia Werkzeugcompany Werkzeugstra e 1 D 58093 Hagen declare by our own responsibility that the product...

Page 23: ...Internet www westfalia net Kundenbetreuung Customer Services Werter Kunde bitte helfen Sie mit Abfall zu vermeiden Sollten Sie sich einmal von diesem Artikel trennen wollen so bedenken Sie bitte dass...

Reviews: