background image

September 1, 2006

4

Lit. No. 95900/95901, Rev. 00

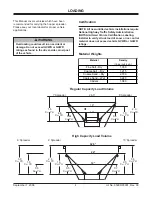
9’ Spreader

0.6

Cu. Yd.

1.8

Cu. Yd.

3.0

Cu. Yd.

32.5”

24”

12”

0.7

Cu. Yd.

2.0

Cu. Yd.

3.3

Cu. Yd.

10’ Spreader

8’ Spreader

0.5

Cu. Yd.

1.6

Cu. Yd.

2.6

Cu. Yd.

0.44

Cu. Yd.

.88

Cu. Yd.

1.6

Cu. Yd.

26.5”

18”

12”

1.0

Cu. Yd.

0.5

Cu. Yd.

2.0

Cu. Yd.

8’ Spreader

7’ Spreader

Material

Density

(lb. per cubic yd.)

Fine Salt - Dry

1,350

Coarse Salt – Dry

1,215

Coarse Sand – Dry

2,700

Coarse Sand – Wet

3,240

Cinders

1,080

This Manual covers vehicles which have been
recommended for carrying the hopper spreader.
Please see your local dealer for proper vehicle
applications.

Regular Capacity Load Volume

High Capacity Load Volume

LOADING

Material Weights

Certification

NOTE: All new untitled vehicle installations require
National Highway Traffic Safety Administration
(NHTSA) Altered Vehicle Certification Labeling.
Installer to verify struck load of snow or ice control
material does not exceed vehicle GVWR or GAWR
ratings.

 WARNING

Overloading could result in an accident or
damage. Do not exceed GVWR or GAWR
ratings as found in the driver-side cornerpost
of the vehicle.

Summary of Contents for ICE BREAKER Hopper Spreader

Page 1: ...city ICE BREAKER Hopper Spreader Installation Instructions This manual is for WESTERN ICE BREAKER Hopper Spreaders with serial numbers beginning with 0609 and higher CAUTION Read this manual and engine owner s manual before installing or operating the spreader ...

Page 2: ...Center Belt Drive 7 Chute Assembly Center Belt Drive Hydraulic Hopper 8 WIRING AND HARNESS PLUG INSTRUCTIONS 9 Wiring Instructions 9 Vehicle Harness Installation 9 Harness Plug and Hook Instructions 9 CHOKE ADJUSTMENT PROCEDURE 10 Tecumseh Choke Adjustment Procedure 10 Honda Choke Adjustment Procedure 10 HYDRAULIC UNIT INSTALLATION INSTRUCTIONS 11 Hydraulic Unit Installation 11 Pump 11 Hydraulic R...

Page 3: ...ding Section to determine maximum volumes of spreading material WARNING Do not install this product in deployment path of an air bag Refer to vehicle manufacturer s manual for air bag deployment area s WARNING Hydraulic fluid under pressure could cause skin injection injury If you are injured by hydraulic fluid get medical attention immediately CAUTION If rear directional CHMSL light or brake stop...

Page 4: ...ght until instructed to tighten according to the torque chart Use standard methods and practices when attaching spreader including proper personal protective safety equipment WARNING Gasoline is highly flammable and gasoline vapor is explosive Never smoke while working on vehicle Keep all open flames away from gasoline tanks and lines Wipe up any spilled gasoline immediately CAUTION Batteries norm...

Page 5: ...ling gas tank DO NOT smoke or use open flame within 25 feet of spreader Allow spilled gas to evaporate completely before starting engine Gasoline engine produces poisonous gases while running DO NOT operate in an enclosed area Gasoline engine has hot and moving parts that can cause injury Use care when working with or near the gasoline engine and its parts Shut off engine when not in use even for ...

Page 6: ... vehicles which have been recommended for carrying the hopper spreader Please see your local dealer for proper vehicle applications Regular Capacity Load Volume High Capacity Load Volume LOADING Material Weights Certification NOTE All new untitled vehicle installations require National Highway Traffic Safety Administration NHTSA Altered Vehicle Certification Labeling Installer to verify struck loa...

Page 7: ... Capacity Lift spreader by hooking the loop located on rear cross channel inside hopper NOTE The loop is located at the approximate balance point of the spreader The balance point may vary with engine fluid levels battery top screen or residual material in hopper WARNING Before lifting verify hopper is empty of material The lifting device must be able to support the spreader s weight High Capacity...

Page 8: ...al obstructions bumper trailer hitch etc 5 Measure the distance from the front of the truck bed to the sills and make a spacer to place between the bed and the rails 6 Bolt the spreader to the vehicle frame through the lengths of lumber using the holes located at each lower support leg Use 1 2 hardware as required by vehicle application If 2 x 4 s are not directly over the truck box supports the t...

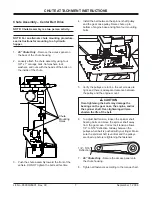
Page 9: ...ner shaft pulley and the gear case pulley Raise chute up to bottom of engine base and tighten four mounting bolts 5 Verify the pulleys are in line the set screws are tight and there is adequate clearance between the pulley and the engine mount 6 To adjust belt tension loosen the spinner shaft bearing bolts and move the spinner shaft away from the gear case Correct belt tension allows 1 4 to 5 16 d...

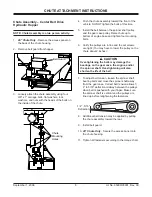
Page 10: ...and tighten four mounting bolts 6 Verify the pulleys are in line and the set screws are tight You may have to lower the pulley on the chute about 2 inches 7 To adjust belt tension loosen the spinner shaft bearing bolts and move the spinner shaft away from the gear case Correct belt tension allows 1 4 to 5 16 deflection midway between the pulleys when belt is pushed with your finger Make sure the s...

Page 11: ... any hot or moving parts of the truck Routing will vary from truck to truck 3 Identify a convenient location for the cab control that can be reached by the harnesses and wiring 4 Drill a 5 8 hole in the fire wall so that the vehicle harness can reach the desired cab control location 5 Insert the rubber grommet into the hole 6 Route the harness to the desired location 7 Secure the vehicle harness t...

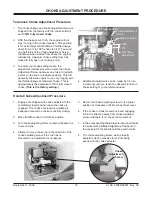
Page 12: ...ent Procedure 1 Engines are shipped with choke adjusted to the completely closed position when the choke is engaged The choke only requires adjusting if inspection reveals the choke is not fully closing 2 Move throttle control to full choke position 3 Turn choke adjusting screw counter clockwise five to seven turns 4 Attempt to move choke rod in the direction of the choke adjusting screw If the ro...

Page 13: ...imum flow rate in gpm Cab Control Valve Installation 1 With the seat fully forward select a suitable location to mount the cab control valve allowing for the operator to adjust the control and to turn it ON and OFF 2 Check for clearance with ALL controls in the cab 3 Under the cab check for interference with transmission etc 4 Check to see that the cab control valve location does not interfere wit...

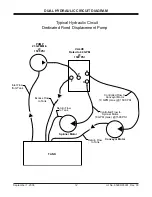
Page 14: ...A S PUMP 23 GPM Min 1500 PSI VALVE Rated to 40 GPM 1500 PSI Conveyor Motor TANK Spinner Motor Controlled Flow to Spinner Motor 10 GPM max 1500 PSI Return Flow to Tank Return Flow to Tank Excess Flow to Tank Controlled Flow to Conveyor Motor 10 GPM max 1500 PSI Inlet Flow from Tank DUAL HYDRAULIC CIRCUIT DIAGRAM ...

Page 15: ...n tension Use the two 5 8 x 6 take up bolts at the front of the spreader to adjust conveyor chain tension Loosen the locknuts before attempting to adjust the take up bolts Turn both bolts equal amounts to ensure the tension is equally distributed across both sides of the conveyor chain Verify correct engine oil level See engine manufacturers Owner s Manual Verify the gear case oil level is level w...

Page 16: ...nal equipment for spreaders Do not exceed vehicle ratings with a spreader Western Products offers a limited warranty for all spreaders and accessories See separately printed page for this important information The following are registered and unregistered trademarks of Douglas Dynamics L L C WESTERN ICE BREAKER Printed in U S A September 1 2006 Lit No 95900 Rev 00 A DIVISION OF DOUGLAS DYNAMICS L ...

Reviews: