9
8
HOW TO OPERATE THE EXERCISE CYCLE
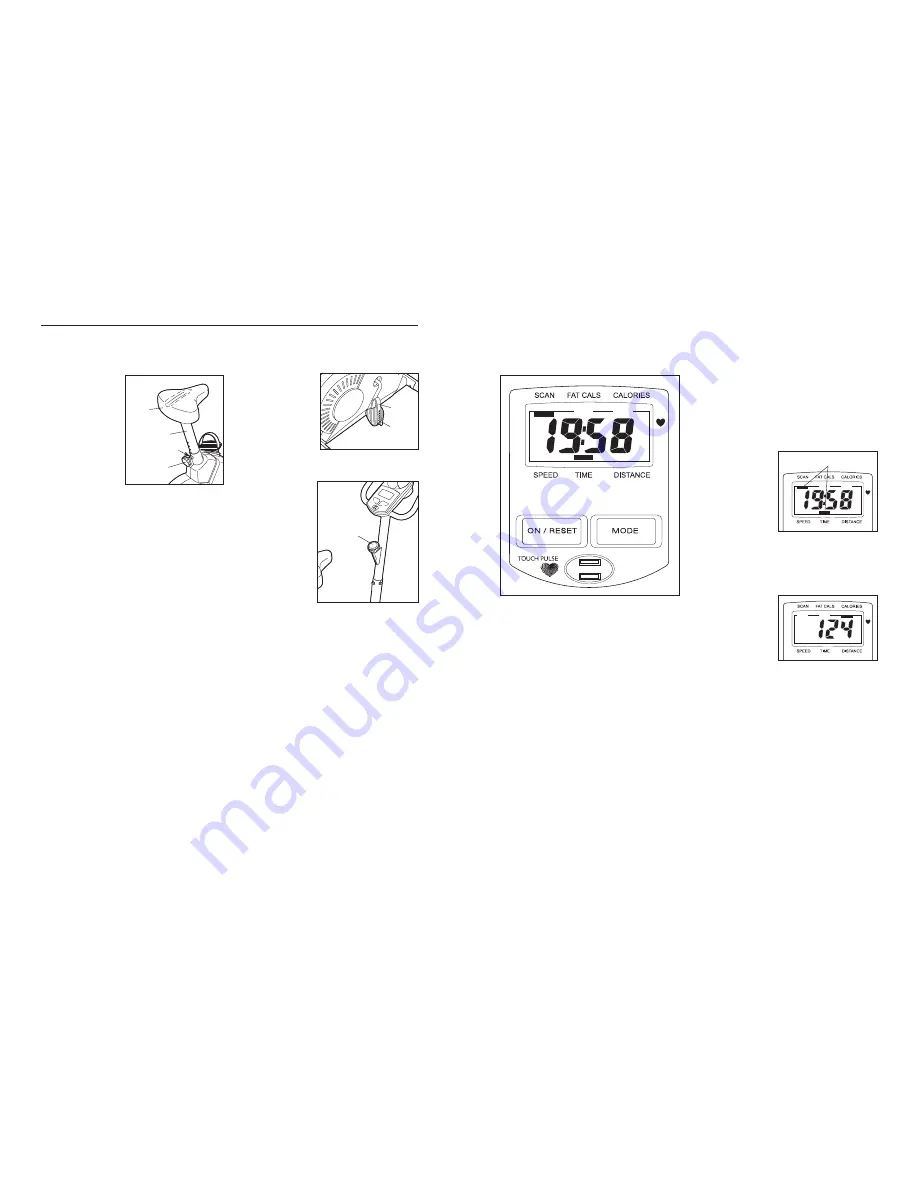
HOW TO ADJUST THE SEAT POST
For effective exer-
cise, the seat should
be at the proper
height. As you
pedal, there should
be a slight bend in
your knees when the
pedals are in the
lowest position. To
adjust the height of
the seat, first turn
the indicated knob
counterclockwise
and remove it. Next,
slide the seat post up or down, and align one of the
adjustment holes in the seat post with the indicated
hole in the Frame. Insert the knob into the frame and
the seat post, and turn the knob clockwise until it is
tight.
Make sure that the knob is inserted through
one of the adjustment holes in the seat post.
HOW TO ADJUST THE PEDAL STRAPS
To adjust the pedal
straps, first pull the
ends of the straps off
the tabs on the ped-
als. Adjust the straps
to the desired posi-
tion, and press the
ends of the straps
back onto the tabs.
HOW TO ADJUST THE PEDALING RESISTANCE
To increase the
resistance of the
pedals, turn the
resistance knob
clockwise; to
decrease the resis-
tance, turn the knob
counterclockwise.
Important: Stop
turning the knob
when turning
becomes difficult,
or damage may
result.
Strap
Tab
Seat Post
Knob
Hole
Seat
Resistance
Knob
FEATURES OF THE CONSOLE
The easy-to-use console features seven modes that
provide instant exercise feedback during your work-
outs. The modes are described below.
• Speed—This mode displays your pedalling speed,
in kilometres per hour or miles per hour.
• Time—This mode displays the elapsed time. Note:
If you stop pedalling for a few seconds, the time
mode will pause.
• Distance—This mode displays the distance you
have pedalled, in kilometres or miles.
• Calories—This mode displays the approximate
number of calories you have burned.
• Fat Calories—This mode displays the approximate
number of fat calories you have burned (see FAT
BURNING on page 12).
• Pulse—This mode displays your heart rate when
you use the pulse sensor.
• Scan—This mode displays the speed, time, dis-
tance, calories, fat calories, and pulse modes, for a
few seconds each, in a repeating cycle. Note: The
pulse mode will be displayed only when the pulse
sensor is being used.
HOW TO OPERATE THE CONSOLE
Make sure there are batteries in the console (see
BATTERY REPLACEMENT on page 11). If there is a
sheet of clear plastic on the console, remove it.
Follow the steps below to operate the console.
1. To turn on the console, press the ON/RESET but-
ton or begin pedalling. The entire display will briefly
appear; the console will then be ready for use.
2. Select one of the modes:
Scan mode—
When the power
is turned on, the
scan mode will be
selected automati-
cally. A mode indi-
cator will appear
below the word
SCAN to show
that the scan
mode is selected,
and a second mode indicator will show which
mode is currently displayed. Note: If you have
selected a different mode, repeatedly press the
MODE button to reselect the scan mode.
Speed, time, dis-
tance, calories,
or fat calories
mode—To select
one of these
modes for contin-
uous display,
repeatedly press
the MODE button.
The mode indicators will show which mode is
selected. Make sure there is not a mode indicator
below the word SCAN.
To reset the display, press the ON/RESET button.
Note: The console can display speed and dis-
tance in either kilometres or miles. To change
the unit of measurement, press the ON/RESET
button for about five seconds. The letters km/h or
mph will appear in the display to show which unit of
measurement is selected. When the batteries are
replaced, it may be necessary to reselect the
desired unit of measurement.
Mode Indicators


