background image

9

HOW TO USE THE ELLIPTICAL EXERCISER

HOW TO MOVE AND LEVEL THE ELLIPTICAL
EXERCISER

To move the elliptical exerciser, stand in front of it,
place one foot against one of the wheels, and firmly
hold the upper end of the upright. Pull the upright for-
ward until you can move the elliptical exerciser on the
wheels. Carefully move the elliptical exerciser to the
desired location and then lower it to the floor. 

To

decrease the risk of injury, do not attempt to move
the elliptical exerciser over an uneven surface.

If the elliptical exerciser rocks slightly on your floor,
turn one or both of the levelling feet under the front
stabilizer until the rocking motion is eliminated.  

HOW TO EXERCISE ON THE ELLIPTICAL
EXERCISER

To mount the elliptical exerciser, firmly hold the upper
body arms and carefully step onto the pedal that is in
the lowest position. Then, step onto the other pedal.
Push the pedals until they begin to move with a con-
tinuous motion. 

Note: The pedal discs can turn in

either direction. It is recommended that you turn
the pedal discs in the direction shown below;
however, for variety, you can turn the pedal discs
in the opposite direction. 

To dismount the elliptical exerciser, allow the pedals
to come to a complete stop. 

The elliptical exerciser

does not have a freewheel; the pedals will contin-
ue to move until the flywheel stops. 

When the ped-

als are stationary, step off the highest pedal first.
Then, step off the lower pedal.

Pedal

Pedal

Disc

Upper

Body Arm

Wheel

Upright

Leveling Foot

Summary of Contents for fit body system

Page 1: ...a manufacturer we are com mitted to providing complete customer satisfaction If you have questions or if parts are damaged or missing PLEASE CONTACT OUR CUSTOMER SERVICE DEPARTMENT DIRECTLY CALL TOLL...

Page 2: ...ASSEMBLY 5 HOW TO USE THE ELLIPTICAL EXERCISER 9 MAINTENANCE AND TROUBLESHOOTING 15 CONDITIONING GUIDELINES 16 PART LIST 17 EXPLODED DRAWING 18 HOW TO ORDER REPLACEMENT PARTS Back Cover LIMITED WARRA...

Page 3: ...e clothes while using the elliptical exerciser Always wear athletic shoes for foot protection while exer cising 9 When mounting and dismounting the ellipti cal exerciser always hold the upper body arm...

Page 4: ...this manual To help us assist you note the product model number and serial number before con tacting us The model number is WLEL2947 0 The serial number can be found on a decal attached to the ellipti...

Page 5: ...each drawing is the key number of the part from the PART LIST on page 17 The number following the key number is the quantity needed for assembly Note Some small parts may have been preassembled If a...

Page 6: ...Nylon Locknut 59 Next press a Wheel Cover 29 onto the posts on the Wheel Attach the other Wheel not shown in the same way 84 35 1 84 3 78 78 13 13 67 13 78 67 1 36 36 28 29 74 78 13 59 3 While anothe...

Page 7: ...that the Wave Washer remains on the end of the Pivot Axle 5 6 Apply a generous amount of grease to the axle on the Left Upper Body Leg 6 Then apply grease to a Large Wave Washer 20 and slide it onto...

Page 8: ...e harness on the Console Attach the Console 10 to the Upright 2 with four M6 x 18mm Patch Screws 87 Be careful not to pinch the wire harnesses Attach the Water Bottle Holder 17 to the Upright 2 with t...

Page 9: ...ng motion is eliminated HOW TO EXERCISE ON THE ELLIPTICAL EXERCISER To mount the elliptical exerciser firmly hold the upper body arms and carefully step onto the pedal that is in the lowest position T...

Page 10: ...he use of the included dumbbells To use the manual mode of the console see the instructions at the right To use an aerobics program see page 12 To use a crosstrainer program see page 13 Before using t...

Page 11: ...which display is selected Make sure there is not an indicator below the word Scan To reset the display press the On Reset button To pause the console stop pedaling When the console is paused the time...

Page 12: ...l pro grammed for the next segment Note You can manually override the programmed resistance level by pressing the Resistance Increase and Decrease buttons However when the current segment ends the res...

Page 13: ...e is about to change the resistance level will flash in the display for a few seconds The resistance of the pedals will then automatically change to the resistance level pro grammed for the next segme...

Page 14: ...mbbells Refer to a weight training manual or exercise guide if you are unfamiliar with the correct form for each strength exercise When performing lunges alternate legs with each repetition When perfo...

Page 15: ...e are three sizes of screws in the side shields note which size of screw you remove from each hole Next locate the Reed Switch 47 Turn the Flywheel 48 until the Magnet 53 is aligned with the Reed Swit...

Page 16: ...exercise must be aerobic Aerobic exercise is activity that requires large amounts of oxygen for prolonged periods of time This increases the demand on the heart to pump blood to the muscles and on the...

Page 17: ...lt 38 1 Lower Wire Harness 39 1 Crank 40 2 Crank Bearing 41 2 Crank Snap Ring 42 1 Left Crank Arm 43 1 Right Crank Arm 44 1 Resistance Cable 45 2 Crank Arm Spacer 46 1 Clamp 47 1 Reed Switch Wire 48 1...

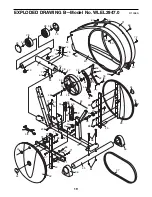
Page 18: ...5 14 64 65 8 9 17 66 7 5 18 73 73 65 64 15 14 15 65 64 23 24 24 19 6 24 24 23 65 68 21 25 81 70 26 68 26 64 22 19 25 81 70 4 27 27 79 79 79 20 20 20 85 85 85 85 20 59 59 11 11 86 EXPLODED DRAWING A Mo...

Page 19: ...41 40 57 41 40 59 48 46 60 47 49 53 50 50 59 64 64 51 54 88 83 63 76 77 84 60 60 30 74 67 60 3 60 60 80 60 29 59 28 28 59 29 31 60 60 67 34 55 56 44 52 13 13 13 78 78 78 84 75 75 75 75 75 75 69 82 82...

Page 20: ...s warranty does not extend to any product or damage to a product caused by or attributable to freight damage abuse misuse improper or abnormal usage or repairs not provided by an ICON authorized servi...

Reviews: