Weslo Daybreak SPRW52461 User Manual Download Page 14

14

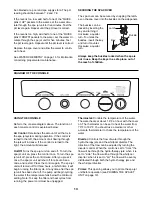
SPA JET UNIT OPERATION

The spa jet unit features five hydro-therapy jets, a
whirlpool diverter, a suction vent, and a filter housing.

The 

five hydro-therapy jets

(A), located on the front

of the spa jet unit, focus the water massage on your
neck and back.

The 

whirlpool divert-

er

(B), located on the

left side of the spa jet
unit, directs the flow of
the water to create a
whirlpool action in the
DAYBREAK. 

The 

suction vent

(C),

located on the right
side of the spa jet
unit,  pulls the water
into the spa unit, in
order to operate the
system. The suction
cover should always
be in place over the
suction vent. 

Never

operate the DAY-
BREAK without the
suction cover in
place.

The 

filter housing

(D), also located on the right side

of the spa jet unit,  and filter can be removed for
cleaning and replacement by pulling the fitting from
the spa jet unit.

The spa jet unit features an automatic filter cycle and
freeze protection. If the spa jet unit has not been
operated for three hours, the pump will begin circulat-
ing the water for twenty minutes to filter any impuri-
ties. Also, if the water temperature falls below 40¡F,
the pump will begin circulating and heating the water
to prevent the water from freezing.

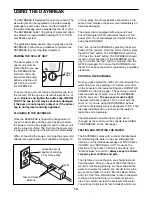
DRAINING THE DAYBREAK

To drain the DAYBREAK, you must use a garden
hose to siphon the water. Place one end of the hose
in the DAYBREAK and hold it in front of a hydro-ther-
apy jet until there is a flow of water coming out of the
hose. 

Turn off the spa unit and unplug the power

cord. The unit will be damaged if it is run without
water circulating.

Be sure the end of the hose in the

DAYBREAK is on the floor of the spa. 
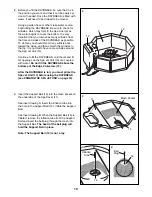
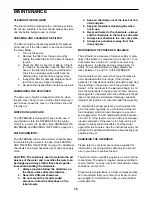
DRAINING THE PUMP

After the DAYBREAK
is drained (see
DRAINING THE DAY-
BREAK above), the
pump in the spa jet
unit should also be
drained if the DAY-
BREAK will be stored
for more than thirty
days, or if it may be
exposed to freezing temperatures.

To drain the pump, remove the spa jet unit from the

side panels. 

Be careful not to tear the spa liner.

Locate the pump inside the spa jet unit. Remove the
indicated bolt from the pump. Tip the spa jet unit
slightly, until all the water has drained from the pump.
Replace the drain plug.

A

B

D

D

B

C

C

Drain Plug

Pump

Summary of Contents for Daybreak SPRW52461

Page 1: ...ined techni cians on our customer hot line will provide immediate assis tance free of charge to you CUSTOMER HOT LINE 1 800 999 3756 Mon Fri 6 a m 6 p m MST Model No SPRW52461 Serial No Write the seri...

Page 2: ...or attributable to freight damage abuse misuse improper or abnormal usage or repairs not provided by an ICON authorized service center products used for commercial or rental pur poses or products used...

Page 3: ...ay collect on the spa cover 12 Keep children and pets away from the DAY BREAK when it is not in use 13 Keep all chemicals away from children and pets 14 The pH and chemical balance of the water must b...

Page 4: ...uld consult with their physician before using the DAYBREAK Pregnant women should not use the DAY BREAK if the water temperature is above 100 F 38 C the unborn child could be seri ously harmed 28 DANGE...

Page 5: ...laced on the DAYBREAK If a decal is missing or if it is not legible please call our Customer Service Department toll free at 1 800 999 3756 Monday through Friday 6 a m until 6 p m Mountain Time to ord...

Page 6: ...i tional questions please call our Customer Service Department toll free at 1 800 999 3756 Monday through Friday 6 a m until 6 p m Mountain Time excluding holidays To help us assist you please note th...

Page 7: ...oom around the DAYBREAK to permit servicing of the unit The diameter of the tub is 60 You should allow for this size plus the size of the spa jet unit when choosing the loca tion 8 Be sure to note any...

Page 8: ...en the Side Panel and the Floor Cap 2 Slide a Connector Bracket 6 into the Side Brackets 5 Attach the Angle Bracket to the other Side Panel with a Bracket Screw 4 Continue to connect the remaining Sid...

Page 9: ...nkles to the edges The seam in the Spa Liner should be lined up with a joint between two of the Side Panels 1 Stretch the edge of the Spa Liner 9 over the top of the Side Panels 1 working the wrinkles...

Page 10: ...Unit 13 Continue to fill the DAYBREAK until the jet and fil ter openings on the Spa Jet Unit 13 are covered with water Do not fill the DAYBREAK above the bottoms of the Edge Protectors 12 After the DA...

Page 11: ...e so the strap on the Spa Cover 11 is tight Note It may be easier to position the Buckles if a second person holds the strap on the opposite side of the Spa Cover tight Do not place the Buckle over on...

Page 12: ...he console Once the unit is running press the GFCI test button The DAYBREAK should shut off Press the reset button The DAYBREAK should resume normal operation If the DAYBREAK contin ues to run after t...

Page 13: ...g through the jets will increase If the control is turned to the right the amount will decrease On Off Turns the spa jet unit on and off To turn the spa jet unit on press the control once To turn the...

Page 14: ...begin circulat ing the water for twenty minutes to filter any impuri ties Also if the water temperature falls below 40 F the pump will begin circulating and heating the water to prevent the water from...

Page 15: ...nd pets 5 Keep all containers closed tightly when not in use 6 Never add water to the chemicals always add the chemicals to the water as directed 7 Always store chemicals in a cool dry place 8 Always...

Page 16: ...a cover The spa cover must be tight Set the air control to low The water will heat at a rate of 1 5 F an hour If you are using the DAYBREAK indoors and the room temperature is maintained at 70 F it wi...

Page 17: ...r chase at any pool and spa supply store b A clamp or seal inside the spa jet may be loose Check the floor around the spa jet unit for excess water and watch the spa jet unit while it is operating to...

Page 18: ...et Nozzle 11 1 Spa Cover 12 7 Edge Protector 13 1 Spa Jet Unit 14 1 Small Edge Protector 15 1 Support Ball Set 16 1 Filter 17 1 Cover Screw 18 1 Suction Cover 19 1 Suction Fitting Key No Qty Descripti...

Page 19: ...9 12 12 1 12 8 6 5 5 2 2 2 5 12 2 3 4 4 4 3 2 4 4 3 13 5 5 1 6 2 3 4 4 6 3 6 1 5 4 4 23 21 1 16 17 18 19 24 25 20 22 15 26 10 32 14 5 21 23 23 29 27 28 33 34 30 31 7 EXPLODED DRAWING Model No SPRW5246...

Page 20: ...rough Friday 6 a m until 6 p m Mountain Time excluding holidays To help us assist you please be pre pared to give the following information when calling 1 The MODEL NUMBER of the product SPRW52461 2 T...

Reviews: