background image

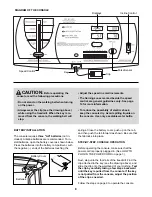
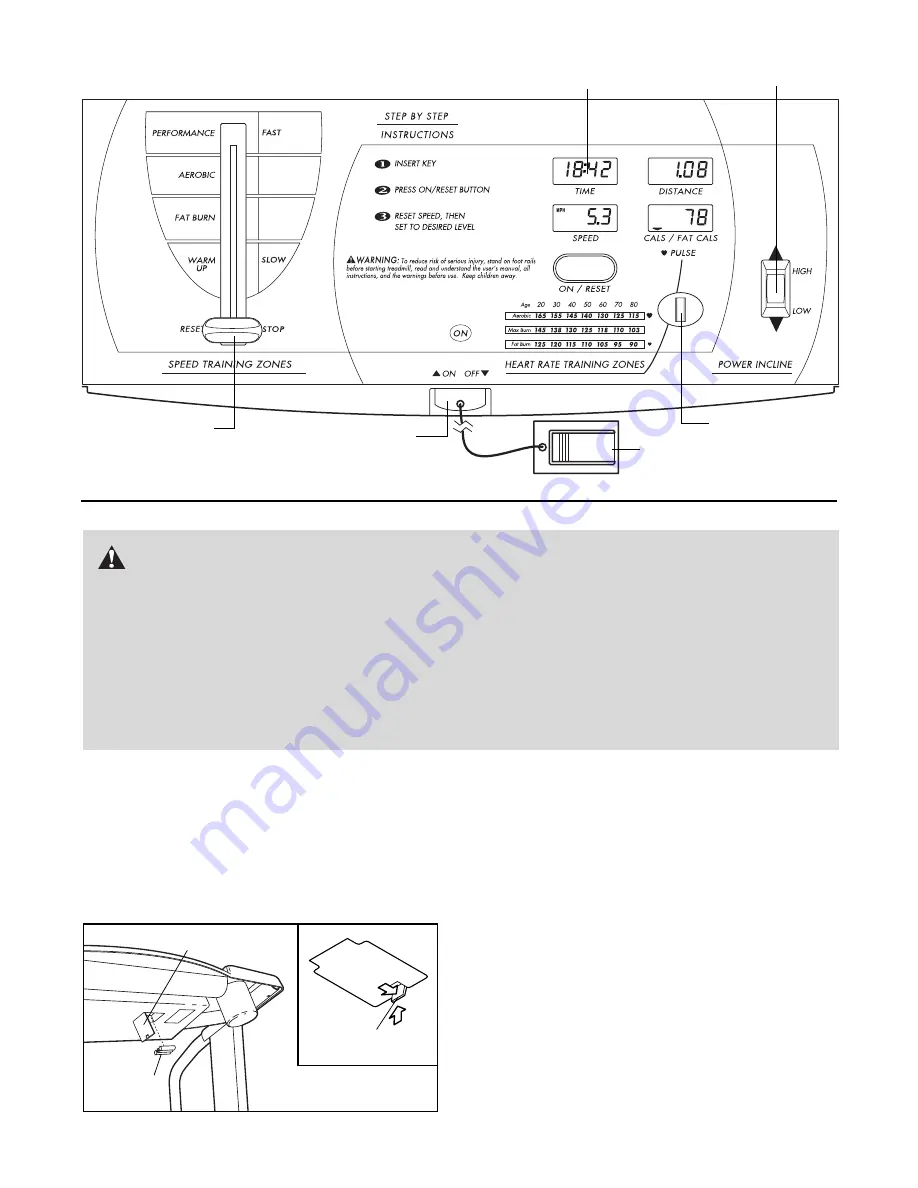
DIAGRAM OF THE CONSOLE 

Clip

Key

Speed Control

Displays

Incline Control

Pulse Sensor

CAUTION:

Before operating the 

console, read the following precautions.

• Do not stand on the walking belt when turning

on the power. 

• Always wear the clip (see the drawing above)

while using the treadmill. When the key is re-
moved from the console, the walking belt will
stop.

• Adjust the speed in small increments.

• The training zones marked beside the speed

control are general guidelines only. See page
14 for more information.

• To reduce the possibility of electric shock,

keep the console dry. Avoid spilling liquids on
the console. Use only a sealable water bottle.

BATTERY INSTALLATION

The console requires three "AA" batteries (not in-
cluded). Alkaline batteries are recommended. To in-
stall batteries, open the battery cover as shown below.
Press the batteries into the battery compartment, with
the negative (–) ends of the batteries touching the

springs. Close the battery cover, push up on the tab,
and then push the tab forward as shown. Be sure that
the tab locks into place.

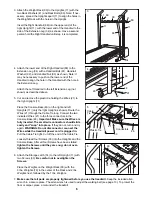
STEP-BY-STEP CONSOLE OPERATION 

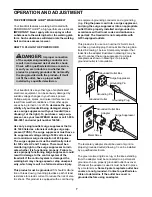
Before operating the console, make sure that the
power cord is properly plugged in. (See HOW TO
PLUG IN THE POWER CORD on page 7.) 

Next, step onto the foot rails of the treadmill. Find the
clip attached to the key (see the drawing above), and
slide the clip onto the waistband of your clothing. Test
the clip by carefully taking a few steps backward
until the key is pulled from the console. If the key
is not pulled from the console, adjust the position
of the clip as needed. 

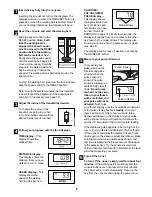
Follow the steps on page 9 to operate the console.

Tab

Batteries

Battery Cover

8

Summary of Contents for Cadence Ex 18

Page 1: ...CUSTOMER HOT LINE The trained techni cians on our customer hot line will provide immediate assis tance free of charge to you CUSTOMER HOT LINE 1 800 999 3756 Mon Fri 6 a m 6 p m MST Model No WLTL49201...

Page 2: ...when using the treadmill Do not wear loose cloth ing that could become caught in the treadmill Athletic support clothes are recommended for both men and women Always wear athletic shoes Never use the...

Page 3: ...ends in general 20 Do not attempt to raise lower or move the treadmill until it is properly assembled See ASSEMBLY on pages 5 and 6 and HOW TO FOLD AND MOVE THE TREADMILL on page 10 You must be able t...

Page 4: ...ll free at 1 800 999 3756 Monday through Friday 6 a m until 6 p m Mountain Time excluding holidays To help us assist you please note the product model number and serial number before calling The model...

Page 5: ...the shipping carton This is a normal condition and does not affect treadmill performance If there is lubricant on top of the walking belt simply wipe off the lubricant with a soft cloth and a mild no...

Page 6: ...nect or connect the Wires while the treadmill power cord is plugged in Pull the Cable Tie tight Cut off the end of the Cable Tie Loosely thread four Screws 33 into the Uprights and the Console Base Af...

Page 7: ...vides a path of least resistance for electric current to reduce the risk of elec tric shock This product is equipped with a cord having an equipment grounding conductor and a grounding plug Plug the p...

Page 8: ...ded Alkaline batteries are recommended To in stall batteries open the battery cover as shown below Press the batteries into the battery compartment with the negative ends of the batteries touching the...

Page 9: ...and fat calories you have burned See FAT BURNING on page 14 Every few seconds the display will change from one number to the other as shown by the mode arrows This display also shows your pulse when...

Page 10: ...re that the storage latch is fully engaged over the catch It may be helpful to press out on the left upright To protect the floor or carpet from damage place a mat under the treadmill Keep the treadmi...

Page 11: ...keep your back straight Unlatched Storage Latch HOW TO MOVE THE TREADMILL Before moving the treadmill convert the treadmill to the stor age position as described above Make sure that the stor age latc...

Page 12: ...er located on the treadmill frame near the power cord see the drawing above If the circuit breaker has tripped wait for five minutes and then press the switch back in b Make sure that the power cord i...

Page 13: ...If the walking belt still slows when walked on please call our Customer Service Department PROBLEM The walking belt is off center or slips when walked on SOLUTION a If the walking belt is off center...

Page 14: ...r prolonged periods of time This increases the demand on the heart to pump blood to the muscles and on the lungs to oxygenate the blood For aerobic exercise adjust the speed and incline of the treadmi...

Page 15: ...nded leg Reach toward your toes as far as possible Hold for 15 counts then relax Repeat 3 times for each leg Stretches Hamstrings lower back and groin 3 Calf Achilles Stretch With one leg in front of...

Page 16: ...48 4 Platform Screw 49 4 Isolator 50 1 Front Roller Pulley 51 1 Front Roller Adj Bolt 52 2 Incline Wheel 53 2 Extension Leg Screw 54 1 Power Cord 55 1 Power Cord Grommet 56 1 Circuit Breaker 57 2 Fra...

Page 17: ...36 37 17 40 87 87 87 60 87 87 26 33 61 63 64 25 47 53 34 69 68 67 48 86 5 74 84 83 39 83 39 66 7 40 57 28 71 16 17 17 75 13 13 13 13 33 33 55 54 33 81 94 94 87 70 33 66 14 33 3 52 82 38 77 52 17 3 17...

Page 18: ...s warranty does not extend to any product or damage to a product caused by or attributable to freight damage abuse mis use improper or abnormal usage or repairs not provided by an ICON authorized serv...

Reviews: