


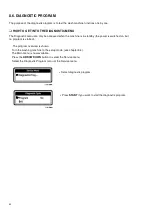


DIAGNOSE:
DIAGNOSE:
In
Case
of
Steam
Heating
:
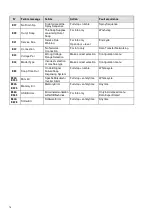
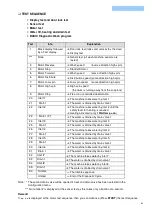
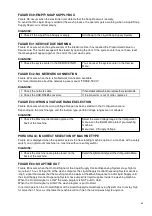
FAILURE
11:
FILL
FAILURE
Failure
11
occurs
when
the
water
level
has
not
reached
its
target
level
in
x
minutes.
x
=
Max
fill
time,
a
value
that
can
be
programmed
at
the
Initialization
Menu.
!
ATTENTION!
The
rubber
hose
must
be
fixed
with
a
flexible
clamp
on
the
electronic
water
level
sensor.
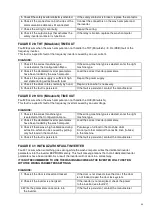
FAILURE
12:
OVERFILL
FAILURE
If
the
target
water
level
is
X
units
above
the
target
level
then
failure
message
12
will
be
displayed.
The
fault
message
will
not
be
generated
when
the
user
is
advancing
from
a
sequence
with
a
high
water
level
to
a
sequence
with
a
low
water
level.
X=
„Max.
level
Overfill“,
a
value
that
can
be
programmed
at
the
Initialization
menu.
If
the
steam
has
not
enough
heating
power
(too
low
temperature),
the
machine
will
be
filled
with
too
much
water
at
the
heating
part.
This
will
result
in
an
increased
water,
energy
and
supply
consumption.
It’s
strongly
recommended
that
the
heating
installation
works
with
enough
heating
power.
A
simple
solution
can
also
be
to
reduce
the
programmed
target
water
level.
As
less
steam
will
be
required,
the
normal
water
level
should
be
reached.
In
the
initialization
menu
it
is
also
possible
to
adjust
the
alarm
level
to
avoid
the
error
message.
(=
not
recommended).
89
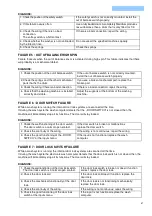
1.
Check
if
the
programmed
Max
fill
time
in
the
Initialization
menu
is
acceptable.
If
the
water
flow
is
very
slow,
increase
the
value
for
the
Max
fill
time.
The
default
value
is
10
minutes.
2.
Check
if
the
external
water
valves
are
open.
If
the
water
valves
are
closed:
open
the
water
inlet
valves.
3.
Check
if
the
water
inlet
valves
are
not
blocked
by
dirt.
If
the
water
inlet
valves
are
blocked
by
dirt:
clean
the
water
inlet
valves
or
replace
the
water
inlet
valves.
4.
Check
the
coil
of
the
water
inlet
valves.
If
the
coil
of
the
water
inlet
valve
is
electric
open:
replace
the
coil
or
the
complete
water
inlet
valve.
5.
Check
the
drain
valve.
If
the
drain
valve
is
defective:
replace
the
drain
valve.
6.
Check
if
the
rubber
hose
(for
measuring
the
water
level)
is
well
mounted
on
the
electronic
level
sensor
and
on
the
drain
valve.
If
the
hose
is
not
well
mounted:
install
the
rubber
hose
properly.
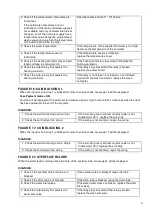
7.
Check
if
the
hose
on
the
electronic
sensor
is
air
tight.
If
the
air
hose
is
not
air
tight:
replace
the
air
tube.
8.
Check
if
the
hose
doesn’t
contain
water.
(siphon)
If
the
air
tube
contains
water:
remove
the
water
and
fix
the
hose
so
that
it
doesn’t
work
as
a
siphon.
9.
Check
the
continuity
of
the
wiring.
If
the
wiring
is
not
continuous:
repair
the
wiring.
10.
Check
the
output
relay
that
powers
inlet
valves
and
the
drain
valve.
If
the
relay
receives
a
command
signal
but
is
not
closed,
replace
the
wash
computer.
1.
Check
if
the
water
inlet
valves
are
broken.
If
the
water
inlet
valves
are
broken:
clean
or
replace
the
water
inlet
valve
diaphragms.
2.
Check
if
the
water
pressure
is
too
high.
Lower
the
water
pressure.
3.
Check
the
output
relay
that
powers
the
inlet
valve.
If
the
relay
stays
closed
and
the
relay
is
broken,
replace
the
wash
computer.
Summary of Contents for WMA504EP
Page 1: ......
Page 2: ......
Page 3: ......
Page 4: ......
Page 5: ......
Page 6: ......
Page 7: ......
Page 8: ......
Page 9: ......
Page 10: ......
Page 11: ......
Page 12: ......
Page 13: ......
Page 14: ......
Page 15: ......
Page 16: ......
Page 17: ......
Page 18: ......
Page 19: ......
Page 20: ......
Page 21: ......
Page 22: ......
Page 23: ......
Page 24: ......
Page 25: ......
Page 26: ......
Page 27: ......
Page 28: ......
Page 29: ......
Page 30: ......
Page 31: ......
Page 32: ......
Page 33: ......
Page 34: ......
Page 35: ......
Page 36: ......
Page 37: ......
Page 38: ......
Page 39: ......
Page 40: ......
Page 41: ......
Page 42: ......
Page 43: ......
Page 44: ......
Page 49: ...8 ...
Page 77: ... DATA EXPORT IMPORT 37 ...
Page 79: ...39 ...
Page 80: ...40 ...
Page 82: ...42 ...
Page 84: ...Press the ENTER button to confirm your selection Go to 5 3 STEP PROGRAM FUNCTIONS 44 ...
Page 86: ...5 4 STEP PROGRAM STEP FUNCTION 46 ...
Page 97: ......
Page 98: ......
Page 146: ...Upper Frame CFD2838P_D1617 4 ...
Page 148: ...Lower Frame CFD2839P_D1617 6 ...
Page 150: ...Stabilizing Springs CFD2840P_D1617 8 ...
Page 152: ...Cabinet CFD2890P_D1617 16 ...
Page 154: ...Cabinet CFD2891P_D1617 18 ...
Page 156: ...Control Panel 32 ...
Page 158: ...Control Panel CFD2896P_D1617 34 ...
Page 160: ...Control Panel CFD2896P_D1617 36 ...
Page 162: ...Coin Meter CFD2729P_D1617 42 ...
Page 164: ...Door Drawing 1 of 2 CFD2899P_D1617 44 ...
Page 166: ...Door Drawing 2 of 2 CFD2900P_D1617 46 ...
Page 168: ...Water Inlet System CFD2732P_D1617 48 ...
Page 170: ...Drain System CFD2848P_D1617 50 ...
Page 172: ...Drain System Drain Pump CFD2735P_D1617 52 ...
Page 174: ...Rear Panel Drawing 1 of 2 CFD2901P_D1617 54 ...
Page 176: ...Rear Panel Drawing 2 of 2 CFD2902P_D1617 56 ...
Page 178: ...Steam Heating CFD2852P_D1617 58 ...
Page 180: ...Washing Drum and Tub CFD2742P_D1617 60 ...
Page 182: ...Drive CFD2853P_D1617 62 ...
Page 184: ...Bearing Housing CFD2747P_D1617 64 ...
Page 186: ......


