background image

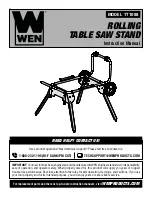
ROLLING

TABLE SAW STAND

Instruction Manual

MODEL TT1088

IMPORTANT: 

Your new tool has been engineered and manufactured to WEN’s highest standards for dependability, 

ease of operation, and operator safety. When properly cared for, this product will supply you years of rugged, 

trouble-free performance. Pay close attention to the rules for safe operation, warnings, and cautions. If you use 

your tool properly and for its intended purpose, you will enjoy years of safe, reliable service.

NEED HELP? CONTACT US!

Have product questions? Need technical support? Please feel free to contact us:

[email protected]

1-800-232-1195 (M-F 8AM-5PM CST)

For replacement parts and the most up-to-date instruction manuals, visit 

WENPRODUCTS.COM

Summary of Contents for TT1088

Page 1: ...gged trouble free performance Pay close attention to the rules for safe operation warnings and cautions If you use your tool properly and for its intended purpose you will enjoy years of safe reliable service NEED HELP CONTACT US Have product questions Need technical support Please feel free to contact us TECHSUPPORT WENPRODUCTS COM 1 800 232 1195 M F 8AM 5PM CST For replacement parts and the most...

Page 2: ... Specific Rules for Your Table Saw Stand 6 BEFORE OPERATING 7 Unpacking Packing List 7 Know Your Table Saw Stand 7 Assembly 8 9 Operation 9 Adjustments 10 Exploded View Parts List 11 Warranty Statement 13 OPERATION MAINTENANCE To purchase accessories for your tool visit WENPRODUCTS COM ...

Page 3: ...t WEN we are continuously improving our products If you find that your tool does not exactly match this manual please visit wenproducts com for the most up to date manual or contact our customer service at 1 800 232 1195 Keep this manual available to all users during the entire life of the tool and review it frequently to maximize safety for both yourself and others SAFETY ALERT SYMBOL Indicates d...

Page 4: ...c shock PERSONAL SAFETY 1 Stay alert watch what you are doing and use com mon sense when operating a power tool Do not use a power tool while you are tired or under the influence of drugs alcohol or medication A moment of inatten tion while operating power tools may result in serious personal injury 2 Use personal protective equipment Always wear eye protection Protective equipment such as a respi...

Page 5: ...accordance with these instructions taking into ac count the working conditions and the work to be per formed Use of the power tool for operations different from those intended could result in a hazardous situa tion 8 Use clamps to secure your workpiece to a stable surface Holding a workpiece by hand or using your body to support it may lead to loss of control 9 KEEP GUARDS IN PLACE and in working ...

Page 6: ...ble before operation 6 Keep proper footing and balance at all times Do not overreach when operating the table saw 7 Be careful not to pinch yourself when folding and un folding the legs 8 Make sure all fasteners including those used to mount the saw to the stand are securely tightened be fore moving folding or unfolding the stand 9 When moving the saw and stand set the stand gently on the ground D...

Page 7: ... PACKING LIST Components 1 Front Handle 1 2 Rear Handle Rest 1 3 Stand Body 1 4 Wheels 2 Hardware Bag 1 1 5mm Hex Wrench 1 2 10mm 13mm Open End Wrench 1 3 Socket Button Head Cap Screws M8x16 2 4 Socket Button Head Cap Screws M8x40 4 5 M8 Lock Nuts 10 6 8mm Flat Washers 6 7 Carriage Bolts M8x40 20mm Thread 4 KNOW YOUR TABLE SAW STAND TOOL PURPOSE Table saw stands give your table saw the support bot...

Page 8: ...HANDLE 1 Install the rear handle rest Fig 2 1 onto the stand body near the wheel axles Secure it with two M8x16 bolts Fig 2 2 Tighten using the included 5mm hex wrench INSTALLING THE WHEELS 1 Install the wheels Fig 3 1 onto the axles Secure each with an 8mm washer Fig 3 2 and M8 lock nut Fig 3 3 Tighten using the included 13mm wrench Make sure not to overtighten the nuts or the wheels won t spin A...

Page 9: ...ets are on the in side and the saw frame is on the outside NOTE Make sure the bolts square necks sit fully in the rectangular holes in the saw body brackets 2 Make sure all fasteners are tight ASSEMBLY Fig 4 Fig 5 2 3 1 1 1 WHEN YOU RE READY TO MOVE YOUR SAW 1 Make sure any and all loose accessories on the saw itself are secure 2 Collapse the legs by pressing the detent buttons Fig 1 1 and folding...

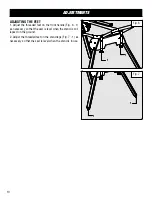
Page 10: ...the front handle Fig 6 1 as necessary so that the saw is level when the stand is col lapsed on the ground 2 Adjust the threaded feet on the stand legs Fig 7 1 as necessary so that the saw is level when the stand is in use ADJUSTMENTS Fig 6 Fig 7 1 1 1 1 ...

Page 11: ...11 EXPLODED VIEW PARTS LIST ...

Page 12: ...Head Cap Screw M8x40 8 6 Lock Nut M8 8 7 Rear Handle 1 No Part No Description Qty 8 Bumper 2 9 Socket Button Head Cap Screw M8x45 2 10 Hex Nut M8 8 11 TT1088 011 Front Handle 1 12 TT1088 012 Handle Foot M8x22 2 13 Leg 4 14 Detent Pin 4 15 7mm Flat Washer 4 16 7mm E clip 4 17 Detent Spring 4 18 TT1088 018 Leg Foot M8x20 4 19 Socket Button Head Cap Screw M8x60 2 20 Wheel Axle 1 21 Carriage Bolt M8x4...

Page 13: ... may need to be sent to WEN before the replacements can be shipped out turning a product for warranty service the shipping charges must be prepaid by the purchaser The product must be shipped in its original container or an equivalent properly packed to withstand the hazards of shipment The product must be fully insured with a copy of the proof of purchase enclosed There must also be a description...

Page 14: ...14 NOTES ...

Page 15: ...15 NOTES ...

Page 16: ...16 V 2021 11 30 THANKS FOR REMEMBERING ...

Reviews: