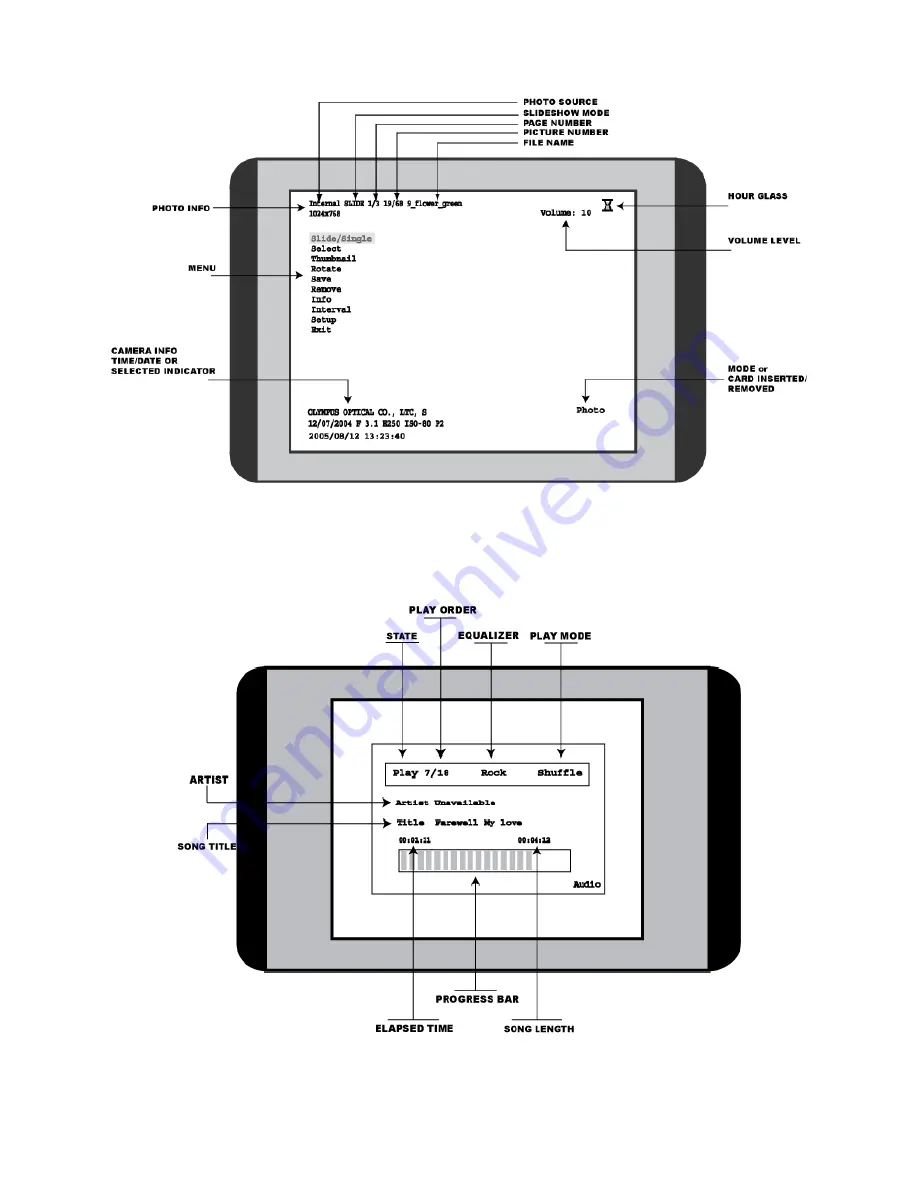
Figure 6: All function displayed on the device (Photo mode)
Figure 7: All function displayed on the device (Audio mode)
7
Page 1: ...USER MANUAL September 2005 785 UM104V01 Rev 1 Copyrights Wellex Corporation All rights reserved Wellex Corporation 551 Brown Rd Fremont CA94539 USA Tel 1 510 743 1818 Product support 1 510 743 1839 www wellex com estore wellex com ...
Page 2: ...GURES 5 3 2 CONTROL PANEL OVERVIEW 8 4 OPERATION 9 4 1 GETTING START 9 4 2 POWER ON OFF 9 4 3 LOADING MEDIA CONTENTS 10 4 4 PLAY PHOTO 11 4 5 PLAY AUDIO 15 4 6 SETUP 19 4 7 CONNECT TO YOUR COMPUTER 22 5 SAFETY 24 6 LIMITED WARRANTY 25 7 TROUBLE SHOOTING 26 8 PRODUCT SPECIFICATION 27 2 ...
Page 3: ...w and photo rotation and elegantly designed to support all the connections plus the ability to play MP3s While listening your favorite tunes you can enjoy viewing your most memorable digital photo albums You can easily relive your memories from the family trip to San Diego the sweet honeymoon in Maui that fun high school reunion in a four star rated French restaurant The DPF1040 s elegant design i...
Page 4: ...C power adapter Input 100 240VAC 50 60Hz 0 5A Output 12VDC 1 25A Max One USB cable 5 feet long cord One User s Manual Warranty and registration card Note A set of speakers built into the DPF1040 This product DOES come with an Audio Out either for use with headphones or external speakers There are NO headphones or external speakers provided with this package 4 ...
Page 5: ...3 Product Overview 3 1 Product Figures Figure 1 Control Panel Top side Figure 2 Right side Panel Figure 3 Left side panel 5 ...
Page 6: ...Figure 4 Bottom side panel Figure 5 Back side panel 6 ...
Page 7: ...Figure 6 All function displayed on the device Photo mode Figure 7 All function displayed on the device Audio mode 7 ...
Page 8: ... your Compact Flash CF type I or II memory card here SD MMC MS 3 in 1 Card Slot Insert your Secure Digital SD Multimedia Card MMC or Memory Stick MS Memory Stick PRO memory card here Audio Out Plug your headphones or external speakers into this standard audio output port USB Device Plug the USB cable included with mini type B connector end to this port for connecting to your PC if the DPF1040 is u...
Page 9: ...Power ON OFF Power ON 1 1 1 Press Power button for more than one second during the device is off The device s main power is being turned on and LED indicator lights on in green color 2 2 2 Please wait a few seconds for the system to be brought up Power OFF 1 1 1 Press Power button for more than one second during the device is on The device s main power is being turned off and LED indicator lights ...
Page 10: ...t 1 1 1 Insert your SD MMC MS or MS PRO card into the SD MMC MS 3 in 1 Card Slot when you want to play or save your photos or music from the SD MMC MS or MS PRO card You will see a message SD MMC or MS inserted shown on the bottom right corner of the LCD screen 2 2 2 Remove your SD MMC MS or MS PRO card from the SD MMC MS 3 in 1 Card Slot when you finish You will see a message SD MMC or MS removed...
Page 11: ...need it any more You will see a message USB removed shown on the bottom right corner of the LCD screen 5 5 5 Disconnect the type A connector of the USB cable from the USB Host Port of the DPF1040 if you wish to remove the connection from card reader writer You will see a message USB removed shown on the bottom right corner of the LCD screen Or Connecting to Apple iPod 1 1 1 Connect USB cable to yo...
Page 12: ...splay the current photo at all time Select Photo by File Name 1 1 1 Scroll highlight to Select in the Main Photo Menu You will see the sub menu of Select which shows a list of media sources including Internal which represents the internal flash memory and CF SD MMC or MS USB0 USB1 USB2 or USB3 if you have inserted your memory cards or USB devices USB Flash Drive Digital Camera and Memory Card Read...
Page 13: ...ayed photo 1 1 1 Scroll to Rotate in the Main Photo Menu 2 2 2 Press Menu Enter button The current displayed photo rotates 90º clockwise 3 3 3 You can continuously press Menu Enter button until the photo set to your desired orientation Save Photo into Internal Flash Memory 1 1 1 Scroll to Save in the Main Photo Menu 2 2 2 Press Menu Enter button The current displayed photo will be copied into inte...
Page 14: ... Scroll highlight to Info in the Main Photo Menu You can see a sub menu with Photo Info and Version options 2 2 2 Press Right button to move highlight to the sub menu 3 3 3 Press Up or Down button to move highlight to Version if you would like see the firmware version Press Menu Enter button you will see information block showing Wellex DPF 1040 Vx xx which x xx represents the version number Or 3 ...
Page 15: ...t to Left New photo appears from right to left Top to Bottom New photo appears from top to bottom Bottom to Top New photo appears from bottom to top Checkered New photo appears like a checker board square 2 2 2 Press Right button to move to the sub menu 3 3 3 Press Up or Down button to scroll up and down until to the desired effect of slideshow 4 4 4 Press Menu Enter button to set the transition e...
Page 16: ...is menu includes Play Pause Stop Select Play Mode Equalizer Save Setup Exit 2 2 2 The default shows the Play Pause is highlighted 3 3 3 Press Up or Down button to scroll up or down Play MP3 Music 1 1 1 Scroll to Play Pause in the Main Audio Menu Press Menu Enter button the DPF1040 will play the music with information shown in the Audio Information block as shown in Figure 7 according to your or de...
Page 17: ...ss Right button to move to another tier of the submenu 5 5 5 Press Up or Down button to until the desired media source is highlighted 6 6 6 Continuously press Right button and Up or Down buttons until the desired MP3 file is highlighted 7 7 7 Press Menu Enter button to select and to play the music Select MP3 Music by Song Title to create a playlist of the selected songs 1 1 1 Scroll and highlight ...
Page 18: ...croll to Save in the Main Audio Menu 2 2 2 Press Menu Enter button The currently played MP3 music will be copied into internal flash memory You will see a block showing the status of copying in percentage When the process is done another block will show File Copied Completed If you are saving a MP3 already existed in the internal flash memory a block with the text of The file already exists will a...
Page 19: ...e Main Photo Menu You can see a sub menu with Date Time Clock Sleep Wake Up LCD Saver Display Default and Firmware Press Right button to move to the sub menu Note Setup can only be accessed in the Photo mode Set the Current Date 1 1 1 Press Up or Down button to scroll and highlight Date in the Setup sub menu You can see month day year appear 2 2 2 Press Right button to move and highlight month Pre...
Page 20: ... second setting Press Up or Down button to set to desired second 5 5 5 Press Left button several times until at the setup sub menu 6 6 6 Press Up or Down button to scroll and highlight Wake Up in the Setup sub menu You can see hour minute second appeared 7 7 7 Press Right button to move and highlight the hour setting Press Up or Down button to set to desired hour 8 8 8 Continuously press Right but...
Page 21: ...Host Slot 3 3 3 Scroll to Setup in the Main Photo Menu You can see a sub menu with Date Time Clock Sleep Wake up LCD Saver Display Default and Firmware in the bottom option 4 4 4 Press Right button and Down button to scroll and highlight Firmware of the submenu 5 5 5 Press Menu Enter button Fimware upgrade information and a message of choice of Yes and No will be shown on the screen 6 6 6 The defa...
Page 22: ...F memory card in Compact Flash Card Slot or SD MMC MS or MS PRO memory card in SD MMC MS 3 in 1 Card Slot if you wish to retrieve the file from any of the above memory cards which have not been inserted yet 2 2 2 Locate the Removable Disk form the root directories in your computer system Click on Removable Disk you can see all the folders and files on this memory card Note The in could be any lett...
Page 23: ...er 1 1 1 Follow the instruction of your computer to remove the USB device which represents the DPF1040 here 2 2 2 Disconnect the cable from your computer and the DPF1040 You will see a message PC Disconnected shown on the bottom right corner of the LCD screen 23 ...
Page 24: ...assemble the case of this display or attempt to modify the DPF1040 in any way Repairs should be only carried out by the manufacturer or authorized service centers Keep the product away from water and wet areas Never put objects of any kinds into this product through the media cards slots as they may touch dangerous voltage points or short out parts that could result in a fire or electric shock Kee...
Page 25: ...rranted to operate without failure Wellex s products should not be used in life support systems or other applications where failure could threaten injury or life This warranty gives you specific legal rights and you may also have other rights which vary by jurisdiction THE FOREGOING IS WELLEX S SOLE WARRANTY WELLEX DISCLAIMS ALL OTHER EXPRESS AND IMPLIED WARRANTIES TO THE FULLEST EXTENT PERMITTED ...
Page 26: ... condition z Why am I unable to turn off the device Answer You have to press the power button for at least a few seconds to wait for the LED lights to be off z Why does the USB device icon not show on the screen if I connect the device to my laptop PC Answer When you connect the device to your personal computer the device acts as a card reader rather than the host device You should otherwise use y...
Page 27: ...rds Friendly Text Based User Interface Store favorite Photos Songs to Internal Memory Direct Camera Connect Thru USB Host Port Easy to search Thumbnail Photos Display Support USB Card Reader SmartMedia CompactFlash Built in internal Speakers Audio out for Headphones External Speakers USB Host Device External Ports Apple iPod Compatible Auto Slideshow with Multiple selected time Intervals Firmware ...