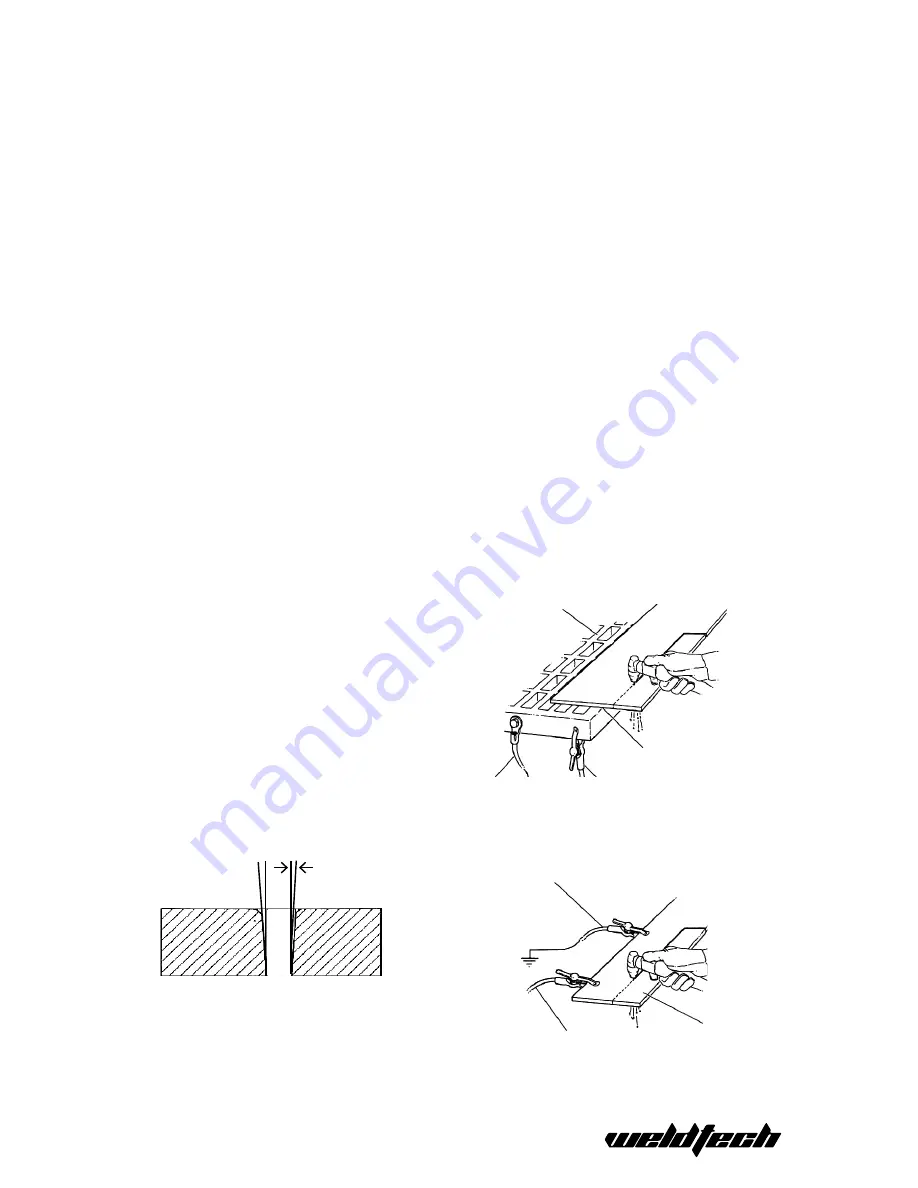
WELDTECH SC40C Operating Instructions Manual Download Page 13

13

Grounded 

work table

Be sure work is in good 

contact with table

Earth ground

Work Cable

Grate Cutting 

For rapid restarts, such as grate or heavy mesh 

cutting, do not release the torch switch. This 

avoids the 2 second preflow portion of the cutting 

cycle.

Edge Starting


For edge starts, hold the torch perpendicular to 

the workpiece with the front of the tip near (not 

touching) the edge of the workpiece at the point 

where the cut is to start. When starting at the 

edge of the plate, do not pause at the edge and 

force the arc to “reach” for the edge of the metal. 

Establish the cutting arc as quickly as possible.

Drag Cutting

Position torch tip slightly above workpiece, press 

torch switch and lower torch tip forward work-

piece until contact is made and cutting arc is 

established. After cutting arc is established, move 

the torch in the desired direction keeping the 

torch tip slightly angled, maintaining contact with 

the workpiece. Avoid moving too fast as would be 

indicated by sparks radiating from the topside of 

the workpiece. Move the torch just fast enough to 

maintain sparks concentration at the underside 

of the workpiece and making sure the material is 

completely cut through before moving on. Adjust 

drag speed as desired/required.                                

Direction of Cut 

In the torches, the plasma gas stream swirls as it 

leaves the torch to maintain a smooth column of 

gas. This swirl effect results in one side of a cut be-

ing more square than the other. Viewed along the 

direction of travel, the right side of the cut is more 

square than the left.

Side Characteristics of Cut

Right Side 

Cut Angle

Left Side 

Cut Angle

To make a square – edged cut along an inside di-

ameter of a circle, the torch should move counter 

clockwise around the circle. To keep the square 

edge along an outside diameter cut, the torch 

should travel in a clockwise direction.

Quality Cuts 

Dross (slag) is the excess material that spatters 

and builds- up on the underside of the work-piece 

as you cut. 
Dross occurs when the operating procedure and 

technique is less than optimal. It will require prac-

tice and experience to obtain cuts without dross. 

Although less than optimal cuts will contain dross, 

it is relatively easy to remove by breaking it off 

using pliers or chipping off with a chisel or scrap-

ing or grinding the finished cut as needed and is 

generally only a minor inconvenience. 
A combination of factors contributes to the build-

up of dross. They include; material type, material 

thickness , amperage used for the cut, speed of 

the torch across the work-piece, condition of the 

torch tip, input line voltage, air pressure, etc. Gen-

erally there is an inversely proportional relation-

ship between output current and speed of cut. 

Do not use more output current than is necessary 

and adjust speed of cut toward minimizing dross 

build-up on underside of cut. Experiment with 

adjusting current and speed to minimize dross.
When dross is present on carbon steel, it is com-

monly referred to as either ‘high speed, slow 

Earth ground

Do not attach 

earth cable to 

piece being 

cut free

Work cable

Summary of Contents for SC40C

Page 1: ...OPERATING INSTRUCTIONS SC40C 40A INVERTER PLASMA CUTTER www weldtech net nz ...

Page 2: ... Precautions They will help you to avoid potential hazards that may exist when working with this product We Appreciate Your Business Your Are In Good Company Weldtech is a strong Global Brand of Welding Products We manu facture and supply to major welding industry sectors world wide including Manufacturing Construction Mining Automotive Aer ospace Engineering Rural and DIY Hobbyist We distinguish ...

Page 3: ...l Safety 4 Plasma Safety 6 Overview 7 Get to Know Your Machine 8 Machine Specifications 9 Installation Setup 10 Cutting Guide 11 OperatingTechniques 12 Replacing PlasmaTorch Consumables 14 Troubleshooting 15 Warranty 17 ...

Page 4: ...t in electric shock fire and or serious injury Save all warnings and in structions for future reference The term power tool in the warnings refers to your mains oper ated corded power tool Keep work area clean and well lit Cluttered or dark areas invite accidents Do not operate power tools in explosive atmospheres such as in the presence of flam mable liquids gases or dust Power tools create spark...

Page 5: ...nt may not pro vide adequate protection Eye protection must be ANSI approved and breathing protection must be OSH approved for the specific hazards in the work area Power Tool Use and Care Do not force the power tool Use the correct power tool for your application The correct power tool will do the job better and safer at the rate for which it was designed Do not use the power tool if the switch d...

Page 6: ...lenium Cadmium Manganese Vanadium Plasma Safety Always read the Material Safety Data Sheets MSDS that should be supplied with the mate rial you are using These MSDSs will give you the information regarding the kind and amount of fumes and gases that may be dangerous to your health Use special equipment such as water or down draft cutting tables to capture fumes and gases Do not use the plasma torc...

Page 7: ...e wear Wear welding gloves and suitable clothing to protect your skin from the arc rays and sparks Keep helmet and safety glasses in good condi tion Replace lenses when cracked chipped or dirty Protect others in the work area from the arc rays Use protective booths screens or shields Overview The SC40C is a compact single phase plasma cutting system As shipped the SC40C is ready to plug in and cut...

Page 8: ...tting Current Adjustment Knob 5 Air Pressure Gauge 6 Air Pressure Regulator Knob 7 Plasma Torch Male Connection 8 Torch Switch Connection 9 Earth Lead Connection 10 Cooling Fan Intake 11 Compressed Air Inlet Nitto Fitting 12 Mains Power Cable 13 Specification Plate 14 Internal Air Filter Water Drain underneath machine 15 Torch Switch Button 16 Plasma Torch Head 17 Workpiece Earth Clamp Get to Know...

Page 9: ...ute period that a given piece of equipment can safely weld or cut at its rated load without overheating For example if a welder or cutting type piece of equipment is rated at a 40 duty cycle at 30 amps that particular piece of equipment must be rested for at least 6 minutes after 4 minutes of continuous welding or cutting NOTE Failure to carefully observe duty cycle limita tions can easily overstr...

Page 10: ...face and connect the inlet power plug to the power supply socket Turn on the wall power supply switch leave the machine power switch in the Off position 3 Connect the machine to a suitable compressed air supply clipping the supply hose onto the male quick connect Nitto coupler on the back of the machine 11 4 Adjust the air pressure regulator 6 until the gauge 5 is reading between 60 and 70PSI To a...

Page 11: ...start cutting 4 After starting the cut the tip can be dragged along the workpiece if cutting up to 3mm thick material When cutting material greater than 3mm maintain a 3 2mm tip to work standoff distance 5 When ending a cut the torch switch should be released and lifted off the workpiece just before the end of the cut to minimize double arcing which can damage the tip This is to prevent hih freque...

Page 12: ...arting to pierce and then straightened after ac complishing the pierce 1 To start a pierce tilt the torch to prevent molten material from coming back against and damaging the torch 2 When the arc breaks through the work bring the torch to an upright position and proceed to cut Piercing Technique using the SC40C Material Thickness mm Cutting Speed mm m 1 6 8 382 Carbon Steel AISI 1020 3 2 2 667 6 4...

Page 13: ...square than the other Viewed along the direction of travel the right side of the cut is more square than the left Side Characteristics of Cut Right Side Cut Angle Left Side Cut Angle To make a square edged cut along an inside di ameter of a circle the torch should move counter clockwise around the circle To keep the square edge along an outside diameter cut the torch should travel in a clockwise d...

Page 14: ...eld Cap These should be replaced if broken chipped cracked or badly heat dam aged Tips and electrodes should wear reasonably evenly and it is normal practice to replace them both together If a new tip is inserted with a worn electrode the tip will wear much more quickly than if the electrode was also replaced at that same time If tips or electrodes are wearing much faster than the other component ...

Page 15: ...speed too slow Torch is too high away from material Worn torch parts Workpiece earth cable disconnected Increase speed until problem solved Lower torch to recommended height Inspect and repair or replace worn parts Connect workpiece earth clamp to work piece or steel table Insufficient penetration Cutting speed too fast Torch tilted too much Metal too thick for plasma capacity Worn torch parts Slo...

Page 16: ...16 ...

Page 17: ...are limited in duration to this express warranty After this period all risks of loss from whatever reason shall be on the purchaser Warranty B ANY INCIDENTAL INDIRECT OR CONSEQUENTIAL LOSS DAMAGE OR EXPENSE THAT MAY RESULT FROM ANY DEFECT FAILURE OR MALFUNCTION OF THIS PRODUCT C This warranty does not apply to any accessory or consumable items included with the product which are subject to wear fr...

Page 18: ...18 ...

Page 19: ...19 ...

Page 20: ...nd will strive to provide you with the best service and reliability in the industry This product is backed by our extensive warranty and world wide service network To locate your nearest distributor or service agency call 0800 387 678 or email us at info euroquip co nz www weldtech net nz ...

Reviews: