background image

WARNING:

To reduce the risk of burns, fire, electric shock, or injury to persons, read the

following important precautions and information before operating the treadmill.

1. It is the responsibility of the owner to ensure

that all users of this treadmill are adequately

informed of all warnings and precautions.

2. Use the treadmill only as described in this

manual.

3. Place the treadmill on a level surface, with at

least eight feet of clearance behind it, two feet

on each side, and six inches in front. Do not

place the treadmill on any surface that blocks

air openings. To protect the floor or carpet

from damage, place a mat under the treadmill.

4. Keep the treadmill indoors, away from mois-

ture and dust. Do not put the treadmill in a

garage or covered patio, or near water.

5. Do not operate the treadmill where aerosol

products are used or oxygen is administered.

6. Keep children under the age of 12 and pets

away from the treadmill at all times.

7. The treadmill should not be used by persons

weighing more than 350 pounds. Never allow

more than one person on the treadmill at a time.

8. Wear appropriate exercise clothes when

using the treadmill. Do not wear loose clothes

that could become caught in the treadmill.

Athletic support clothes are recommended

for both men and women.

Always wear ath-

letic shoes. Never use the treadmill with bare

feet, wearing only stockings, or in sandals.

9. When connecting the power cord (see page 11),

plug the power cord into a surge suppressor

(not included) and plug the surge suppressor

into a grounded circuit capable of carrying 15

or more amps. No other appliance should be on

the same circuit. Do not use an extension cord.

10. Use only a single-outlet surge suppressor

that meets all of the specifications described

on page 11. To purchase a surge suppressor,

see your local WEIDER dealer or call the toll-

free telephone number on the front cover of

this manual and order part number 146148, or

see your local electronics store.

11. Failure to use a properly functioning surge

suppressor could result in damage to the con-

trol system of the treadmill. If the control sys-

tem is damaged, the walking belt may change

speed, accelerate, or stop unexpectedly,

which may result in a fall and serious injury.

12. Keep the power cord and the surge suppres-

sor away from heated surfaces.

13. Never move the walking belt while the power

is turned off. Do not operate the treadmill if

the power cord or plug is damaged, or if the

treadmill is not working properly. (See

TROUBLESHOOTING on page 25 if the tread-

mill is not working properly.)

14. Read, understand, and test the emergency

stop procedure before using the treadmill (see

HOW TO TURN ON THE POWER on page 12).

15. Never start the treadmill while you are stand-

ing on the walking belt. Always hold the

handrails while using the treadmill.

16. The treadmill is capable of high speeds.

Adjust the speed in small increments to avoid

sudden jumps in speed.

17. The pulse sensor is not a medical device.

Various factors, including the user's move-

ment, may affect the accuracy of heart rate

readings. The pulse sensor is intended only

as an exercise aid in determining heart rate

trends in general.

18. Never leave the treadmill unattended while it

is running. Always remove the key, unplug

the power cord, and move the reset/off circuit

breaker to the “off” position when the tread-

mill is not in use. (See the drawing on page 5

for the location of the circuit breaker.)

19. Do not attempt to raise, lower, or move the

treadmill until it is properly assembled. (See

ASSEMBLY on page 6, and HOW TO FOLD

AND MOVE THE TREADMILL on page 23.)

You must be able to safely lift 45 pounds (20

kg) to raise, lower, or move the treadmill.

20. When folding or moving the treadmill, make

sure that the storage latch is fully closed.

IMPORTANT PRECAUTIONS

3

Summary of Contents for Black 130 Xtb Treadmill

Page 1: ...al Number Decal QUESTIONS As a manufacturer we are commit ted to providing complete customer satisfaction If you have questions or if parts are missing PLEASE DO NOT CONTACT THE STORE please contact Customer Care IMPORTANT You must note the product model number and ser ial number see the drawing above before contacting us CALL TOLL FREE 1 877 992 5999 Mon Fri 6 a m 6 p m MT Sat 8 a m 4 p m MT ON T...

Page 2: ...5 ASSEMBLY 6 TREADMILL OPERATION 11 HOW TO FOLD AND MOVE THE TREADMILL 23 TROUBLESHOOTING 25 EXERCISE GUIDELINES 27 PART LIST 30 EXPLODED DRAWING 32 ORDERING REPLACEMENT PARTS Back Cover LIMITED WARRANTY Back Cover WEIDER is a registered trademark of ICON IP Inc ...

Page 3: ... see your local WEIDER dealer or call the toll free telephone number on the front cover of this manual and order part number 146148 or see your local electronics store 11 Failure to use a properly functioning surge suppressor could result in damage to the con trol system of the treadmill If the control sys tem is damaged the walking belt may change speed accelerate or stop unexpectedly which may r...

Page 4: ...intended for in home use only Do not use the treadmill in any commercial rental or institutional setting WARNING Before beginning this or any exercise program consult your physician This is especially important for persons over the age of 35 or persons with pre existing health problems Read all instructions before using ICON assumes no responsibility for personal injury or property damage sustaine...

Page 5: ...have questions after read ing this manual please see the front cover of this man ual To help us assist you note the product model number and serial number before contacting us The model number and the location of the serial number decal are shown on the front cover of this manual To avoid a registration fee for any service needed under warranty you must register the treadmill at www weiderservice ...

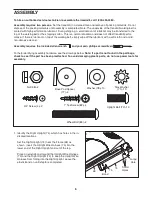
Page 6: ...equires the included allen wrench and your own phillips screwdriver For help identifying assembly hardware see the drawings below Note If a part is not found in the part bags check to see if the part has been preattached To avoid damaging plastic parts do not use power tools for assembly 1 Identify the Right Upright 74 which has holes in the in dicated locations Set the Right Upright 74 near the F...

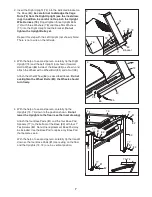
Page 7: ...o the position shown Do not lower the Uprights to the floor see the inset drawing Attach the four Base Pads 81 and the four Base Pad Spacers 77 to the bottom of the Base 83 with four 1 Tek Screws 82 Note One replacement Base Pad may be included Use the Base Pad to replace any Base Pad that becomes worn With the help of a second person carefully tip the treadill down so the four Base Pads 81 are re...

Page 8: ...position shown Press the end of the Shock onto the ball on the bracket See drawing 6a Insert the Shock Pin 102 into the two indicated small holes in the end of the Shock 88 Then rotate the Shock Pin until it clips onto the Shock Note Extra Shock Pins are included 102 50 88 Hole Hole 102 88 6 6a Bracket Cylinder Bracket 7 Remove the Shock Pin 102 from the lower end of the Shock 88 Next press the lo...

Page 9: ...on the console assembly into the Right Upright and the Left Upright 73 Be careful not to pinch the wires 74 Console Assembly Front of Bracket 73 Console Wire 75 9 While pressing down on the Handrails 99 attach the console assembly to the Uprights 73 74 with four Upright Bolts 72 four Washers 78 and four Star Washers 71 Start all four Upright Bolts before tight ening them Note The Left Accessory Tr...

Page 10: ...d small screws 3 Make sure that no wires are pinched Reattach the Access Door 70 with the Console Back Screw 67 The other wires included with the receiver may be discarded A 70 69 Small Cylinder 67 Wire Small Screws 12 Make sure that all parts are properly tightened before you use the treadmill Note Extra hardware may be included Keep the included allen wrench in a secure place the allen wrench is...

Page 11: ...down grounding provides a path of least resistance for electric current to reduce the risk of elec tric shock This product is equipped with a cord having an equipment grounding conductor and a grounding plug Plug the power cord into a surge suppressor and plug the surge suppressor into an appropriate outlet that is properly installed and grounded in accordance with all local codes and ordinances I...

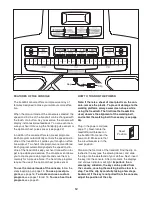
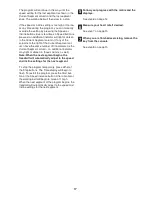
Page 12: ...he console follow the steps beginning on page 13 To use a preset pro gram see page 16 To create and use a custom program see pages 18 and 19 To use a heart rate program see page 20 HOW TO TURN ON THE POWER Note If there is a sheet of clear plastic on the con sole remove the plastic To prevent damage to the walking platform always wear clean shoes while using the treadmill The first time the treadm...

Page 13: ...l burn and a speed setting If desired adjust any of the val ues Note The last two values that you change will become your workout goals Press the Start button to start the walking belt A moment after the button is pressed the walking belt will begin to move Hold the handrails and begin walking As you exercise change the speed of the walking belt as desired by press ing the Speed increase and decre...

Page 14: ...were set this display will show the ap proximate number of calories you have burned If a goal was set the display will show the number of calories still to be burned during your workout Note When a preset program or a custom program is selected the display will show the number of calories still to be burned during the program The Pulse display The display will show your heart rate when you use the...

Page 15: ...will ap pear in the Pulse display and then your heart rate will be shown For the most accurate heart rate reading continue to hold the contacts for about 15 seconds When you are finished exercising remove the key from the console Step onto the foot rails press the Stop button and adjust the incline of the treadmill to the lowest setting The incline must be at the lowest setting or you may damage t...

Page 16: ...rt button to start the program A moment after the button is pressed the tread mill will automatically adjust to the first speed and incline settings of the program Hold the handrails and begin walking Each program is divided into several time seg ments of equal length One speed setting and one incline setting are programmed for each segment Note The same speed setting and or incline set ting may b...

Page 17: ...olumn an additional indicator may light or darken in those columns as well Note When the next segment begins the treadmill will automatically adjust to the speed and incline settings for the next segment To stop the program temporarily press either of the Stop buttons The Time display will begin to flash To restart the program press the Start but ton or the Speed increase button After a moment the...

Page 18: ...tting and an incline setting for the first segment simply adjust the speed and incline of the treadmill as de sired by pressing the Speed and Incline increase and decrease buttons Every few times a Speed button is pressed an additional indicator will light or darken in the Current Segment column When the first segment of the program ends a se ries of tones will sound and the current speed set ting...

Page 19: ...isplay and the Incline display will flash When the first segment ends all speed settings will move one column to the left The speed setting for the sec ond segment will then be shown in the flashing Current Segment column and the treadmill will au tomatically adjust to the second speed and incline settings that you programmed The program will continue in this way until the speed setting for the la...

Page 20: ...f the maxi mum target heart rate setting is changed the in tensity level of the entire program will change Press the Start button or the Speed increase button to start the program A moment after the button is pressed the tread mill will automatically adjust to the first speed and incline settings of the program Hold the handrails and begin walking The first heart rate program is divided into 40 on...

Page 21: ...s your heart rate to the target heart rate set ting the speed of the treadmill may automatically change to bring your heart rate closer to the target heart rate setting If your pulse is not detected during the program the letter P will flash in the Pulse display and the speed of the treadmill may automatically decrease If this occurs see the instructions in cluded with the optional chest pulse sen...

Page 22: ... for metric kilometers will appear in the Calories display Press the Speed in crease button to change the unit of measurement if de sired IMPORTANT The Pulse display should be blank If a d appears in the display the console is in the demo mode This mode is intended to be used only when a tread mill is displayed in a store When the console is in the demo mode the power cord can be plugged in the ke...

Page 23: ...il the catch is aligned with the latch pin Slowly release the latch knob Make sure that the latch pin is fully inserted into the catch To protect the floor or carpet from damage place a mat under the treadmill Keep the treadmill out of direct sunlight Do not leave the treadmill in the stor age position in temperatures above 85 Fahrenheit HOW TO MOVE THE TREADMILL Before moving the treadmill conver...

Page 24: ...t hand pull the latch knob to the left and hold it Pivot the treadmill down until the frame is past the latch pin Slowly release the latch knob 2 Hold the frame firmly with both hands and lower it to the floor To decrease the possibility of injury bend your legs and keep your back straight Latch Knob Latch Pin Open Catch ...

Page 25: ... as shown the circuit breaker has tripped To reset the circuit breaker wait for five minutes and then press the switch back in PROBLEM The power turns off during use SOLUTION a Check the reset off circuit breaker see drawing c above If the circuit breaker has tripped wait for five minutes and then press the switch back in b Make sure that the power cord is plugged in If the power cord is plugged i...

Page 26: ...the key and run the treadmill for a few minutes Repeat until the walking belt is properly tightened c If the walking belt still slows when walked on please see the front cover of this manual PROBLEM The walking belt is off center or slips when walked on SOLUTION a If the walking belt is off center first remove the key and UNPLUG THE POWER CORD If the walking belt has shifted to the left use the al...

Page 27: ...amounts of oxygen for prolonged periods of time This increases the demand on the heart to pump blood to the muscles and on the lungs to oxygenate the blood For aerobic exercise adjust the speed or incline of the treadmill until your heart rate is near the highest number in your training zone WORKOUT GUIDELINES Each workout should include the following three parts A Warm up Start each workout with ...

Page 28: ...lles Stretch With one leg in front of the other reach forward and place your hands against a wall Keep your back leg straight and your back foot flat on the floor Bend your front leg lean forward and move your hips toward the wall Hold for 15 counts then relax Repeat 3 times for each leg To cause further stretching of the achilles ten dons bend your back leg as well Stretches Calves achilles ten d...

Page 29: ...29 NOTES ...
Page 30: ... 1 Lift Motor 40 1 Lift Motor Bolt Top 41 2 Lift Motor Spacer 42 2 15 1 2 Wire Tie 43 1 Power Cord 44 1 Hood 45 4 Hood Clip 46 2 Grommet 47 1 Walking Belt 48 1 Frame 49 10 Belly Pan Clip 50 1 Belly Pan 51 1 Right Rear Foot 52 4 Rear Wheel 53 2 Rear Wheel Bolt 54 1 Right Rear Endcap 55 2 Rear Roller Lock Washer 56 2 Rear Roller Adj Bolt 57 1 Allen Wrench 58 1 Left Rear Foot 59 1 Left Rear Endcap 60...

Page 31: ...ire 107 1 Incline Stop Bracket 108 1 Stop Bracket Spacer 109 1 Power Cord Grommet 110 1 Power Cord Bracket 111 1 Key Plate 112 4 Electronic Bracket Star Washer 113 1 Lift Motor Bolt Bottom 114 1 Pulse Wire Harness 115 8 8 x 3 4 Screw 116 1 Power Cord Nut 117 2 Key Plate Screw 118 1 Console Ground Wire 1 8 Blue Wire 2 F 1 Userʼs Manual These parts are not illustrated Specifications are subject to c...

Page 32: ...101 62 60 55 56 58 4 6 47 62 10 57 7 8 7 39 38 40 49 49 54 115 59 12 15 16 19 18 50 51 38 53 4 4 17 32 35 41 33 33 43 4 36 13 37 18 17 19 16 15 4 4 4 2 3 2 1 67 4 11 53 38 52 52 113 38 34 4 4 4 4 67 46 13 4 4 4 30 30 25 9 8 45 45 3 49 49 49 49 61 61 55 56 48 103 106 107 108 105 109 110 112 112 115 116 ...

Page 33: ... 85 66 87 87 115 92 91 93 71 78 75 63 64 70 67 86 85 38 71 79 80 72 71 79 80 72 71 13 84 98 97 98 95 96 95 95 95 96 104 76 76 76 76 76 76 46 75 71 78 87 78 78 78 38 38 72 71 78 102 77 82 81 77 82 81 77 82 81 77 90 84 118 111 117 114 114 115 42 EXPLODED DRAWING Model No WBTL13608 0 R0908A ...

Page 34: ...nder warranty the customer will be responsible for a minimal handling charge For in home service the customer will be responsible for a minimal trip charge This warranty does not extend to any damage to a product caused by or attributable to freight damage abuse misuse improper or abnormal usage or repairs not provided by an ICON authorized service cen ter products used for commercial or rental pu...

Reviews: