

5
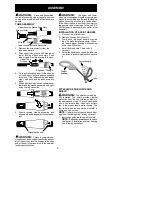
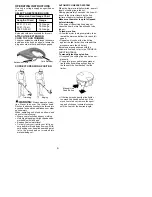
2. Insert the shield onto the motor housing.
Ensure the cutting head remains free to
rotate and the line is not caught between
the shield and the motor housing (see
following illustration).
3. Twist the shield as illustrated until the hole
in the shield aligns with the hole in the
housings. Make sure the shield
4. Install bolt into shield and motor hous-
ing as shown. Tighten securely.
is assembled to the unit as shown in the
following illustration and in the KNOW
YOUR UNIT section of this manual.
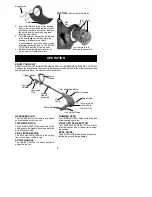
OPERATION
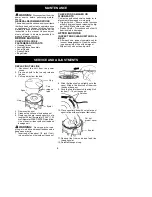
KNOW YOUR UNIT
READ THIS INSTRUCTION MANUAL AND SAFETY RULES BEFORE OPERATING YOUR UNIT.
Compare the illustrations with your unit to familiarize yourself with the location of the various controls
and adjustments. Save this manual for future reference.
Line Limiter Blade
Trimmer Head
with 0.065 in.
Trimmer Line
RECESSED PLUG
The RECESSED PLUG is where you attach
your extension cord to the unit.
TRIGGER SWITCH
The TRIGGER SWITCH is used to turn on the
unit. Squeeze the trigger switch to operate the
unit. Release to stop.
LINE LIMITER BLADE
The LINE LIMITER BLADE cuts the cutting
line to the proper cutting length.
ASSIST HANDLE
The ASSIST HANDLE is used to help hold
and guide the unit.
TRIMMER HEAD
The TRIMMER HEAD holds cutting line and
rotates during operation.
TWIST AND EDGE BUTTON
The TWIST AND EDGE BUTTON is used to
twist the lower portion of the unit into an edg-
ing position.
EDGE GUIDE
The EDGE GUIDE protects the unit from con-
tacting the ground during edging.
CAUTION:
Sharp line limiter blade
Holes
Bolt
Cord
Retainer
Recessed
Plug
Trigger Switch
Assist
Handle
Locking
Sleeve
Assembly
Air
Vents
Twist and Edge Button
Debris Shield
Edge Guide
Motor Housing
Twist shield in this
direction to assemble
Edge Guide
Shield


