background image

14

Op

er

at

ion

A

C

B

D

E

Using the WEBER CONNECT Module

Model: WC2 CONTROLLER

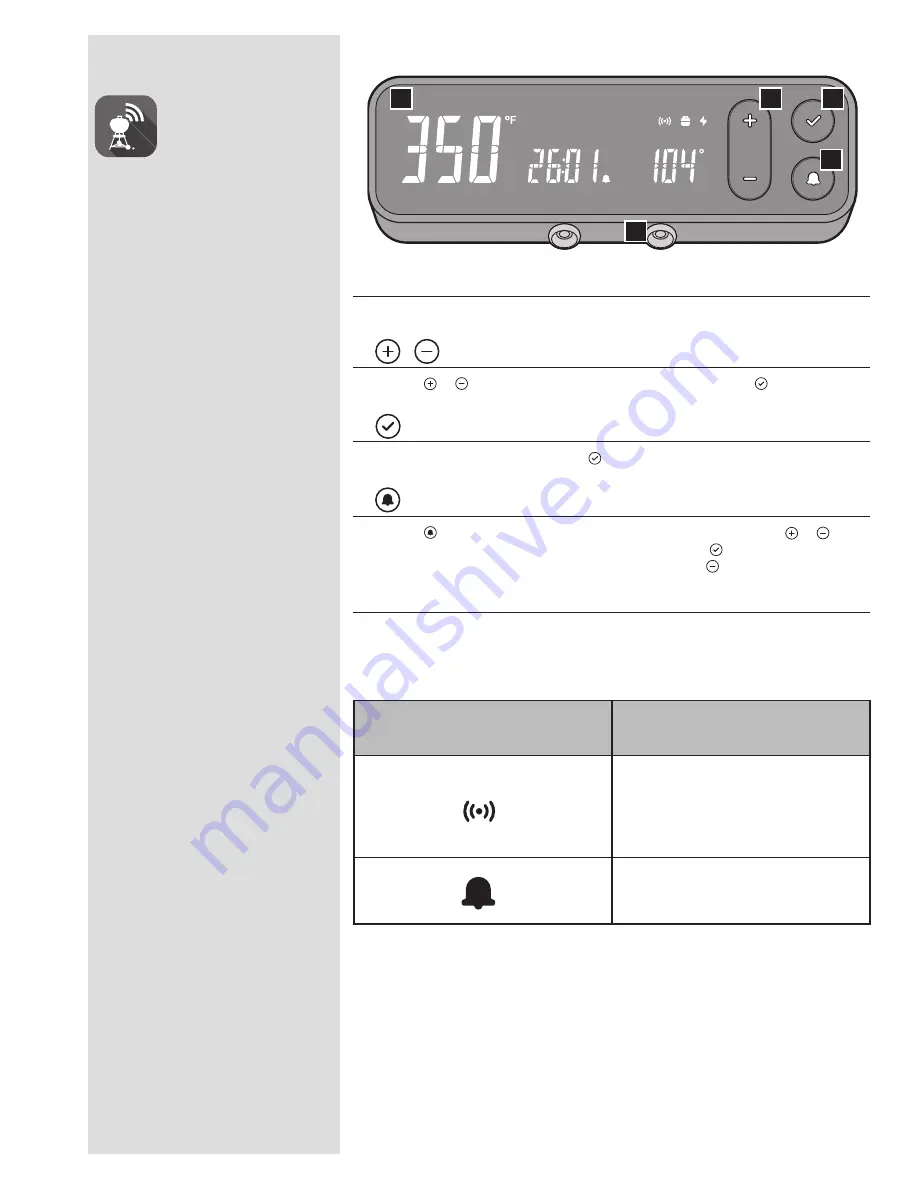
A   Dashboard

The LED display dashboard on your module is where you can visually check temperatures, receive 
notifications, view connectivity status, and check the status of your cook.

B        

Push the 

 or 

 buttons to increase or decrease target temperatures. Push the 

 button to confirm 

your selection. 

C         Confirm Selection / Turn Display Off 

After selecting a target temperature, push the 

 button confirm the selection.  


Hold the same button for three seconds to turn off the display.

D         Target Temperature Alert 

Push the 

 button to set an alert for the grill and/or meat probe temperatures. Push the 

 or 


buttons to increase or decrease the desired target temperature. Push the 

 button to confirm the target 

temperature alert. To clear alert, select desired input and press/hold the 

 button until dash marks appear.

E   Food Temperature Probes

Your new WEBER CONNECT module can handle up to two separate food temperature probes (one probe 
included) to gain superior control of your grill for perfect results every time. 

NOTE: Download the WEBER CONNECT app to get the latest grill software and features.

WEBER CONNECT App

First things first.

Download the WEBER CONNECT app.

Open the app to receive:

• 

Flip and Serve Notifications

• 

Food Readiness Countdowns

• 

Custom Food Doneness Alerts

• 

Step-by-step Grilling Assistance

Connecting Your Grill To Bluetooth® or 

Wi-Fi Network

To connect your WEBER grill via Bluetooth® or 
your local Wi-Fi network, follow these steps:

NOTE: WEBER recommends that your smart 
device be running the latest version of its 
operating system before attempting to connect 
your grill to Bluetooth® or your Wi-Fi network.

1)  Push any button located on the temperature 

controller to turn ON the WEBER CONNECT 
module.

2)  Verify that your smart device is connected to 

Bluetooth®

 or 

your local Wi-Fi network.

3)  From your smart device, download the new 

WEBER CONNECT app from the App Store on 
Apple devices, or the Play Store on Android 
devices.

4)  Open the WEBER CONNECT app and follow 

the in-app instructions for connecting to your 
WEBER grill.

NOTE: In order to successfully connect your 
smart device to your grill via a local Wi-Fi 
network, first make sure your grill is paired via 
Bluetooth® and that your grill is within range of 
your Wi-Fi router. If your attempts to connect 
have been unsuccessful, try moving the grill 
within range of the Wi-Fi router or adding a 
signal extender for a stronger signal. 

Integrated WEBER CONNECT 

Technology

Notifications

A green wireless symbol is shown on the WEBER 

CONNECT module display when connected to the 

WEBER CONNECT app via your local Wi-fi network.

A blue wireless symbol is shown on the WEBER 

CONNECT module display when connected to the 

WEBER CONNECT app via Bluetooth®.

A bell alert icon will display when a target temperature 

is set.

Summary of Contents for Genesis SMART EX-325s

Page 1: ...have any questions please contact us today NG Owner s Manual 52998 101021 enUS REGISTER TODAY Register your gas grill and receive special content to make you the ultimate backyard hero Scan the QR Co...

Page 2: ...AS GRILL BE PERFORMED BY A PROFESSIONAL Confirm that the branch supply line from the house to the grill is properly installed before using the grill In the United States installation must conform with...

Page 3: ...ime to flip food to a countdown that displays when it s ready APP ENABLED FOOD THERMOMETERS INSTANT FOOD STATUS READOUT View food temperature doneness without lifting the lid The food probes monitor d...

Page 4: ...its option to replace the grill in question with a new grill of equal or greater value WEBER may ask you to return parts for inspection shipping charges to be pre paid This WARRANTY lapses if there a...

Page 5: ...and accessories HIGH PERFORMANCE GRILLING 4 Grease Management System Drippings that are not vaporized by the FLAVORIZER BARS are funneled away from the burners into the disposable drip tray located w...

Page 6: ...l is equipped with a model specific hose that was attached during the manufacturing process This specific hose must be used for proper performance If the hose becomes worn or damaged contact the Custo...

Page 7: ...isconnect is properly engaged 1 Check that all burner control knobs are in the off position Check by pushing in and turning knobs clockwise A 2 Slide the collar of the quick disconnect back B 3 Push m...

Page 8: ...roughly checked for gas leaks and the burners have been flame tested WEBER recommends performing a thorough leak check after assembly as well as annually The following fittings should be tested Where...

Page 9: ...ERATE THE GRILL If a leak is present contact the Customer Service Representative in your area using the contact information on our website 4 If bubbles do not appear leak checking is complete Turn gas...

Page 10: ...e the grill 3 Plug the short power cord into the port beneath the side table then to the extension cord D before plugging it into a grounded electrical outlet 4 Turn on the main power switch E Preheat...

Page 11: ...e in the off position Check by pushing in and turning knobs clockwise B 3 Turn the gas supply valve on C 4 Begin with the burner furthest to the left Push the burner control knob in and turn it counte...

Page 12: ...eheating leave the sear burner control knob and the adjacent burner control knobs in the start high position A The sear burner works in tandem with adjacent burners B The remaining burner s can be tur...

Page 13: ...ver direct heat With indirect heat the heat is on both sides of the grill or off to one side of the grill The food sits over the unlit part on the cooking grate The Flame Direct or Indirect DIRECT HEA...

Page 14: ...ess Alerts Step by step Grilling Assistance Connecting Your Grill To Bluetooth or Wi Fi Network To connect your WEBER grill via Bluetooth or your local Wi Fi network follow these steps NOTE WEBER reco...

Page 15: ...ture probes 1 Once the grill has been preheated open the grill lid and clean the cooking grates using a grill brush or scraper then set the control knobs to the desired grill temperature 2 Place your...

Page 16: ...to operate Try not to peek The lid on your grill is for more than just keeping the rain out Most importantly it s for preventing too much air from getting in and too much heat and smoke from getting o...

Page 17: ...m the cookbox C Hang the grate vertically on the back edge of the cookbox Use heat resistant mitts or gloves when adjusting rack A B C Extra on the Side Storage Hooks Use the double sided hooks on the...

Page 18: ...onto your food if you do not clean the lid regularly 1 Brush the carbonized grease from the inside of the lid with a stainless steel bristle grill brush A To minimize further build up the inside of th...

Page 19: ...tes Pastes do not clean or polish They will change the color of the metal by removing the top chromium oxide film coating Cleaning Painted Porcelain Enameled Surfaces and Plastic Components Clean pain...

Page 20: ...a Match to Determine if there is Gas Flow to the Main Burners 1 Open the grill lid 2 Check that all burner control knobs including side burner control knob are in the off position Check by pushing in...

Page 21: ...ns to prevent spiders and other insects from spinning webs and building nests inside the burners Additionally dust and debris can accumulate on the outside of the spider insect screen and obstruct the...

Page 22: ...be checked 1 Check that the ignition wires are connected securely to the terminals on the ignition button under the control panel 2 Make sure the ignition wires are properly attached to the ignition...

Page 23: ...aining connectivity or pairing with a smart device CAUSE SOLUTION Bluetooth is a short range signal only When the WEBER CONNECT module is on it is ready to pair Make sure that Bluetooth on the smart d...

Page 24: ...se is 1 6A 250V 5x20mm Fast blow 1 Make sure that the grill is completely cool then power off and unplug the grill from the power source A 2 The fuse is installed inside the fuse holder located on the...

Page 25: ...board Connect the cable to the USB C port on the control board B 3 Confirm the power bank is on 4 Place the power bank on the small shelf beneath the side table C Refer to the manufacturer s operating...

Page 26: ...d 10 to 12 pounds 4 54 5 44 kg 2 to 2 hours indirect medium heat SEAFOOD Fish Fillet or Steak halibut red snapper salmon sea bass swordfish and tuna to inch 6 35 12 7 mm thick 3 to 5 minutes direct me...

Page 27: ...IS EX 325s SX 325s weber com 5 9 10 11 12 13 14 15 16 21 23 22 17 26 6 7 3 2 1 4 24 25 8 18 20 19 GENESIS EX SX 325s NG US 063021 34 37 38 39 35 36 27 28 32 33 48 47 52 49 53 54 57 58 56 55 50 51 40 4...

Page 28: ...Inc registered in the U S and other countries App Store is a service mark of Apple Inc Android is a trademark of Google LLC Google Play and the Google Play logo are trademarks of Google LLC The Blueto...

Reviews: