background image

32

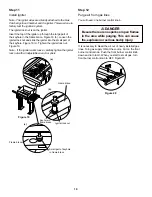
Figure 15

White wire

Black wire

Crossover Ignition System Operations

If the Crossover Ignition System fails to ignite the Front
burner, light the Front burner with a match. If the Front
burner lights with a match, then check the Crossover
Ignition System.

Check that both the white and black ignition wires are
attached properly. Figure 15.

Check that the Crossover Ignition button pushes the
igniter (button) down, and returns to the up position.

Check to see if the igniter is loose in the frame.
Tighten if necessary; see Step “Install igniter” for
correct procedure.

If the Crossover Ignition System still fails to light, See
Section "Manual Lighting", and contact Weber-Stephen
Customer Service.

Summary of Contents for Genesis 1500 NG

Page 1: ...left with the owner and the owner should keep them for future use WARNING Follow all leak check procedures carefully in this manual prior to barbecue operation Do this even if barbecue was dealer asse...

Page 2: ...minutes before attempting to relight using the lighting instructions Do not use charcoal or lava rock in your Weber Gas Barbecue Never lean over open grill or place hands or fingers on the front edge...

Page 3: ...er installation or improper maintenance or service or failure to perform normal and routine maintenance including but not limited to damage caused by insects within the burner tubes as set out in this...

Page 4: ...ademarks of Weber Stephen Products Co 200 East Daniels Road Palatine IL 60067 6266 U S A Genesis Gas Barbecues are covered under the following patent nos U S A 4 677 964 4 727 853 4 777 927 4 829 978...

Page 5: ...heat c Rapid read thermometer for precision cooking measures grill temperature and can be removed and inserted into the food d Heavy gauge steel Flavorizer Bars distribute heat within the grill Flavo...

Page 6: ...must be turned OFF at the natural gas supply when the Weber Gas Barbecue is not in use Operating area WARNING Only use this barbecue outdoors in a well ventilated area Do not use in a garage building...

Page 7: ...otected with an approved coating insulated from hose piping and cathodically protected It is recommended that copper tubing be corrosion protected with a satisfactory material such as TC Mastic All bu...

Page 8: ...a professional CAUTION Combustible materials should never be within 24 inches of the top bottom back or sides of the barbecue Do not locate under overhead combustible construction View from behind bar...

Page 9: ...728 20 4 40 Figure 4 If you use a concrete bag mix use the mix for maximum strength An average 80 pound bag of concrete mix will make approximately 2 3 of a cubic foot of concrete Note Follow the conc...

Page 10: ...s long On a small screw for example 6 32 x 1 2 inch screw means a number 6 screw with 32 threads to the inch 1 2 inch long Step 1 Check package contents Cooking box assembly Lid assembly Bottom tray C...

Page 11: ...2 Catch pan holder Catch Pan Drip pans 2 Thermometer Condiment basket Left frame Right frame Side frame 2 Accessory rack Warm Up Basket Warming Rack Five long Flavorizer Bars Eight short Flavorizer B...

Page 12: ...fold bracket Two hinge pins hardware size 1 4 x 1 1 2 inch clevis pin actual size One 1 4 20 x 2 inch bolts actual size Six 1 4 20 x 1 2 inch bolts actual size One 1 4 20 keps nut Seven nylon washers...

Page 13: ...rt a bolt and there are no holes you have the left frame turned the wrong way Turn the left frame around Figure 1 b Step 3 Continue frame assembly You will need frame assembly two side frames four 1 4...

Page 14: ...legs as necessary so that the measurement is 26 1 2 Place the base panel in between the legs to insure fit Figure 4 Once the fit is established remove the base panel and mark the holes CAUTION A minim...

Page 15: ...drilling the hole for the screw base The machine screw anchor requires a setting tool Typical installation of the base for an existing concrete patio new pad or wood deck continued Method 1 Concrete...

Page 16: ...mbustible materials should never be within 24 inches of the top bottom back or sides of the barbecue Do not locate under overhead combustible construction CAUTION For a deck installation it is recomme...

Page 17: ...7 16 inch wrench Set the cooking box in the frame so the burner tubes are under the frame brace Figure 13 Note Be careful when sliding the burner tubes through the side frame Your Weber Gas Barbecue b...

Page 18: ...barbecue gas supply line to the flare fitting end of the 3 8 inch flare fitting Tighten with a 3 4 inch wrench Figure 16 a Attach the flare nut at the other end of the barbecue gas supply line to the...

Page 19: ...de the igniter into the small part of the keyhole Figure 19 c Tighten the igniter lock nut Figure 19 Note If the igniter works loose carefully tighten the igniter lock nut with an adjustable wrench or...

Page 20: ...m leak checks Turn ON gas supply at the source Figure 21 WARNING Do not ignite burners while leak checking Check for leaks by wetting the connections with the soap and water solution and watching for...

Page 21: ...3 Step 15 Install side panels You will need two side panels and eight plastic buttons From the inside of the frame assembly set the left side panel in place between the side frame legs Notice that the...

Page 22: ...ng grates onto the ledges in the cooking box Figure 26 Step 17 Install the bottom tray You will need bottom tray catch pan holder catch pan and one drip pan Hook the ends of the catch pan holder into...

Page 23: ...u will need three tool holders control panel two Phillips screws washers a Phillips screwdriver and three burner control knobs Hook the tool holders over the frame rail and snap down into place Figure...

Page 24: ...me tube Push the bracket into the frame Figure 32 b Check to see that the lower tab of the bracket is hooked in the slot in the frame Figure 32 c To fully seat the bracket you may have to tap it light...

Page 25: ...n the right end of the lid and the other end into the slot in the left end of the lid Figure 34 a Set the warming rack into the slots at the rear of the cooking box Figure 34 b Set the work table onto...

Page 26: ...h 7 After the FRONT burner is lit you can turn on the other burners Note Always light the FRONT burner first The other burners ignite from the FRONT burner To Extinguish Turn gas supply OFF at the sou...

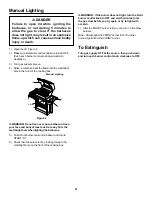
Page 27: ...e or not waiting 5 minutes to allow the gas to clear if the barbecue does not light may result in an explosive flame up which can cause serious bodily injury or death 1 Open the lid Figure 2 2 Make su...

Page 28: ...becue OFF and wait for it to cool before cleaning CAUTION Do not clean your Flavorizer Bars or cooking grates in a self cleaning oven Replacement cooking grates and Flavorizer Bars are available throu...

Page 29: ...Do not ignite burners while leak checking Check for leaks by wetting the connections with the soap and water solution and watching for bubbles If bubbles form or if a bubble grows there is a leak Not...

Page 30: ...ames appearing yellow and lazy 2 Barbecue does not reach temperature 3 Barbecue heats unevenly 4 One or more of the burners do not ignite DANGER Failure to correct these symptoms may result in a fire...

Page 31: ...the corners of the cooking box Figure 11 h Lift and twist the burner assembly slightly to separate the crossover tube from the burners Figure 12 Remove the burners from the cooking box i To reinstall...

Page 32: ...ition System Check that both the white and black ignition wires are attached properly Figure 15 Check that the Crossover Ignition button pushes the igniter button down and returns to the up position C...

Page 33: ...Flavorizer Bars heavily coated with burned on grease Is the bottom tray dirty and not allowing grease to flow into catch pan Are burners clean The lid is porcelain on steel not paint It cannot peel Wh...

Page 34: ...34 1 2 3 6 7 8 10 9 19 20 13 14 15 43 47 51 9 48 41 39 38 37 36 35 33 32 31 30 29 28 27 42 40 21 25 26 34 11 12 16 17 18 5 4 23 16 24 22 50 49...

Page 35: ...ut 45 Gas catcher ignition chamber 46 Igniter wire black 47 Igniter wire white 48 Right frame 49 Gas supply line 50 Flare fitting 51 Control panel inserts 2 WARNING Use only Weber factory authorized p...

Page 36: ...le Customer Service staff is prepared to help you with any problems with parts or assembly Call our toll free number 1 800 446 1071 For quicker service please have your owner s manual available for re...

Reviews: