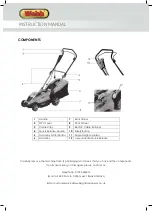
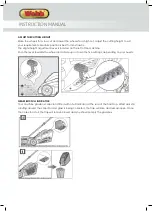
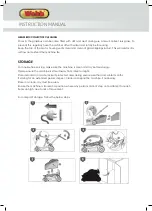
Webb 1938123001 Operators Manual & Parts Lists Download Page 8

 
GENERAL MOWING TIPS 

§


When cutting long grass, reduce walking speed to allow for more effective cutting and a proper 
discharge of the clippings. It is recommended that you cut longer grass in stages. Start at a higher 
cutting height and go over the same area a second time with a lower cutting height. 

§


Do not cut wet grass; it will stick to the underside of the deck and prevent proper collection or 
discharge of grass clippings. 

§


New or thick grass may require a higher cutting height. 

§


Empty the grass box regularly, the discharge chute will become blocked with grass cuttings. 

§


The mower is designed to operate and cut most effectively when moving forwards. 
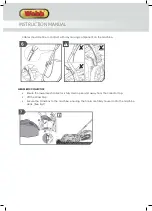
OVERLOAD PROTECTION 

§


The product has an overload protection device. When overloading is detected, the product will 
automatically switch off. If the overload protector is actuated, the motor must be allowed to cool 
down for 5 to 10 minutes. 

§


Turn off the power and remove the plug from the supply. The blades are sharp, wear heavy duty 
gloves before touching. Make sure the blade can rotate freely and is not jammed or tight. 

§


When the motor is cool, connect the plug to the power supply, turn the power on. Press the Safety 
Button & then the Trigger to start the product. If the product will still not start, return it to an 
authorised service centre for repair. 

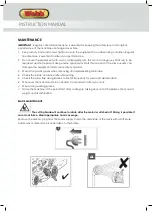
MAINTENANCE AND STORAGE 

§


Keep all nuts, bolts and screws tight to be sure the equipment is in safe working condition. 

§


Replace worn or damaged parts for safety. 

§


Keep the machine free of grass, leaves, or other debris build-up.   

§


Allow the machine to cool before storing. 

§


Grass catcher components are subject to wear, damage, & deterioration, which could expose 
moving parts or allow objects to be thrown. Frequently check & replace them with the 
manufacturer’s recommended parts, when necessary. 

§


Mower blades are sharp and can be dangerous. Wrap the blade(s) or wear gloves, and use extra 
caution when servicing them. 


§


Make sure the power cable is positioned so that it cannot be damaged by the cutting means and 
will not be stepped on, tripped over or otherwise subjected to damage or stress. 

§


Never pick up or carry the product by the electric cable. 

§


Never pull by the power cord to disconnect from the power supply. 

§


Keep the power cord away from heat, oil and sharp edges. 

§


Make sure voltage is correct for your product. A nameplate on the product indicates the product’s 
voltage. Never connect the product to an AC voltage that differs from this voltage. 

§


Always ensure the cord from the handlebar to the mower body is never trapped, pinched or 
otherwise damaged during assembly or handle folding. Never apply power to the mower if this 
cable is damaged. Return to authorised service centre for professional repair. 
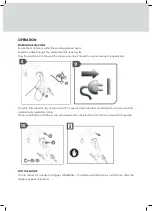
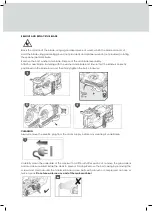
OPERATION 

§


Only operate the mower in daylight or in good artificial light. 

§


Avoid operating the equipment in wet grass. 

§


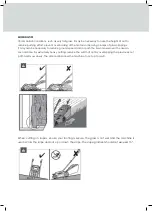
Always be sure of your footing on slopes. Exercise extreme caution when changing direction on 
slopes. Do not mow excessively steep slopes, which exceed 15°. For wheeled rotary machines, 
mow across the face of slopes, never up and down. 

§


Never run while using the mower, always walk. 

§


Do not pull the mower backwards unless absolutely necessary. Use extreme caution when 
reversing or pulling the lawnmower towards you. 

§


Stop the blade(s) if the lawnmower has to be tilted for transportation when crossing surfaces 
other than grass (such as gravel drives, walks, or roads) & when transporting the lawnmower to & 
from the area to be mowed. Never pick up or carry a lawnmower while the electric motor is 
running. 

§


Never operate the lawnmower with defective guards, or without safety devices, for example 
deflectors and/or grass catchers, in place. 

§


Do not put hands or feet near or under rotating parts. Keep clear of the discharge opening at all 
times. 

Stop the motor and disconnect the electrical plug from the power source: 

ü


before clearing blockages or unclogging the chute; 

ü


before checking, cleaning or working on the lawnmower; 

ü


after striking a foreign object inspect the lawnmower for damage and make repairs before 
restarting and operating the lawnmower, 

ü


if lawnmower starts to vibrate abnormally (check immediately). 

§


Shut the motor off and wait until the motor and the blade come to a complete stop before 
removing the grass catcher. 

§


Watch for holes, ruts, or bumps. Tall grass can hide obstacles. 

§


Do not mow near drop-offs, ditches or embankments. The operator could lose footing or 
balance. 

§


Be alert and turn the machine off if children enter the area. 

§


Never tamper with safety devices. Check their proper operation regularly. 

§


Never attempt to make wheel height adjustments while the motor is running. 


INSTRUCTION MANUAL

Summary of Contents for 1938123001

Page 1: ...tand this manual paying particular attention to the safety instructions before use Operator s Manual Parts List 1938124001 01 Nov 2016 1800W Electric 40cm Lawnmower WEER40 1938123001 1600W Electric 36cm Lawnmower WEER36 ...

Page 2: ......

Page 3: ...4001 Motor Rated Power 1600W 1800W Motor Rated Voltage 230 240V 50Hz 230 240V 50Hz No Load Speed 3700rpm 3700rpm Cutting Width 36cm 40cm Height of Cut 20 70mm 20 70mm Height Adjustments 5 5 Grassbox Capacity 45L 50L Sound Pressure Level 80 6dB A 84dB A Guaranteed Sound Power Level 96dB A 96dB A Vibration 1 47m s2 2 5m s2 Insulation Double Insulated IPX4 Double Insulated IPX4 Weight N W 11 5kg G W ...

Page 4: ...ll Indicator 11 Single Height Adjuster 6 Grassbox 12 Lower Handle Quick Release Carefully remove the machine from its packaging and check that you have all the components If parts are missing or damaged please contact us Telephone 01793 333212 Mon to Fri 8 00am to 5 30pm excl Bank Holidays Email customerservice webbgardenpower co uk INSTRUCTION MANUAL ...

Page 5: ...AWN AREAS but not in public facilities parks or sports grounds and not for agricultural or forestry use Compliance with the operating manual supplied by the manufacturer is a prerequisite for the proper usage of the lawn mower The operating manual contains servicing and maintenance instructions as well as directions for use IMPORTANT The lawn mower must not be used to trim bushes hedges and shrubs...

Page 6: ...te after the motor is switched off Keep the supply flexible cord away from the cutting blades Remove all objects that could be thrown by the blade in the working area Wear Ear Eye Protection Before working or undertaking any servicing or cleaning of the machine ensure the electrical cable is removed from the power source Be careful when using on slopes Do not operate on inclines greater than 15 It...

Page 7: ...rting Always check that the switch is in Off position before plugging in the product to the power supply Do not carry a plugged in product with your finger on the switch Avoid body contact with earthed or grounded surfaces such as pipes radiators ranges and refrigerators There is an increased risk of electric shock if your body is earthed or grounded Do not expose the product to rain or wet condit...

Page 8: ...treme caution when reversing or pulling the lawnmower towards you Stop the blade s if the lawnmower has to be tilted for transportation when crossing surfaces other than grass such as gravel drives walks or roads when transporting the lawnmower to from the area to be mowed Never pick up or carry a lawnmower while the electric motor is running Never operate the lawnmower with defective guards or wi...

Page 9: ...llowed to cool down for 5 to 10 minutes Turn off the power and remove the plug from the supply The blades are sharp wear heavy duty gloves before touching Make sure the blade can rotate freely and is not jammed or tight When the motor is cool connect the plug to the power supply turn the power on Press the Safety Button then the Trigger to start the product If the product will still not start retu...

Page 10: ...the lawn mower out of the carton and check thoroughly for additional loose parts Please ensure that you have all the below necessary parts before commencing with the assembly In the unlikely event that you are missing a component please do contact us on 01793 333212 option 2 or email customerservice handydistribution co uk for assistance x1 x1 x1 x2 INSTRUCTION MANUAL ...

Page 11: ...y With the handles in line with the Lower Quick Release Handle secure by folding the Quick Release Handle upwards to secure Repeat on both sides See fig 3 Secure the Upper Lower Handle See fig 4 5 Select the required height for the user and secure ensure the handle assembly is straight and in line with each other Secure the Electric Cable to the handle assembly using the Cable Clips provided See f...

Page 12: ...n the machine GRASSBOX COLLECTOR Ensure the lower mesh collector is fully clear open and away from the collector top Lift the Grass Flap Secure the Grassbox to the machine ensuring the hooks are firmly housed onto the machine deck See fig 7 4 INSTRUCTION MANUAL ...

Page 13: ...ets the recommended requirements Press the Safety Button A and pull the OPC Lever B towards the main handle The mower will start and blade immediately rotate When operating the machine you can release the Safety Button and the machine will still operate STOP THE MOTOR To stop the motor release the Trigger WARNING The blade will still rotate for a small time after the trigger has been released ...

Page 14: ...the machine Push the lever towards the wheel and rotate up or down the five settings depending on your needs GRASSBOX FULL INDICATOR Your machine grassbox collector is fitted with a full indicator at the rear of the hard top Whilst air is still rotating around the collector and grass is being collected the flap will raise and remain open Once the collector is full the flap will remain closed and y...

Page 15: ...ssary to reduce ground speed and or push the lawn mower over the area a second time For extremely heavy cutting reduce the width of cut by overlapping the previously cut path and mow slowly The side combs allow the machine to cut up to walls When cutting on slopes ensure your footing is secure the grass is not wet and the machine is used across the slope and not up or down the slope The slope grad...

Page 16: ...strong work gloves when removing and reassembling the blade 4 Check the blade s balance after sharpening 5 Check the grass flap and grassbox collector frequently for wear and deterioration 6 Whenever the machine is to be handled transported or tilted you must ü Wear strong working gloves ü Grasp the machine at the points that offer a safe grip taking account of the blades the mower s weight and it...

Page 17: ...e bolt Ensure that the blade is correctly positioned on the blade boss and then firmly tighten the bolt clockwise CLEANING Always remove the electric plug from the mains supply before any cleaning is undertaken Carefully clean the underside of the deck with a stiff brush after each cut remove the grass debris and mud accumulated inside the deck to prevent it drying Remove the belt casing by removi...

Page 18: ...TORAGE For trouble free service make sure the machine is clean and dry before storing Please ensure the machine is stored away from direct sunlight Store indoors or in a safe locked protected area during severe weather and winter months If storing for an extended period inspect clean and repair the machine if necessary Store in a clean dry dust free area Ensure the machine is stored in a position ...

Page 19: ...t rotate freely 4 Correct the cutting height Reduced Motor Power 1 Correct the cutting height 2 Clean the discharge chute housing 3 Have the blade re sharpened or replaced by an authorised service dealer The grass collector does not fill completely 1 Correct the cutting height 2 Allow the lawn to dry 3 Have the blade re sharpened or replaced by an authorised service dealer 4 Clean the grille on th...

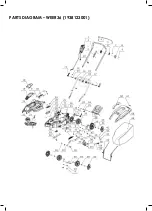
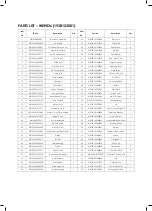
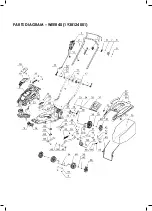
Page 20: ...PARTS DIAGRAM WEER36 1938123001 ...

Page 21: ... St4 2 12 Screw 4 17 WE125 103020129 Lower Handle 1 52 WE125 103060289 1 Tension Spring 1 18 WE124 301070910 Motor Cover 1 53 WE125 103990750 Pin 1 19 WE124 301070911 Air Window Cover 1 54 WE125 103990798 Front Connecting Rod 1 20 WE124 301070396F Motor Cover Carry Handle 1 55 WE125 301062854 Adjusting Bracket 1 21 WE125 301070920 Upper Deck 1 56 WE125 301062853 Long Pin Shaft 1 22 WE125 4070213 M...

Page 22: ...PARTS DIAGRAM WEER40 1938124001 ...

Page 23: ... 1 17 WE126 103020127 Lower Handle 1 54 WE125 103990798 Front Connecting Rod 1 18 WE124 301070910 Motor Cover 1 55 WE126 301070796 Adjusting Aracket 1 19 WE124 301070911 Air Window Cover 1 56 WE125 301062853 Long Pin Shaft 1 20 WE124 301070396f Motor Cover Carry Handle 1 57 WE126 103050254 Adjusting Bracket Shaft 1 21 WE126 301070900 Upper Deck 1 58 WE125 103060285 Height Adjuster Spring 1 22 WE12...

Page 24: ...NOTES INSTRUCTION MANUAL ...

Page 25: ...NOTES ...

Page 26: ...followed was in accordance with EN 60335 1 2012 A11 2014 EN 60335 2 77 2010 EN 62233 2008 Measured Sound Pressure Level LPA 80 6dB A Measured Sound Power Level LWA 96dB A Vibration Level 3 47 m s Notified Body Intertek Testing Services Shanghai Addresses Building No 86 1198 Qinzhou Road North Caohejing Development Zone Shanghai 200233 P R C Authorised signatory and technical file holder Date 31 10...

Page 27: ...e followed was in accordance with EN 60335 1 2012 A11 2014 EN 60335 2 77 2010 EN 62233 2008 Measured Sound Pressure Level LPA 84dB A Measured Sound Power Level LWA 96dB A Vibration Level 2 5 m s Notified Body Intertek Testing Services Shanghai Addresses Building No 86 1198 Qinzhou Road North Caohejing Development Zone Shanghai 200233 P R C Authorised signatory and technical file holder Date 31 10 ...

Page 28: ...NOTES INSTRUCTION MANUAL ...

Page 29: ...NOTES ...

Page 30: ...wnmowers Petrol Hand Held Range Please register your machine using the following pages or at www webblawnmowers co uk By registering your machine you agree to maintain the machine in accordance with the service schedules specified in this manual and services duly recorded You may be asked to produce this booklet as proof of servicing in the event of a claim Proof of purchase should also be kept as ...

Page 31: ...ranty a The warranty policy does not cover any depreciation or damages caused by ordinary wear rusting or corrosion lack of correct maintenance or operation misuse abuse lack of transportation or accident b The warranty policy does not cover any costs necessary for the standard periodic maintenance services instructed by the operators manual or service parts replacement which would include oil filt...

Page 32: ... which are specialised in our products and will be aware of your particular machine and any technical updates which will save valuable time money If you are using your machine in dry dusty or high temperatures you will need to service the machine more regularly Fuel Due to ongoing efforts by fuel companies to reduce emissions unleaded petrol will oxidize deteriorate in storage overtime leaving res...

Page 33: ...e correct service actions have been completed PLEASE ENSURE THE SERVICE BOOK IS AVAILABLE FOR THE DEALER DURING SERVICE WORK 1st Service This must be stamped by an approved service dealer to qualify for a free second year warranty 24 Months Date Date 36 Months 12 Months Date SERVICE BOOK ...

Page 34: ...Service Record 48 Months Date Date Date Date Date Date Date Date 72 Months 96 Months 120 Months 60 Months 84 Months 108 Months 132 Months INSTRUCTION MANUAL ...

Page 35: ...t to your and or your machine We value your trust by giving us this information about yourself and we are committed to protecting your privacy From time to time Webb its associated companies authorised dealers or third parties working on our behalf may wish to contact you regarding our products services offers technical improvements or just opinions which may be used for marketing research or anal...

Page 36: ...Webb Lawnmowers Murdock Road Dorcan Swindon Wiltshire SN3 5HY ...

Reviews: