background image

Coolant Circuit

Webasto Product N.A., Inc.

48

www.techwebasto.com

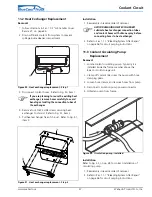
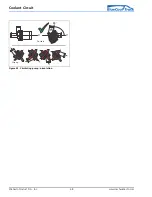
Figure 53. Circulating pump - orientation

85°

Correct

Wrong

Summary of Contents for BlueCool Truck BCT010300A

Page 1: ...or repair a Webasto heating or cooling system unless you have successfully completed the factory training course and have the technical skills technical information tools and equipment required to pr...

Page 2: ......

Page 3: ...e 9 3 3 Discharge Mode Bunk Cooling 10 3 3 1 Vehicle Key OFF no 12V reference signal present at control module 10 3 3 2 Operation 10 4 Technical Data 11 4 1 General Information 11 4 1 1 Technical Data...

Page 4: ...ment and System Service 36 7 1 System Cleanup and Compressor Replacement After Compressor Failure 36 8 Circuit Diagrams 38 9 Component Replacement Refrigeration Unit 39 9 1 General Information and Saf...

Page 5: ...uation which if not avoided MAY result in minor or moderate injury or property damage It may also be used to alert against unsafe practices These symbols are used to alert the technician to important...

Page 6: ...s and services should be performed Trucks other than new will likely require additional services such as Cleaning of battery connections Cleaning of jumpers bottom of connector typical weak connection...

Page 7: ...r accessory kit The power inverter converts 12 volts DC supplied by the vehicle batteries into 110 volts AC required to drive the refrigeration compressor Where the vehicle is equipped with the option...

Page 8: ...ge 12 volts DC vehicle power into 110 volts AC is utilized to supply power to drive the electric refrigeration compressor Figure 6 Power Inverter 2 6 Control Module The control module is central to en...

Page 9: ...ature sensor s performance can only be analyzed through the use of a special tool available from Webasto Figure 8 Digital Core Temperature Sensor 2 8 Ambient Temperature Thermostat Located behind the...

Page 10: ...al Protector Hermetic Compressor Motor 110 VAC Device Lethal current may be present Switch off the DC to AC power inverter before servicing The compressor motor is protected from overheating by a ther...

Page 11: ...delayed start countdown after which based on the temperature in the storage unit WILL or WILL NOT provide a signal to the control relay Approximate time to completely recharge freeze the storage core...

Page 12: ...eration The chilled coolant mixture is circulated by way of a small coolant pump from the storage unit to the air handler unit heat exchanger in the cab and back to the storage unit The air handler fa...

Page 13: ...and cold storage assembly Cab mounted air chiller handler 300 lb 136 kg 26 lb 13 6 kg Storage System Design Maintenance free with patented graphite matrix no additional batteries required System Refri...

Page 14: ...ssembly Figure 14 Dimensions Refrigeration Cold Storage Assembly Specifications U 4846 Coolant Circulating Pump Flow rate against 0 0 PSI 0 0 Bar 528 g hr 2 000 l hr Rated Voltage 12 Volts Power Consu...

Page 15: ...w webasto us 13 Webasto Product N A Inc 4 2 2 Air handler Assembly Figure 15 Dimensions Air handler Assembly 179 8 mm 7 04 in 616 4 mm 24 26 in 623 6 mm 24 55 in 203 94 mm 8 03 in 498 5 mm 19 62 in 50...

Page 16: ...m in Charging Mode Vehicle Key ON or Vehicle Engine Running The following tables list the possible error symptoms If the actions listed in the following tables do not restore proper operation consult...

Page 17: ...30 minutes replace control module System control relay not responding Check 20 amp fuse at fuse holder X4 Check for power on pin 87 red wire and ground on pin 85 brown wire Refer to Fig 20 on pg 19 Ch...

Page 18: ...Fig 34 on pg 34 Check compressor function and electrical diagnosis Refer to Section 6 Troubleshooting Refrigerant Compressor Repair as necessary If open circuit OL replace limiter Repair or replace as...

Page 19: ...ve to Coolant Pump Purple 16GA 12V Switched Positive to Pressure Sensor X6 Ambient Thermostat X7 and System Control Relay X10 Not Used Black 20GA Storage Core Digital Temperature Sensor White 20GA Sto...

Page 20: ...Signal to Control Module Orange 14GA 12V Switched Positive to Coolant Pump Purple 16GA 12V Switched Positive to Pressure Sensor X6 Ambient Thermostat X7 and System Control Relay X10 Not Used Black 20...

Page 21: ...Circuit X10 X11 Blue 12GA 12V Switched Output to Condensor Fan X9 Brown 14GA Ground to Battery Negative Post Purple 16GA 12V Input from Control Module X1 Pressure Sensor X6 and Ambient Thermostat X7...

Page 22: ...from System Control Relay X10 On Off Switch Circuit to Power Inverter Not Used Viewed from wire insertion side LEGEND 87a 87 30 85 86 30 85 86 87 87a X11 OFF O N A C C Key Switch Position 30 min ON PO...

Page 23: ...ambient temperature thermostat Figure 24 Ambient temperature thermostat checks continuity Checking continuity through high low refrigerant pressure switch Figure 25 High low refrigerant pressure switc...

Page 24: ...ing condenser fan circuit Figure 27 Condenser fan circuit checks DC voltage DC TO AC POW ER INVERTER ON PO W ER OFF V AC Volts AC V _ Inverter ON Allumez l inverter To Refrigerant Compressor WARNING H...

Page 25: ...Replace blown defective fuse Damaged or open circuit Repair wiring or connections No ground connection Repair wiring or connections No output to circulation fans at control module With fan control tur...

Page 26: ...Constant Power Positive Fused 10 amp Brown 14GA Constant Negative to all Components Pink 16GA 12V Positive Reference Signal to Control Module Orange 14GA 12V Switched Positive to Coolant Pump Purple...

Page 27: ...ystem www webasto us 25 Webasto Product N A Inc Checking circulation pump circuit at pump Figure 30 Circulation pump circuit checks DC voltage V DC V V Volts DC _ To Circulation Pump To Main System Ha...

Page 28: ...ting these products should be done only by those with the necessary knowledge training and equipment Never service repair or troubleshoot unless you are a professional air conditioning refrigerationse...

Page 29: ...vere frostbite Also in the event of a compressor motor failure some refrigerant and oil mixtures can be acidic and cause chemical burns To avoid injury wear appropriate protective eye wear gloves and...

Page 30: ...sures in excess of 2000 PSIG at 70 F At pressures much lower than 2000 PSIG compressors can explode and cause serious injury or death To avoid over pressurizing the system always use a pressure regula...

Page 31: ...on of System Explosions In certain water utilizing refrigeration systems water can leak into the refrigerant side of the system This can lead to an explosion of system components including but not lim...

Page 32: ...trical problems a Compressor motor has a winding open or shorted b Start capacitor not working properly c Relay does not close See Identifying Compressor Electrical Problems on page 31 Same as a Same...

Page 33: ...power before removing the protective terminal cover Never energize the system unless the protective terminal cover is securely fastened and the compressor is properly connected to ground Never reset a...

Page 34: ...or a Hi Potential Ground Tester Hi Pot To reduce the risk of electrocution always follow the manufacturers procedures and safety rules when using these devices Connect one lead of either the megger or...

Page 35: ...C and S See Identification of Hermetic Terminal on page If there is no continuity replace the compressor See System Cleanup and Compressor Replacement After Compressor Failure starting on page 36 Chec...

Page 36: ...VAC White Ground Green Compressor Unit Ground Main Motor Winding Start Winding Compressor Housing Black Black White White Red Black Stripe Black DC AC Power Inverter Green Table 11 Troubleshooting PS...

Page 37: ...t services gauges to the system Turn on power to system If the system has an adequate refrigerant charge the compressor should maintain at least 200 psig pressure differential between the suction and...

Page 38: ...filter driers should clean up the system If however the discharge line or the suction line shows evidence of contamination the compressor was running at the time of the motor failure and contaminants...

Page 39: ...ermanent installation as described in Install Replacement Compressor and Components on page 36 On the other hand where Systems Contamination occurred an increased pressure drop will be measured Change...

Page 40: ...TOR 10 15VDC 120VAC 60HZ TEMPERATURE CURRENT LIMITER COMPRESSOR COOLANT PUMP CONDENSER FAN CONTROL UNIT IN AIR HANDLER X2 10A BATTERY BATTERY F3 KEY ON SIGNAL 12VDC BY INSTALLER 12V DC RELAY 12 VOLT C...

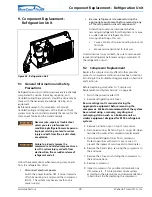
Page 41: ...rigerant from the system can cause a sudden release of refrigerant and oil Among other things this can Cause a variety of injuries including burns and frost bite Expose service personnel to toxic gas...

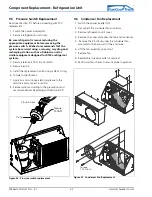
Page 42: ...d for R134a refrigerant systems 3 Disconnect refrigerant lines from condenser Protect open lines with plastic caps or wrap to prevent the ingress of moisture and contaminates 4 Remove the top plate ov...

Page 43: ...ess of moisture and contaminates 6 Remove the 2 allen head bolts securing the TXV to the storage core pipes 7 Pull the TXV free of the storage core pipes 8 Inspect TXV and lines for possible contamina...

Page 44: ...e replacement switch using a NEW O ring 6 Torque to specification 7 Apply an anti corrosive electrical grease to the terminals and connect to switch 8 Service system according to the precautions and r...

Page 45: ...te the ambient temperature switch It will be in the area of the compressor wire tied to the run capacitor Refer to Fig 42 4 Replace as required 5 Apply an anti corrosive electrical grease to the termi...

Page 46: ...rs from rotary switch shafts 3 Remove four screws holding panel to cover 4 Remove panel Installation 1 Reassembly in reverse order of removal 10 2 Air handler Cover Removal 1 Pull 10 amp fuse from fus...

Page 47: ...allation Before handling the new control unit discharge any possible static electrical charge from your body by touching a grounded metal surface 1 Reassembly in reverse order of removal 10 4 Fan Repl...

Page 48: ...Fig 49 item A DO NOT leave this valve open unattended 4 Continue to replenish the reservoir as coolant is drawn in 5 Continue to bleed air out at the bleeder valve until coolant is evident at the val...

Page 49: ...Reassembly in reverse order of removal AVOID DAMAGING HEAT EXCHANGER Lubricate heat exchanger connection tubes and coolant hoses with silicone spray before connecting hoses to heat exchanger 2 Refer t...

Page 50: ...Coolant Circuit Webasto Product N A Inc 48 www techwebasto com Figure 53 Circulating pump orientation 0 85 0 Correct Wrong...

Page 51: ...ation lack of reasonable and necessary maintenance alteration civil disturbance or act of God 8 Transportation damages should be claimed directly with the forwarding company 9 This limited warranty ap...

Page 52: ...Warranty Webasto Product N A Inc 50 www techwebasto com...

Page 53: ...Warranty www webasto us 51 Webasto Product N A Inc...

Page 54: ...duct N A Inc 15083 North Road Fenton MI 48430 Technical Assistance Hotline USA 800 860 7866 Canada 800 667 8900 www webasto us www techwebasto com Org 02 2007 Rev 2 2012 Ver BCT_ABC 2012 Webasto Produ...

Reviews: