16
XL
™
VideoProbe
®
3 - Getting Started
System Removal
Gently remove the insertion tube from the internal storage reel and lift
the handset from the storage case.
Page 1: ...Everest XL Detect XL Detect VideoProbe Operating Manual...
Page 2: ...System Removal 16 System Power On 17 System Power Off 18 System Storage 18 Mounting Accessories 19 Battery 20 Battery Charge Level 21 Charging Battery 21 Keyboard Support 22 Saving Images and Video 2...
Page 3: ...iculation Home 77 Freeze Frame 78 Freeze Frame Menu 79 Still Image Capture and Playback 81 Video Recording and Playback 81 Recalling a File 82 Recalled Image Menu 83 Video Playback Menu 84 Copying Fil...
Page 4: ...oses only with the prior written consent of Waygate Technologies Should you have any questions concerning clarification of problems in connection with application use operation specification of your R...
Page 5: ...erence information To ensure operator safety please read and understand this manual prior to using the system For additional assistance go to www waygate tech com for a complete listing of contact inf...
Page 6: ...6 XL Detect VideoProbe 1 LCD Screen 2 USB2 Port 3 Integrated 2 5 mm Headset Microphone Jack 4 Controls 5 2 hour Lithium Ion Battery 6 Battery Charge Indicator 7 AC Adaptor Input 8 USB Bay Indicators...
Page 7: ...XL Detect VideoProbe 7 1 Introduction...
Page 8: ...1 Introduction 8 XL Detect VideoProbe Controls The following buttons control basic and advanced operation of the XL Detect VideoProbe 1 2 3 4 5 6 XL Vu XL Detect...
Page 9: ...neck locked in place after the joystick is released A lock will appear on the LCD when enabled Press and release again to unlock the steering control The lock will disappear from LCD when disabled Al...
Page 10: ...cally to particular procedures appear in the corresponding sections of the manual Do not allow the conductive insertion tube system or its working tools to come in direct contact with any voltage or c...
Page 11: ...ertion tube as straight as possible during operation loops or bends anywhere in the tube decrease its ability to steer the probe tip Avoid bending the insertion tube sharply Note Always use the Home b...
Page 12: ...ls strike the battery with a hammer step on the battery or otherwise subject it to strong impacts or shocks Do not expose the battery to water or salt water or allow the battery to get wet Do not disa...
Page 13: ...s proc dures particuli res sont indiqu s dans les sections correspondantes de ce manuel Le syst me XL Detect et les outils de travail qui l accompagnent ne doivent jamais entrer en contact direct avec...
Page 14: ...anger la sonde Ne manipulez jamais le b quillage la main pour le tirer le courber ou le redresser vous risqueriez de l endommager l int rieur Envoyez la sonde en r paration au premier signe d endommag...
Page 15: ...euillez contacter le Service client le au num ro 1 866 243 2638 L utilisation de la batterie en dehors de la plage de fonctionnement recommand e entra nerait une d gradation de ses performances et de...
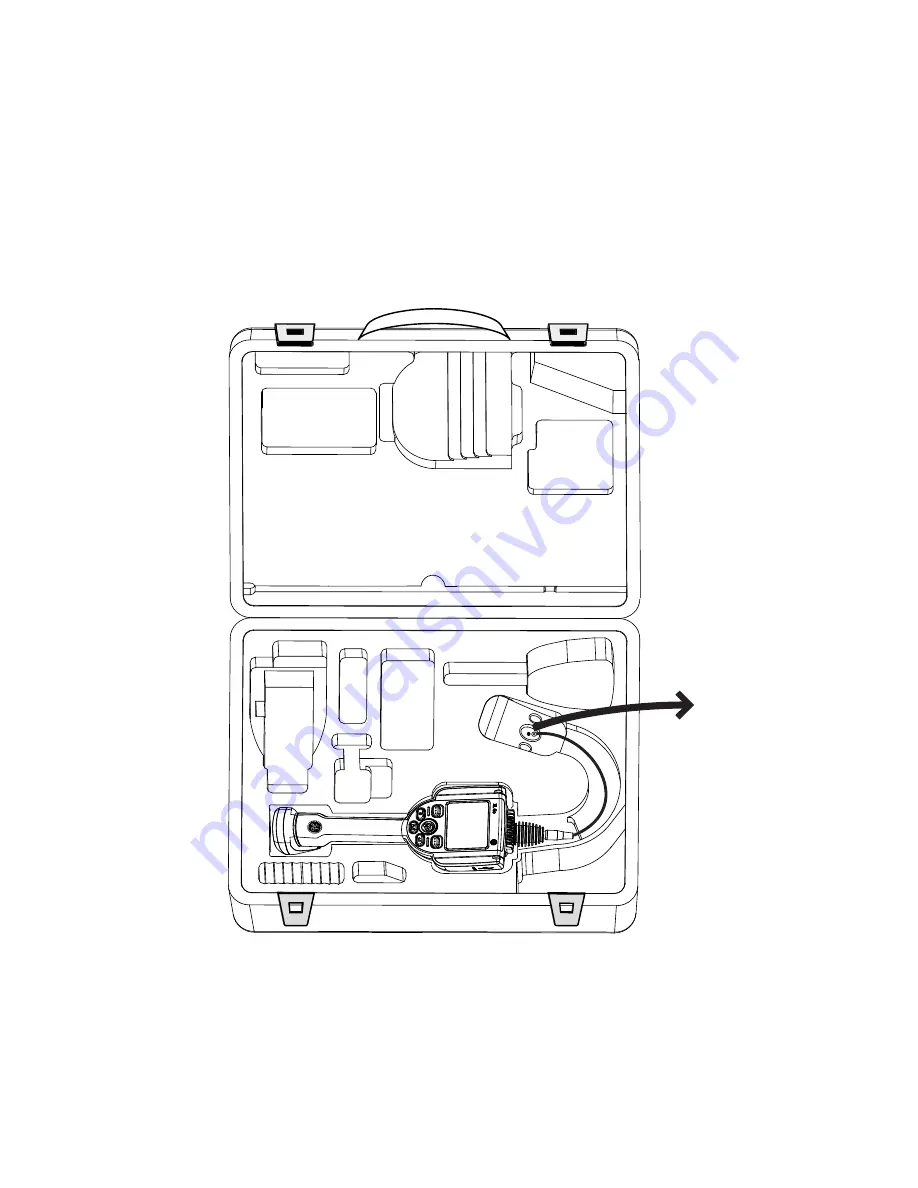
Page 16: ...16 XL Detect VideoProbe 3 Getting Started System Removal Gently remove the insertion tube from the internal storage reel and lift the handset from the storage case...
Page 17: ...rystal Display LCD will light and begin the power up sequence After approximately 30 seconds select the desired language The system screen will display live video and screen prompts The system is now...
Page 18: ...HUTTING DOWN message appears Key illumination and LED probe lights will go out when system is completely powered down System Storage Place the tip of the insertion tube into the orange funnel and gent...
Page 19: ...tarted Mounting Accessories Assemble the optional mounting accessories by screwing together the mini magic clamp swivel ball and handset holder Secure the XL Detect mini magic clamp and place the XL D...
Page 20: ...battery is keyed and may only be installed in the proper orientation Removing Battery For batteries with the removal tab using your hand turn the tab counter clockwise to release the battery Note Do...
Page 21: ...ct the DC output of the battery charger into the XL Detect battery The LED battery lights will illuminate according to the amount of charge attained The system may operate while charging The battery m...
Page 22: ...keyboards contact your sales representative or customer support The function keys on the keyboard act as the keys on the XL Detect F1 Menu Function on Joystick F2 Left Soft Key F3 Power Exit Key F4 St...
Page 23: ...ht soft key with SAVE on the LCD above to save to the default location Alternately from live video press and hold Freeze Enter to quick save Video To record live video press and hold the left soft key...
Page 24: ...2 Gently pull the tip away from the probe and continue loosening counterclockwise until the tip is free from the second set of threads Optical Tip Installation 1 Ensure the optical tip is clean Clean...
Page 25: ...he second set of threads 4 Remove tip tool and tip will be within Applying Tips 1 Apply tip tool containing appropriate tip to probe head 2 Apply pressure while turning in the clockwise position 3 Whe...
Page 26: ...right soft key labeled GOTO during live video mode To exit any menu press Power Exit GO TO File Manager To enter the file manager navigate to FILE MANAGER with the joystick and select with the right s...
Page 27: ...to the right of EJECT HARDWARE and select the appropriate drive using the right soft key labeled SELECT Note Always use EJECT HARDWARE before removing a USB thumb drive to prevent loss of data BACK S...
Page 28: ...o 5 5 times zoomed Navigate to the right of ZOOM LEVEL and use the joystick to adjust the zoom level Zoom can be turned off in live video mode by pressing Power Exit BACK SELECT GO TO MENU FILE MANAGE...
Page 29: ...HT OUTPUT and select ON or OFF BACK SELECT GO TO MENU FILE MANAGER EJECT HARDWARE ZOOM LEVEL LIGHT OUTPUT LONG EXPOSURE INVERSE INVERT ON OFF ANNOTATIONS XL Detect Note Pressing the Freeze Frame key i...
Page 30: ...to turn long exposure off Long Exposure may be turned off in live video mode by pressing the Power Exit key After selecting Long Exposure the following options will be available BACK SELECT LONG EXPOS...
Page 31: ...choose ON or OFF Invert may be turned off in live video mode by pressing the Power Exit key BACK SELECT GO TO MENU FILE MANAGER EJECT HARDWARE ZOOM LEVEL LIGHT OUTPUT LONG EXPOSURE INVERSE INVERT ON O...
Page 32: ...key labeled GOTO for 3 seconds Live Main Menu Light Output To turn the LED optical light on off use the joystick to choose LIGHT OUTPUT and select ON or OFF BACK SELECT LIVE MAIN MENU LIGHT OUTPUT IM...
Page 33: ...When Annotations have already been added to the image user can quickly remove them by choosing ANNOTATIONS DELETE ALL BACK SELECT GO TO MENU FILE MANAGER EJECT HARDWARE ZOOM LEVEL LIGHT OUTPUT LONG E...
Page 34: ...diately BACK SELECT LIVE MAIN MENU LIGHT OUTPUT IMAGE CONTROL ANNOTATION EJECT HARDWARE SETUP FILE MANAGER XL Detect The following options are then available Image Brightness Zoom Level Long Exposure...
Page 35: ...Control Image Brightness Navigate to IMAGE BRIGHTNESS from the IMAGE CONTROL Menu and use the joystick to adjust the image brightness BACK SELECT IMAGE CONTROL IMAGE BRIGHTNESS ZOOM LEVEL LONG EXPOSU...
Page 36: ...evel Navigate to ZOOM LEVEL from the IMAGE CONTROL Menu and use the joystick to adjust the zoom level Digital zoom levels from 1x to 5x may be selected BACK SELECT IMAGE CONTROL IMAGE BRIGHTNESS ZOOM...
Page 37: ...ze the risk of blurring Select LONG EXPOSURE to choose manual exposure automatic long exposure or to turn long exposure off Long Exposure may be turned off in live video mode by pressing the Power Exi...
Page 38: ...ME MENU or RECALLED IMAGE MENU Navigate to SPLIT SCREEN and press the right soft key to select Choose the area of screen to view by moving the joystick left or right and using the right soft key to se...
Page 39: ...e View Navigate to SINGLE VIEW from the IMAGE CONTROL MENU and select ON or OFF Pressing the Power Exit key from live video will disable Single View BACK SELECT IMAGE CONTROL IMAGE BRIGHTNESS ZOOM LEV...
Page 40: ...a photographic negative It enhances the image contrast making subtle details more visible To alter the contrast of an image select INVERSE from the IMAGE CONTROL MENU and select ON or OFF BACK SELECT...
Page 41: ...ge horizontally To activate or deactivate Invert navigate to INVERT from the IMAGE CONTROL MENU and select ON or OFF BACK SELECT IMAGE CONTROL IMAGE BRIGHTNESS ZOOM LEVEL LONG EXPOSURE SPLIT SCREEN SI...
Page 42: ...ation may be used on live frozen and recalled images To alter the annotation settings press the joystick to activate the LIVE MAIN MENU and select ANNOTATION BACK SELECT LIVE MAIN MENU LIGHT OUTPUT IM...
Page 43: ...TATION menu BACK SELECT ANNOTATION TEXT ARROW PRESET HIDE ANNOTATION ADD EDIT DELETE DELETE ALL AUDIO XL Detect BACK DONE USE JOYSTICK ENTER TO ENTER TEXT v ENTER SPACE BACKSPACE B O 2 C P 3 D Q 4 E R...
Page 44: ...nu Annotation Arrow To add edit or clear arrow on a specific image select ARROW from the ANNOTATION menu BACK SELECT ANNOTATION TEXT ARROW PRESET HIDE ANNOTATION ADD EDIT DELETE DELETE ALL AUDIO XL De...
Page 45: ...epresentation of the character to be entered 2 Use the numbers on the external keyboard to select the desired character from the candidate list 3 Press the enter key to confirm the selection Japanese...
Page 46: ...TATION menu To load or export a file containing presets choose PRESET from the ANNOTATION menu BACK SELECT ANNOTATION TEXT ARROW PRESET HIDE ANNOTATION CREATE RECALL EDIT DELETE IMPORT EXPORT AUDIO XL...
Page 47: ...n Tasks Live Main Menu Annotation Hide Annotation To hide or unhide an annotation select HIDE ANNOTATION from the ANNOTATION menu followed by ON or OFF BACK SELECT ANNOTATION TEXT ARROW PRESET HIDE AN...
Page 48: ...a separate line File Type txt Encoding UTF8 Recommended Program Microsoft Notepad At the time of saving the document select txt as the file type and UTF 8 as the encoding See example below Loading the...
Page 49: ...k to navigate to the right of EJECT HARDWARE and select the appropriate drive using the right soft key labeled SELECT BACK SELECT LIVE MAIN MENU LIGHT OUTPUT IMAGE CONTROL ANNOTATION EJECT HARDWARE SE...
Page 50: ...ive Main Menu Setup To change default settings select SETUP For more information see SYSTEM SETUP Section in the Operation Chapter BACK SELECT LIVE MAIN MENU LIGHT OUTPUT IMAGE CONTROL ANNOTATION EJEC...
Page 51: ...XL Detect VideoProbe 51 4 Common Tasks...
Page 52: ...nu press Power Exit Live Main Menu Setup Screen Display Setup To alter the display setup press the joystick to activate the LIVE MAIN MENU Select SETUP followed by SCREEN DISPLAY BACK SELECT SETUP SCR...
Page 53: ...Live Main Menu Setup Screen Display Battery Icon To enable and disable the battery icon select BATTERY ICON followed by ON or OFF BACK SELECT SCREEN DISPLAY BATTERY ICON DATE TIME LOGO TEXT COLOR TEMP...
Page 54: ...SELECT SCREEN DISPLAY BATTERY ICON DATE TIME LOGO TEXT COLOR TEMP ICON WHITE BALANCE ON OFF SET X XL Detect BACK SELECT X BACK SEL ELE LE LECT CT CT X X X PLEASE ENTER TIME AND DATE BACK OK XX XX XXXX...
Page 55: ...file name logo jpg must be used To load a logo or to turn a logo on or off select LOGO from the SCREEN DISPLAY menu and select the desired option BACK SELECT SCREEN DISPLAY BATTERY ICON DATE TIME LOG...
Page 56: ...ible text color will vary with the coloring and brightness of the image To change the color of the text displayed over images select TEXT COLOR followed by GREEN BLACK or WHITE BACK SELECT SCREEN DISP...
Page 57: ...ve Main Menu Setup Screen Display Temp Icon To enable or disable the temperature icon select TEMP ICON from the SCREEN DISPLAY menu BACK SELECT SCREEN DISPLAY BATTERY ICON DATE TIME LOGO TEXT COLOR TE...
Page 58: ...White balance corrects color so white appears white despite any slight hues that may be present under varying lighting and ambient conditions To execute white balance select WHITE BALANCE from the SCR...
Page 59: ...Setup To change video record defaults press the joystick to activate the LIVE MAIN MENU Select SETUP followed by VIDEO RECORD SETUP BACK SELECT SETUP SCREEN DISPLAY VIDEO RECORD SETUP STILL IMAGE SETU...
Page 60: ...Operation Live Main Menu Setup Video Record Setup Save Location Select SAVE LOCATION from the VIDEO RECORD SETUP menu and navigate to the desired location BACK SELECT VIDEO RECORD SETUP SAVE LOCATION...
Page 61: ...video quality select MPEG QUALITY from the VIDEO RECORD SETUP menu followed by LOW or HIGH BACK SELECT VIDEO RECORD SETUP SAVE LOCATION MPEG QUALITY MIC LOW HIGH XL Detect MPEG Quality Recording Rate...
Page 62: ...Main Menu Setup Video Record Setup MIC To turn an external mic on or off select MIC from the VIDEO RECORD SETUP menu followed by ON MUTE or DISABLED Note The XL Detect does not have a built in mic BA...
Page 63: ...Setup To change still image defaults press the joystick to activate the LIVE MAIN MENU Select SETUP followed by STILL IMAGE SETUP BACK SELECT SETUP SCREEN DISPLAY VIDEO RECORD SETUP STILL IMAGE SETUP...
Page 64: ...64 XL Detect VideoProbe 5 Operation Live Main Menu Setup Still Image Setup Save Location Select SAVE LOCATION from the STILL IMAGE SETUP menu and use the joystick to navigate to the desired location...
Page 65: ...ose the image format Bitmap BMP or JPEG JPG navigate to the right of FORMAT and select BMP or JPG BACK SELECT STILL IMAGE SETUP SAVE LOCATION FORMAT JPEG QUALITY BMP JPG XL Detect Bitmap images are th...
Page 66: ...quality the user must first select JPEG image format Once selected navigate to the right of JPEG QUALITY and select LOW or HIGH BACK SELECT STILL IMAGE SETUP SAVE LOCATION FORMAT JPEG QUALITY LOW HIG...
Page 67: ...ACK SETUP BACK SELECT SETUP SCREEN DISPLAY VIDEO RECORD SETUP STILL IMAGE SETUP AUDIO PLAYBACK SETUP STEERING LANGUAGE SETUP SYSTEM TOOLS XL Detect Note To PLAY RECORD OR DELETE AUDIO ANNOTATION press...
Page 68: ...yback volume select PLAYBACK VOLUME from the AUDIO ANNOTATION SETUP menu Use the joystick to control the volume from 0 to 10 BACK SELECT AUDIO PLAYBACK SETUP PLAYBACK VOLUME 0 10 XL Detect Note XL Det...
Page 69: ...tect VideoProbe 69 Live Main Menu Setup Steering Setup Steering To manage probe articulation select the steering increment Options are COARSE or FINE BACK SELECT STEERING SETUP STEERING TIP MAP X COAR...
Page 70: ...Main Menu Setup Steering Setup Tip Map Tip Map is a grid that indicates probe tip position To turn Tip Map ON or OFF select STEERING SETUP from the SETUP menu followed by TIP MAP BACK SELECT STEERING...
Page 71: ...age or external keyboard select LANGUAGE SETUP from the SETUP menu followed by the appropriate language BACK SELECT SETUP SCREEN DISPLAY VIDEO RECORD SETUP STILL IMAGE SETUP AUDIO ANNOTATION SETUP STE...
Page 72: ...Tools To view system information or adjust power management select SETUP from the LIVE MAIN MENU followed by SYSTEM TOOLS BACK SELECT SETUP SCREEN DISPLAY VIDEO RECORD SETUP STILL IMAGE SETUP AUDIO A...
Page 73: ...n Menu Setup System Tools System Info To view system information such as the software version or the amount of free disk space select SYSTEM INFORMATION from the SYSTEM TOOLS menu BACK SELECT SYSTEM T...
Page 74: ...enu followed by ON or OFF BACK SELECT SYSTEM TOOLS SYSTEM INFO POWER MANAGEMENT ON OFF XL Detect Sleep Mode Occurs automatically under battery power if no buttons have been activated for 15 minutes Sl...
Page 75: ...les and folders on the XL Detect VideoProbe system select FILE MANAGER with the joystick For more details refer to the FILE MANAGEMENT section in the Operation Chapter BACK SELECT LIVE MAIN MENU LIGHT...
Page 76: ...k To hold the bending neck in place while steering press and release the Steering Control key A lock icon will appear in the corner of the display to symbolize steer and stay is enabled The probe will...
Page 77: ...k A blinking home icon will appear on LCD when enabled HOME icon will disappear when system is finished RECORD GOTO XL Detect Note It is recommended that a home operation is performed before withdrawi...
Page 78: ...Freeze Frame To freeze an image press Freeze Enter An FF will appear in the upper right corner of the display to symbolize that the image is frozen To disable Freeze Frame press Freeze Enter again The...
Page 79: ...Freeze Frame Menu Once Freeze Frame is enabled press the joystick to enter the FREEZE FRAME MENU BACK SELECT FREEZE FRAME MENU SAVE AS ANNOTATION SPLIT SCREEN XL Detect The following options are avail...
Page 80: ...dd edit or delete an annotation or to play stop or pause an audio annotation select ANNOTATION from the FREEZE FRAME MENU BACK SELECT FREEZE FRAME MENU SAVE AS ANNOTATION SPLIT SCREEN XL Detect The fo...
Page 81: ...on the LCD above A record symbol will appear in the upper right hand corner When the video is stopped it will automatically save to the default location To view recorded videos on a PC use either Qui...
Page 82: ...IVE MAIN MENU Navigate to FILE MANAGER and select Recalling a File To recall a file select RECALL Move the joystick to the right to locate the file s and use the right soft key to select BACK SELECT F...
Page 83: ...robe 83 Recalled Image Menu After recalling an image press the joystick to activate the RECALLED IMAGE MENU BACK SELECT RECALLED IMAGE MENU SAVE AS SPLIT SCREEN XL Detect The following options are ava...
Page 84: ...press the joystick left rewind or right fast forward or press the left soft key to pause the video and then press the joystick left or right If navigating a paused video press the left soft key to re...
Page 85: ...s and use the right soft key to mark unmark Press Freeze Enter to copy Choose the destination for the copied file Use the joystick to navigate to the desired folder Press Freeze Enter to paste the co...
Page 86: ...rs To delete a file select DELETE FILE Move the joystick to the right to locate the file s and select Press Freeze Enter to delete BACK SELECT FILE MANAGER RECALL COPY DELETE SPLIT SCREEN CREATE FOLDE...
Page 87: ...DER Select the location of the folder Use the joystick to highlight and Freeze Enter to select each letter When done press the right soft key to save the folder name BACK SELECT FILE MANAGER RECALL CO...
Page 88: ...ired file folder and use the right soft key to select Use the joystick to highlight and Freeze Enter to select each letter When finished press the right soft key to save the file name BACK SELECT FILE...
Page 89: ...es for return instructions and an RMA return material authorization number Early detection of minor conditions can prevent costly repair Cleaning Optical Tips Dirty optical tip surfaces cause distorte...
Page 90: ...rning a product for service and or repair North South America Waygate Technologies 721 Visions Drive Skaneateles NY 13152 Tel 888 332 3848 315 554 2000 ext 1 Europe Baker Hughes Digital Solutions GmbH...
Page 91: ...Humidity 95 max non condensing 95 max non condensing Waterproof Insertion tube and tip to 14 7 psi 1 bar 10 2m of H2 O 33 5 ft of H2 O Insertion tube and tip to 14 7 psi 1 bar 10 2m of H2 O 33 5 ft o...
Page 92: ...ve sunlight readable display Integrated 12 7 cm 5 0 active matrix VGA color LCD Transmissive display Joystick Control 360 All Way tip articulation menu access and navigation 360 All Way tip articulati...
Page 93: ...6 521 3 Tested to United States Department of Defense Environment Tests Sections 506 5 507 5 509 5 510 5 511 5 514 6 516 6 521 3 MIL STD 461F Tested to United States Department of Defense Electromagn...
Page 94: ...aphic Annotation User placement of arrows User placement of arrows Articulation Control Steer Stay Articulation lock fine articulation tip Home return to neutral forward tip orientation User selectabl...
Page 95: ...9 8 ft 6 1 mm 0 24 2 0 3 0 4 5 6 0 m 6 6 9 8 14 8 19 7 ft 8 4 mm 0 33 3 0 10 0 m 9 8 32 8 ft Tip Articulation Insertion Tube Length Articulation 2 0m 3 0m and 4 5m Up Down 160 min Left Right 160 min 6...
Page 96: ...0 6 inf 24 inf T40120SF 6 1 Forward None 50 50mm infinity 1 97 infinity XLG3T6150FF 6 1 Forward White 50 12 200mm 47 7 87 XLG3T6150FG 6 1 Forward Black 120 5 120mm 20 4 72 XLG3T61120FG 6 1 Forward Ora...
Page 97: ...Forward None 40 250mm infinity 9 84 infinity XLG3T8440FF 8 4 Forward Black 120 5 200mm 020 87 XLG3T84120FN 8 4 Forward Gold 20 500mm infinity 19 69 infinity XLG3T8420FF 8 4 Forward Yellow 80 25 500mm...
Page 98: ...NING Do not use this system in explosive environments These substances are safe for a short duration of contact with the insertion tube Water Aircraft Gasoline Jet A Fuel Isopropyl alcohol JP 4 Fuel K...
Page 99: ...urn the product to Waygate Technologies or one of its authorized service centers The warranty does not cover accessories or optional equipment not manufactured by Waygate Technologies but these items...
Page 100: ...lettering to indicate cadmium Cd lead Pb or mercury Hg For proper recycling return the battery to your supplier or to a designated collection point What do the markings mean Batteries and accumulators...
Page 101: ...of mouth and gums personality change nervousness fever and rashes Visit http ec europa eu environment waste weee index_en htm for take back instructions and more information about this initiative E A...
Page 102: ...omply with the limits for a Class A digital device pursuant to part 15 of the FCC Rules These limits are designed to provide reasonable protection against harmful interference when the equipment is op...
Page 103: ...ust be Microsoft Windows compatible Creating the Logo File 1 Open logo file with image editor 2 Create custom background comprised of Red 255 Green 0 Blue 255 This will create a magenta colored backgr...
Page 104: ...provided for the aggregated proprietary software With respect to each open source software distribution no warrantee is expressed nor implied by either the original authors of the software nor by any...
Page 105: ...oration of factory defaults Performing this action restores the following options Batter Icon On Date Time On Date Format MM DD YYYY Logo On Temp Icon On Text Color Green Image Format BMP Power Manage...
Page 106: ...MDI software provides an advantage and convenience during the inspection process MDI makes labeling images and videos easier and automatically generates reports from the Video Probe within a few step...
Page 107: ...Pacific Baker Hughes Solutions Pte Ltd 10 Lok Yang Way Singapore 628631 Phone 65 62135500 XLDETECTBMAN Rev China Baker Hughes Sensing Inspection Co Ltd No 8 Xi hu Road Wu jin high tech zone Changzhou...