background image

Step Two: Mounting the Handlebars & Display. 

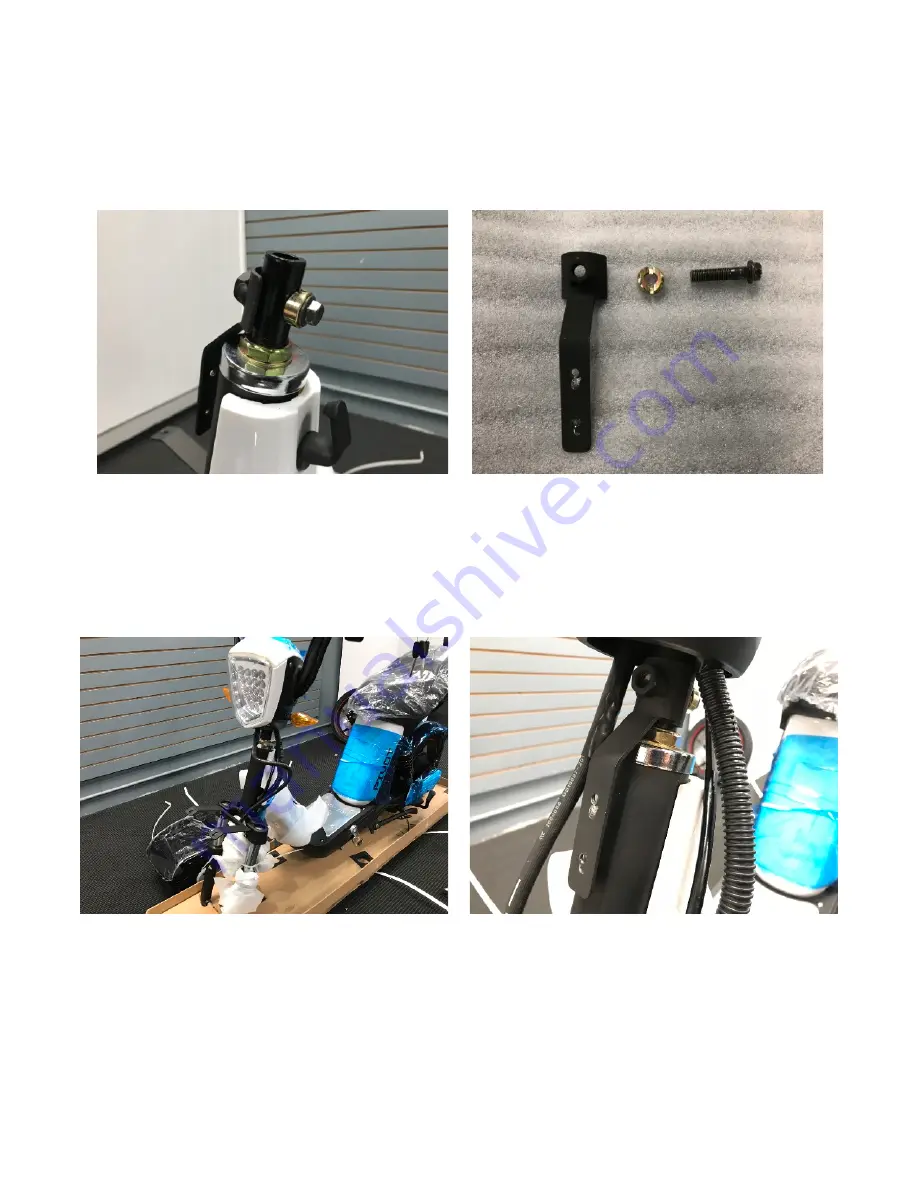
Begin by removing the bolt (12mm) and basket mount from the steering column.

When removed, there will be a bolt, a cylinder washer, and the basket mount.

Place the Handlebars and Display assembly onto the steering column. Check to see 
the cables are properly situated: facing the front of the bike, the ribbed cable and black 
rear brake cable will be on the right side, and the front hydraulic brake line will be on 
the left.

Mount the handlebar assembly by placing the bolt back through the steering column 
and handlebar assembly with the basket mount. Be sure the cylinder washer is 
properly sitting on the steering column before tightening.

4

Summary of Contents for PIVOT

Page 1: ...ELECTRIC BICYCLE OWNER S MANUAL www gowattson com...

Page 2: ...Four Mounting the Front Wheel 6 Step Five Installing Pedals 8 Step Six Recommended Disconnect Speed Regulator 9 Step Seven Optional Installing Sideview Mirrors 9 Step Eight Optional Swap KM H with MP...

Page 3: ...see you out on the road Be safe out there and remember always wear a helmet ELECTRICBIKE GOFREE If you d like to get in contact with us send us an email at hi gowattson com or reach out on social med...

Page 4: ...illips Screwdriver 2 16mm 14mm and 12mm Socket Wrench 3 15mm 14mm and 12mm Wrench 4 Flathead Screwdriver 5 Scissors Begin by removing bubble wrap and packaging materials having a scissor handy will be...

Page 5: ...n the base of the provided carton package as it assists in stabilizing the bike The bike can be assembled by 1 person Step One Removing the Front Basket To remove the front basket use a Phillips screw...

Page 6: ...he steering column Check to see the cables are properly situated facing the front of the bike the ribbed cable and black rear brake cable will be on the right side and the front hydraulic brake line w...

Page 7: ...he front hydraulic brake line fits into a space to the left of the steering column and between the basket The control line and rear brake line will fit into a space to the right of the steering column...

Page 8: ...to place Tighten each screw diagonally to ensure a flush fit Do not over tighten as this may damage plastics Step Four Mounting the Front Wheel To begin mounting the front wheel first untwist the wire...

Page 9: ...r included on bolts between the brake assembly and the fork Remove the brake tab from between the brake pads If it is di cult to remove cut the zip tie holding the front brake right handle from rider...

Page 10: ...can attach the front fender above the wheel Remove the 4 small bolts and nuts placed towards the top of the forks Take the front fender and gently squeeze the sides together to place it in between the...

Page 11: ...lator is completely safe Step Seven Optional Installing Sideview Mirrors Install corresponding sideview mirrors into slots located on the handlebars Rotate at least 4 full revolutions then tighten to...

Page 12: ...the bottom of the display cover Remove the 4 dark green screws do not remove the metallic color screws to pull out the KM H display Unplug the cable by pressing down the white clip Replace the KM H di...

Page 13: ...Clip the zip ties around the brakes and take the keys to open the seat compartment lock located at the rear of the bike to plug in the battery Simply roll the bike o the carton package base insert the...

Page 14: ...Diagram 12...

Page 15: ...Fill with DOT 3 or DOT 4 brake fluid Tighten to increase rear brake strength 13...

Page 16: ...km h Travel Range 40 miles 64km Dependent on Load and Terrain Climbing Angle 20 Charging Time 4 6 hours Seat Seats 2 with Rear Foot Pegs for Passenger Load Capacity 300 lbs Motor 350W Brushless Hub Mo...

Page 17: ...arge will help prolong the life of the battery Tires Keep tires filled at 35 45 psi Avoid large potholes and sharp objects Abrasive surfaces will lower the lifespan of the tires Chain Keep chain clean...

Page 18: ...e products is regulated by state vehicle code and these vary from state to state For a brief overview of all the states visit https en wikipedia org wiki Electric_bicycle_laws State_requirements_for_u...

Page 19: ...amage or weather related damage Warranty does not cover shipping or towing charges Defective parts must be exchanged for new replacement parts Warranty does not cover minor cosmetic damage caused by u...

Reviews: