background image


- 1

st

 choice is the sleep icons  .      (End of the day) 

- 2

nd

 choice is the leaving icons,      to add another step to 

the program during the day.  
 
When the choice is made, press 

( ) 

to validate and you 

can adjust the hour of this step with 

LESS


(-) 

or

 MORE 

(+) 

key, 


Press 

( ) 

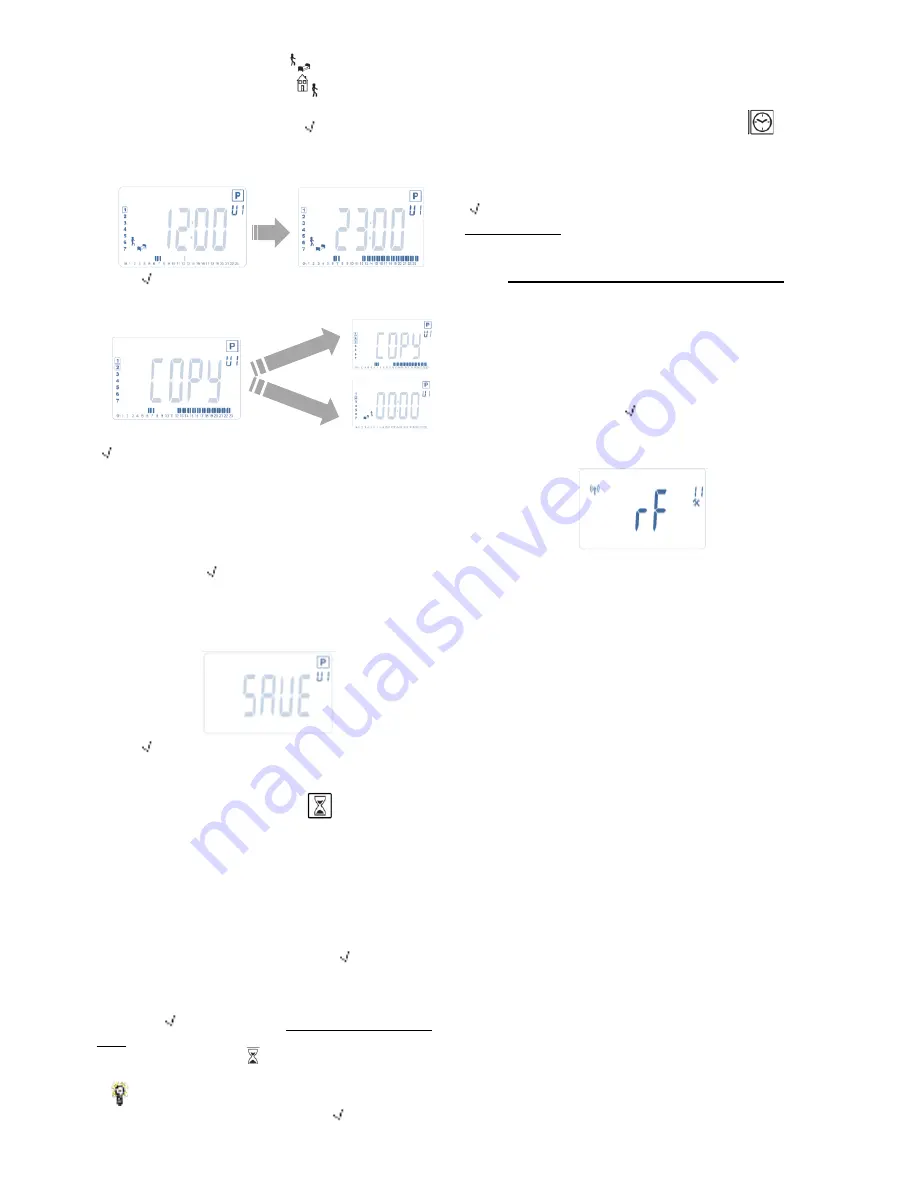
to validate and finish the edition of the first day. 


Now you can choose to copy the program day just 
created to subsequent days. 


Copy the current day to the following day by pressing the 

( ) 

key.  [on Tuesday on Wednesday... up to the last day 

of the week (7 Sunday) ].  
 
If you don’t want to copy the current day press another 
key (

LESS


(-) 

or

 MORE (+) 

or

 LEFT


(

◄)

 or 

RIGHT


(

►) 

key )and you will be invited to create a program for 
Tuesday (repeat the previous method to build it.) 


When you press 

( ) 

key on the last day (7 Sunday) you 

will be invited to save your program. 


Then the message “

SAVE

” appears and blinks until 

validation: 


Press 

( ) 

key to save your program and return to 

AUTO


operating mode following your user program. 

3.2.7 

Timer/Booster mode 


The Timer/Booster mode allows you to adjust, the 
temperature and the duration for a special time. 
This function can be used when you stay at home for 
several days, or if you want to override the program for 
some time (reception...). 
 
- You can first adjust, the desired setting temperature 
with 

LESS


(-) 

or

 MORE (+) 

key, press

 ( ) 

key to start the 

function. (Default value 

24°C 

). 

 - In a second time, you can adjust the duration in hours 

h

” if below 24h, then in day “

d

” with 

LESS


(-) 

or

 MORE 

(+), 

press

 ( ) 

key


to validate. (Adjustable 1 Hour to 44 

days). 
The Timer/Booster logo 

 will blink and the number of 

hours /days left is displayed until the end of the period. 

You can switch between Timer counter value and 

temperature Timer value by pressing 

( ) 

key. 

If you want to stop the Timer/Booster function before the 
end, set the duration period to “

no

” with 

LESS


(-) 

key. 

3.2.8 

  Clock update mode 


By pressing 

LESS


(-) 

or

 MORE (+) 

keys, your are 

allowed to update time values ( Hour 

– Minutes – Year – 

Month 

– Day of the month ) and validate it by pressing   

( ) 

key. 

See section 2.2 

“Time and Date adjustment” 


In combination with Central Unit 


4.1 

Installation 

If your thermostatic head works in combination with a RF 
Central Unit, it will become a remote unit. 
 
To configure your thermostatic head with the BT-CT02 
RF (Central Unit): 
- Press and maintain the 

( ) 

key during 5s, then you are 

in the Parameters Menu number 

10

. Press the 

RIGHT


key 

(

►) 

to be in the RF pairing mode (User Menu 

number 

11

). 


** To ease the installation, it will be better to have the 
Central Unite near to the thermostatic head during the 
configuration mode. (A minimal distance of > 1 meter 
must be respected) 
 
- Now put your Central Unit in RF pairing mode too. 
(please refer to the Central Unit leaflet for this ) 
The Central Unit will now send the radio configuration 
signal to the thermostatic head.  
- After few seconds, the Central Unit and the thermostatic 
head should exit by themselves the RF pairing mode,  
this is the normal procedure to confirm a correct pairing.  
- Now, you can check the RF distance and if RF signal is 
strong enough, replace the Central Unit to its room. 
Return to your room where the thermostatic head is 
placed. Put your thermostatic head in Comfort mode 
(setting temperature position 30°C), wait the backlight 
extinction and 5 seconds more (RF antenna will blink 
during RF communication on the LCD).  
- Now return to the Central Unit to see the setting passes 
through the RF and is also equal to 30°C in the Central 
Unit.  
 
If the RF signals were received correctly, adjust your 
setting temperature as you like. 
If the RF signals weren’t received correctly, check the 
installation (Position, distance...) or restart the RF pairing 
rules to be sure. You may have to use a Watts RF 
repeater if you want to extend the RF range. 
Please note that this is not possible to make a direct RF 
pairing between the BT-TH02 RF and a BT RF 
thermostat. If you want to use a BT RF thermostat in a 
room, you should pair the RF thermostat to the Central 
Unit BT-CT02 RF, then pair one or several BT-TH02 RF 
to the Central Unit. 

Other key 

pressed 

(OK)

 key 

pressed 

Summary of Contents for BT-TH02 RF

Page 1: ...statkopf funkgesteuert 10 18 MANUEL D UTILISATION FR T te thermostatique RF digitale programmable 19 26 MANUALE D USO IT Testina Cronotermostato digitale RF 27 34 GU A DE USUARIO ES Cabezal termost ti...

Page 2: ...inition 4 3 2 1 Manual mode Comfort 4 3 2 2 Manual mode Reduced 4 3 2 3 Manual mode Anti Freeze 4 3 2 4 OFF mode 4 3 2 5 Automatic mode 4 3 2 6 Program mode 4 3 2 7 Timer Booster mode 6 3 2 8 Clock up...

Page 3: ...2 Adjustment of the minutes Date 3 Adjustment of the year 4 Adjustment of the month number 01 to 12 5 Adjustment of the day number 01 to 31 Then the blinking message Save appears press to validate th...

Page 4: ...press key to enter in the operating mode you have chosen 3 2 1 Manual mode Comfort Manual working mode the comfort setting temperature will be followed all the time By pressing LESS or MORE keys the...

Page 5: ...ce the choice is made press the key to jump to the following step The program creation will always start with the day value 1 Monday Once you are in the program change mode after pressing the OK key f...

Page 6: ...th Day of the month and validate it by pressing key See section 2 2 Time and Date adjustment 4 In combination with Central Unit 4 1 Installation If your thermostatic head works in combination with a R...

Page 7: ...he both LESS and MORE keys The logo will be displayed on the screen Repeat the same procedure to unlock the key board 5 2 Open window function Conditions of open window detection The thermostatic head...

Page 8: ...e The thermostatic head will re measure this time at each program change to compensate external temperature change influence You can now program your thermostatic head without the need to adjust the t...

Page 9: ...Head seems to work correctly but the RF communication doesn t work correctly Output On the thermostatic head check the good reception of RF signal Check the batteries Contact your installer My Thermo...

Page 10: ...mfort 12 3 2 2 Betriebsart Abgesenkter Betrieb 12 3 2 3 Betriebsart Frostschutz 12 3 2 4 Betriebsart OFF AUS 12 3 2 5 Betriebsart Automatik 13 3 2 6 Programmmodus 13 3 2 7 Betriebsart Timer Booster 14...

Page 11: ...4 Einstellung der Monatszahl 01 bis 12 5 Einstellung der Tageszahl 01 bis 31 Anschlie end blinkt die Meldung Save Dr cken Sie um die eingestellte Uhrzeit und das Datum zu best tigen Sie haben jederzei...

Page 12: ...zeigen Bewegen Sie den Cursor bis zur gew nschten Betriebsart und dr cken Sie die Taste um die ausgew hlte Betriebsart aufzurufen 3 2 1 Betriebsart Komfort Im manuellen Betriebsmodus wird die eingeste...

Page 13: ...benutzerdefinierten Programms w hlen Sie ein U1 bis U4 Programm aus und dr cken ca 2 Sekunden lang die Taste Symbole und Anweisungen f r die Programmierung Die Mindestdauer f r einen Programmschritt b...

Page 14: ...ung nach dem oben beschriebenen Verfahren vor Wenn Sie am letzten Wochentag 7 Sonntag die Taste dr cken werden Sie zur Speicherung Ihres Programms aufgefordert Es erscheint die Meldung SAVE Sie blinkt...

Page 15: ...WATTS um die Reichweite zu erh hen Beachten Sie dass eine direkte Paarung Funk Initialisierung zwischen dem Heizk rperregler BT TH02 RF und einem BT xx02 RF Funk Raumthermostat NICHT m glich ist Wenn...

Page 16: ...durch das Parametermen navigieren Der angezeigte Parameter kann mit Hilfe der Taste ausgew hlt werden und mit MINUS oder PLUS ver ndert werden Zur Best tigung der nderung dr cken Sie die Taste W hlen...

Page 17: ...en zur cksetzen Halten Sie die Taste Ok 2 Sekunden lang gedr ckt um die eingestellten Heiztemperaturen und benutzerdefinierten Parameter dieses Men s auf die standardm igen Werkseinstellungen zur ckzu...

Page 18: ...heint korrekt zu funktionieren aber die Funkverbindung ist gest rt Signal Am Heizk rperregler berpr fen Sie den korrekten Empfang des Funksignals berpr fen Sie die Batterien Wenden Sie sich an Ihren I...

Page 19: ...21 3 2 4 Mode OFF 21 3 2 5 Mode automatique 21 3 2 6 Mode programme 22 3 2 7 Mode Timer Booster 23 3 2 8 Mode de r glage de la date et de l heure 23 4 Fonctionnement avec l unit centrale 23 4 1 Instal...

Page 20: ...ure et de la date Time 1 R glage des heures 2 R glage des minutes Date 3 R glage de l ann e 4 r glage du mois 01 to 12 5 r glage du jour 01 to 31 Lorsque le message clignotant Save appara t validez vo...

Page 21: ...sur pour entrer dans le mode de fonctionnement que vous avez choisi 3 2 1 Mode manuel Confort Le mode manuel confort vous permet de r gler un point de consigne qui sera suivi tout au long de la journ...

Page 22: ...d un programme La programmation se fera par pas de 30 minutes A chaque valeur ou pictogramme qui clignotent vous devez faire un choix avec les touches ou Une fois votre choix fait appuyez sur pour pas...

Page 23: ...roger le programme pour une occasion particuli re r ception r glez d abord la temp rature de consigne d sir e avec les touches ou puis appuyez sur pour d marrer la fonction valeur par d faut 24 C dans...

Page 24: ...n sera synchronis e avec cette m me heure A tout moment si le r tro clairage est teint appuyez sur n importe quelle touche pour le rallumer puis appuyez sur la touche OK pour basculer la temp rature d...

Page 25: ...du radiateur et v rifiez la temp rature r elle de la pi ce au bout d une heure Lorsque vous entrez dans le param tre de calibration no est affich sur la droite pour indiquer qu aucune calibration n a...

Page 26: ...RoHS 2011 65 EU 8 Dimensions 9 Probl mes et solutions Ma t te thermostatique ne d marre pas Probl me de piles V rifiez que le film de protection est bien retir V rifiez le sens d insertion des piles V...

Page 27: ...Ridotta 29 3 2 3 Modalit manuale Antigelo 29 3 2 4 Modalit OFF 29 3 2 5 Modalit automatica 30 3 2 6 Modalit di programmazione 30 3 2 7 Modalit Timer Boost 31 3 2 8 Modalit aggiornamento orologio 31 4...

Page 28: ...regolare data e ora giorno e orario Ora 1 Regolazione delle ore 2 Regolazione dei minuti Data 3 Regolazione dell anno 4 Regolazione del numero del mese da 01 a 12 5 Regolazione del numero del giorno d...

Page 29: ...INISTRA o DESTRA per visualizzare il menu da cui selezionare la modalit operativa Spostare il quadrante sulla modalit operativa desiderata e premere il tasto per accedere alla modalit di funzionamento...

Page 30: ...zare un programma utente premere per 2 secondi il tasto OK Icone e istruzioni per creare un programma L incremento di programmazione minimo di 30 minuti Ogni volta che un valore o un icona lampeggiano...

Page 31: ...golare la temperatura e la durata per un arco di tempo specificato Questa funzione pu essere utilizzata quando si resta in casa per diversi giorni oppure se si desidera derogare al programma per un pe...

Page 32: ...are alcun programma il programma impostato direttamente all interno dell Unit Centrale consultare il foglio illustrativo dell Unit Centrale Possono essere visualizzate le seguenti schermate Nota l ora...

Page 33: ...enheit 13 hour selezione di visualizzazione dell orario 24H 24 00 12H 12 00 AM PM 14 dst cambio dell ora legale solare YES passaggio automatico secondo la data no nessun cambio automatico dell ora 15...

Page 34: ...nza radio 868 3 MHz 10 mW Versione software Indicata nel menu parametri n 19 v X X Compatibile con Unit Centrale BT CT02 RF Norme e omologazione La Testina Cronotermostato stata progettata in conformi...

Page 35: ...de funcionamiento 37 3 2 1 Modo manual Confort 37 3 2 2 Modo manual Reducida 37 3 2 3 Modo manual Anticongelaci n 37 3 2 4 Modo Apagado 37 3 2 5 Modo Autom tico 37 3 2 6 Modo Programa 37 3 2 7 Modo Te...

Page 36: ...oras 2 Ajuste de los minutos Fecha 3 Ajuste del a o 4 Ajuste del mes de 01 a 12 5 Ajuste del d a del 01 al 31 A continuaci n se muestra el mensaje parpadeante Save Pulse para validar la hora y fecha s...

Page 37: ...En el modo de funcionamiento manual podr ajustar un valor de temperatura de confort que se utilizar durante todo el d a Al pulsar las teclas MENOS o M S el valor de temperatura de confort empieza a pa...

Page 38: ...e cambio de programa despu s de mantener pulsada la tecla OK durante m s de 2 segundos se mostrar la siguiente pantalla Aqu podr ajustar la hora del primer paso del programa con las teclas MENOS o M S...

Page 39: ...a tecla Consulte el apartado 2 2 Ajuste de la hora y la fecha 4 En combinaci n con la unidad central 4 1 Instalaci n Si utiliza el cabezal termost tico en combinaci n con una unidad central RF el cabe...

Page 40: ...l para cambiar el valor de temperatura de anti hielo de su instalaci n Modo Apagado 5 Funciones especiales 5 1 Funci n de bloqueo de las teclas Utilice esta funci n para evitar cualquier cambio de sus...

Page 41: ...establecido en su programa semanal Este sistema de control autom tico funciona del modo siguiente Al poner en marcha el cabezal termost tico por primera vez medir el tiempo que tarda el radiador en a...

Page 42: ...ado el adhesivo de protecci n de las pilas Compruebe la orientaci n de las pilas Compruebe la capacidad de las pilas El nivel de carga de las pilas es demasiado bajo La palabra Batt y la luz de fondo...

Page 43: ...ort 45 3 2 2 Handbedieningsmodus Verlaagd 45 3 2 3 Handbedieningsmodus Vorstbeveiliging 45 3 2 4 UIT modus 45 3 2 5 Automatische modus 45 3 2 6 Programmeermodus 46 3 2 7 Timer boostermodus 47 3 2 8 Mo...

Page 44: ...tijd en dag Tijd 1 Instelling van de uren 2 Instelling van de minuten Datum 3 Instelling van het jaar 4 Instelling van het maandnummer 01 t m 12 5 Instelling van het dagnummer 01 t m 31 Vervolgens ve...

Page 45: ...dbedieningsmodus Comfort Handmatige werkmodus de voor comfort ingestelde temperatuur wordt altijd gevolgd Als u op de toets MINDER of MEER drukt begint de ingestelde comforttemperatuur te knipperen en...

Page 46: ...rukt u op de toets om door te gaan naar de volgende stap Het programmeren begint altijd met de dagwaarde 1 maandag Wanneer u naar de programmawijzigingsmodus gaat door de OK toets langer dan 2 seconde...

Page 47: ...minder dan 24 uur vervolgens in dagen d Druk op de toets om te bevestigen Af te stellen op een duur van 1 uur tot 44 dagen Het timer boosterpictogram gaat knipperen en het resterende aantal uren dage...

Page 48: ...eid 4 3 Werkmodi Bij gebruik van de centrale eenheid zijn de modi voor het afstellen van de klok en het programmeren niet meer beschikbaar want de instelling van tijd en programmawaarden wordt rechtst...

Page 49: ...en om aan te geven dat er nog geen ijking is uitgevoerd Voer de door de thermometer aangegeven waarde in met behulp van de toets MINDER of MEER om de werkelijke waarde in te voeren Druk vervolgens op...

Page 50: ...108 EG RoHS 2011 65 EU 8 Afmetingen 9 Problemen oplossen De thermostaatkop start niet Probleem met batterijen Controleer of de beschermingssticker op de batterijen is verwijderd Controleer de stand va...

Page 51: ...1516 17 1819 20212223 0 1 2 3 4 5 6 7 8 9 10 111213141516 17 1819 20212223 0 1 2 3 4 5 6 7 8 9 10 111213141516 17 1819 20212223 0 1 2 3 4 5 6 7 8 9 10 111213141516 17 1819 20212223 1 2 3 4 5 6 7 0 1 2...

Page 52: ...819 20212223 0 1 2 3 4 5 6 7 8 9 10 111213141516 17 1819 20212223 0 1 2 3 4 5 6 7 8 9 10 111213141516 17 1819 20212223 0 1 2 3 4 5 6 7 8 9 10 111213141516 17 1819 20212223 0 1 2 3 4 5 6 7 8 9 10 11121...

Reviews: