background image


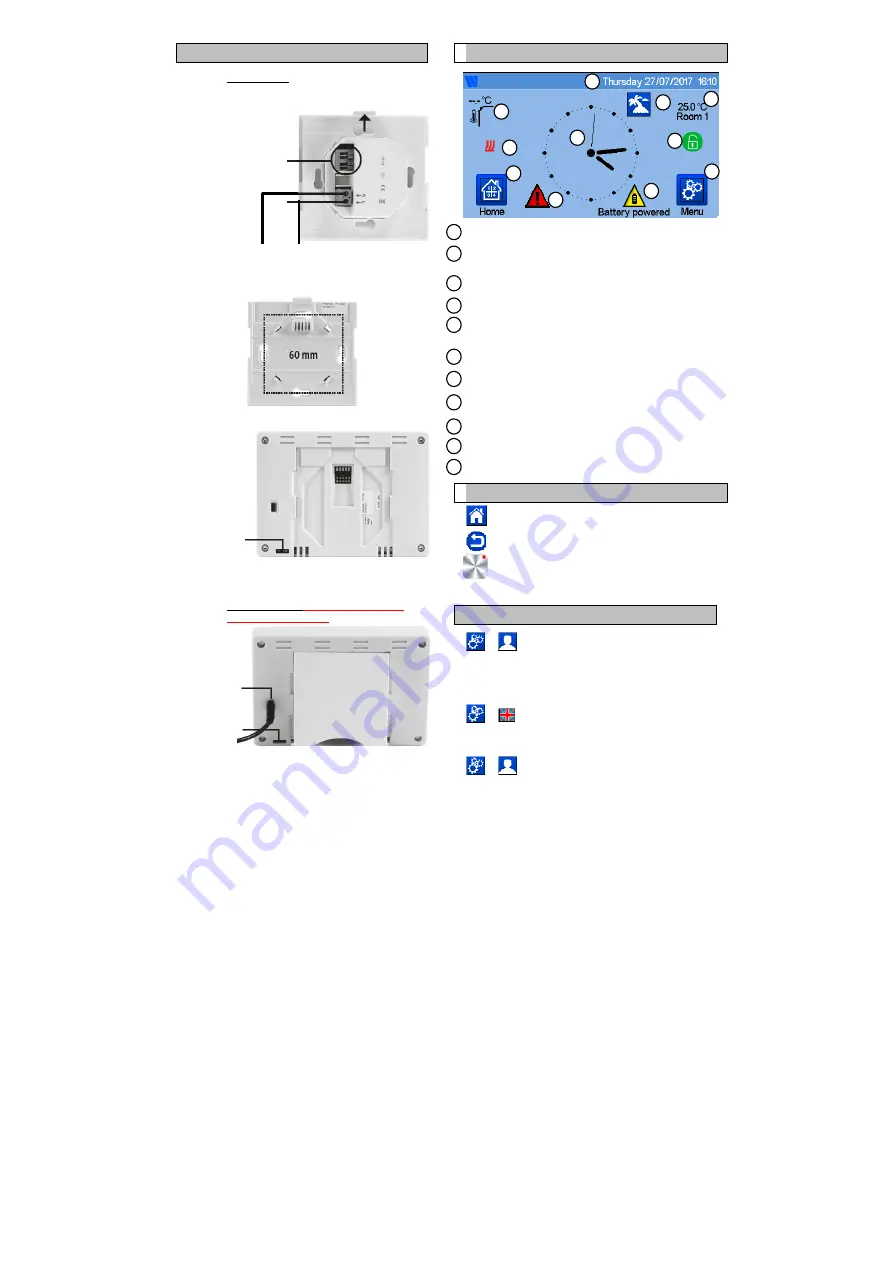
1 INSTALL YOUR CENTRAL 


a- Wall 

mounting 


1- Connect the power as described below :  


2- Screw the power unit on the wall 

and connect to power 

supply.  Note!

 The tab must be on the top! 


3- Put the switch on ON position 


4- Mount the Central 

control 

on the power unit and slide it on 

the bottom to clip it. The Central is ready for operation. 


b- 

Table installation 

(with optional mini USB 

cable – sold seperately) 


Connect the central unit with the 

mini USB

 cable (5V, 1A) and 

then mount the leg support on it and put the switch on ON 
position. The central unit is ready for operation. 


MAIN SCREEN 

ICONS


Date 
 
Display the time or the ambient T° of the room or zone. Make 
your choice by pressing on the central part of the screen 
 
Outside sensor temperature 
 
Screen lock. Long press toggles between locking / unlocking. 
 
Error flag – press to access RF, limits, alarms, battery 
anomalies. 
 
The device is working on battery (! only for settings and pairing). 
 
Rooms access (if Central is locked - cannot change settings). 
 
Main menu.  
 
Holidays mode status. 


Boiler status displayed if connected to the Central. 


Display the ambient temperature in one room 
 

GENERAL PICTOGRAMS 

To return to the main screen. 

To return to the previous screen. 

The buttons with a red point need a 
long press (min 5s). 


2 ADJUST TIME / USER SETTINGS 


Set the time and the date manualy 

or automatically. If you 

select auto, you have to set the time zone (UTC) and the device 
is getting the time from internet (WIFI connection is mandatory). 


Set your language  - see MAIN MENU section 


Personalise your screen settings, eg background colour etc 
 
See “User Settings Menu” in MAIN MENU section (page 8) for 
further information. 


NOT TO BE USED 

MAINS


POWER SUPPLY 85-265VAC -  50/60HZ 

ON/OFF 

ON/OFF 

CABLE 

3

2

5

7

10 

11 

1

2

3

4

5

6

7

8

9

10 

11 

1

Summary of Contents for BT-FR02-RF

Page 1: ...WIFI INSTALLATION AND USER GUIDE 2 8 GB INSTALLATIE EN GEBRUIKERSHANDLEIDING 9 15 NL INSTALLATION OG BRUG GUIDE 16 22 DK INSTALLATION OCH ANVANDNING GUIDE 23 29 DK SE INSTALLASJONS OG BRUKSANVISNING...

Page 2: ...30 C to 40 C 0 C to 40 C 30 C to 50 C Electrical Protection Electrical insulation IP30 Class II Temperature precision 0 1 C Setting Temperature Range Comfort Reduced Anti freeze 5 C to 30 C in 0 5 C s...

Page 3: ...locking unlocking Error flag press to access RF limits alarms battery anomalies The device is working on battery only for settings and pairing Rooms access if Central is locked cannot change settings...

Page 4: ...te the pump and or boiler First step define on which circuit an device belongs to With the plan of your installation define which devices excluding the receiver are on circuit 1 Then using the Central...

Page 5: ...ected to the WiFi network with an IP address WiFi status should read 1 2 Press the home key to go back to front screen If after several attempts connection is unsuccessful connect the central unit to...

Page 6: ...date and set the desired temperature on main screen Anti freeze Mode Use this mode to put your room in anti freeze mode the temperature is set in the Installation menu OFF Mode To switch OFF the devic...

Page 7: ...o program the lighting devices please set the devices as ON OFF ON OFF DEVICES MANAGEMENT Press on in the main screen and on Device type choice heating cooling lighting On Off These buttons are only d...

Page 8: ...s menu In this menu you can set Time Date Manual Automatic Time zone UTC if the device is in automatic time update mode Time and date if the device is in manual time update mode Summer Winter Manual A...

Page 9: ...connected to the Wifi router 2 2 Central unit connected to the wifi router and to the server Pairing of the central to an account is required n b The connection to Internet is recommended with Certifi...

Reviews: