background image

Setup

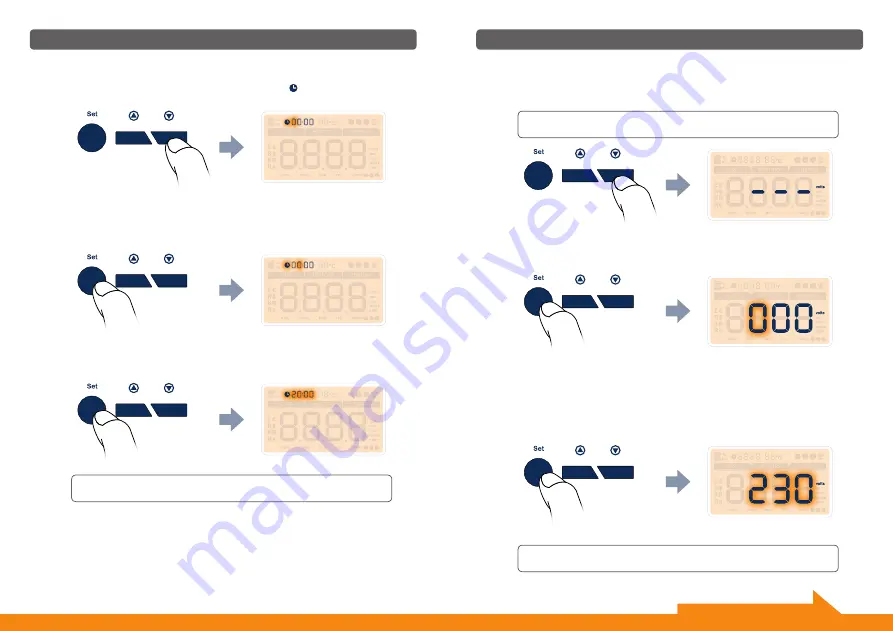
Press the [ 

Set button

1

] shortly and the dashes [ - - - ] will automatically 

turn to be [ 0 0 0 ] and then the hundred-digit will flash.

Fig. 7

Fig. 8

Step 6  •  Setting Mode - Setup for the VOLTAGE

After you press [ 

Down button

3

] to confirm the setting of TIME and then 

will enter into voltage setting interface, where you will find three dashes to 
be set as the correct voltage value (Fig. 7).

Use [ 

Up button

2

] or [ 

Down button

3

] to adjust the hundred - digit to 

the correct value for the voltage. Then press the [ 

Set button

1

] shortly 

to confirm and do the same way until you set the correct value for the last-
digit.

After  you  set  the  last  single  -  digit,  press  the  [ 

Set  button

1

]  shortly  to 

confirm. The confirmation of the last single digit will make the complete 
voltage value flash (Fig. 8).

The voltage are generally in the range 100-240V. Check carefully the 
voltage level of your country before set up.

Setup

Step 5  •  Setting Mode - Setup for the TIME

After you press [ 

Down button

3

] to confirm the setting of DAY and then 

will enter into time setting interface. The symbol [       ] is flashing (Fig. 6).

Fig. 6

Press the [ 

Set button

1

] shortly, the hour value of the clock will flash. 

Use the [ 

Up button

2

] or [ 

Down button

3

] to adjust to the correct hour.

Then press the [ 

Set button

1

], the time value will flash. Use the [ 

Up but-

ton

2

] or [ 

Down button

3

] to adjust to the correct minute.

To confirm the setting of TIME, press [ 

Down button

3

].

To modify the TIME, please press the [ 

Set button

1

] again to restart 

the TIME setting.

10

11

Continue setting on the next page.

To modify the VOLTAGE, please press the [ 

Set button

1

] again to re-

start the VOLTAGE setting.

To confirm the setting of VOLTAGE, press [ 

Down button

3

].

Summary of Contents for EW4008

Page 1: ...WIRELESS Energy Monitor Monitor household electricity use Instruction Manual EW4008 C Tx Rx...

Page 2: ...batteries Do not use the monitoring system if you find your electric wire in abnormal conditions such as loose wire exposed copper wire burnt mark on wire insulation layer holes on wire layer or dama...

Page 3: ...re available to purchase online and your reseller Please visit www wattsclever com C Tx Rx C Tx Rx Contents 5 6 7 16 18 19 20 21 23 25 27 28 29 30 Contents of the box Parts Setup 1 Full LCD Display La...

Page 4: ...display will shown the default setting for the year is 2011 and the symbol Y is flashing Fig 2 Now press the Set button1 shortly Fig 2 The thousand digit will flash Then use Up button2 or Down button...

Page 5: ...DAY press Down button3 To modify the DAY please press the Set button1 again to restart the DAY setting Setup Press Set button1 to confirm and you will see that the hundred digit of the year begins to...

Page 6: ...e the complete voltage value flash Fig 8 The voltage are generally in the range 100 240V Check carefully the voltage level of your country before set up Setup Step 5 Setting Mode Setup for the TIME Af...

Page 7: ...ress the Set button1 to confirm for the rate of TARIFF 1 Setup To modify the CURRENCY please press the Set button1 again to restart the CURRENCY setting Step 7 Setting Mode Setup for the CURRENCY Afte...

Page 8: ...g 11 follow by TARIFF 3 Please operate the setting same way as Setting of Tariff 1 symbol is flashing behind TARIFF Setup Press the Set button1 shortly the hour value of the clock will flash Use the U...

Page 9: ...its value will disappear to be replaced by the channel numbers After adjusting to the desired channel We recommend use CH 01 for mon itoring entire house energy consumption press the Down button3 and...

Page 10: ...ny other displays will return the LCD screen to the COST Mode 10 sec idleness Fig 16 COST Mode Setup 4 Installation of the Power Transmitter OR Fig 15 You may choose to put the Power Transmitter in a...

Page 11: ...ser will get the value of 0000 kWh For 10 005 kWh the user will see the difference value as 0005 kWh as Fig 20 the electricity consumption from 00 00 of current day to now the electricity consumption...

Page 12: ...same time to get the value after deducting 10 000 For example if the YTD value is 10 000 the user will get the value of 0000 For 10 005 the user will see the difference value as 0005 as Fig 24 4 Mode...

Page 13: ...nto the history date input interface as Fig 25 Fig 25 Press for 3 sec The first two digits represent Month range 01 12 and the last two digits represent Date range 01 31 If you want to view the histor...

Page 14: ...s a BEE sound In Fig 29 bON is the screen symbol of buzzer on status After switching to desired status press the Set button1 to finish the set ting and return to the COST Mode COST Mode Fig 28 Buzzer...

Page 15: ...Mauritius Montserrat Leeward Is Myanmar formerly Burma Nepal Netherlands New Zealand Norway Poland Portugal Romania Rwanda St Kitts and Nevis Leeward Is St Vincent Windward Is Samoa Senegal Sierra Le...

Page 16: ...e household ap pliances Television Toaster Air conditioner Hot water heater Microwave 150 W 1000 W 2000 5000 W 4000 W 1000 2000 W My Appliances Cost Dishwasher Electric stove Microwave Clothes washer...

Page 17: ...CD Display 79 L x 48 5 H mm Power Transmitter 90 5 L x 72 W x 44 5 H mm Operating range 80 265V Wireless transmission 433 MHz SRD band Maximum rated sensor current 100A Min current sensitivity 0 1A Ma...

Reviews: