


Page 5 of 8
PRODUCT INSTALLATION:
INS31006
MIRO CONFERENCE
WATSON DESKING
800.426.1202
www.watsondesking.com
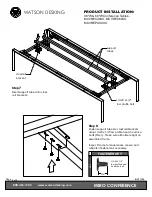
Step 9 -
for seamed tables
Place one half of table top on
to assembled frame.
assembled
frame
table surface
FASTENER KEY
F
IG
-2
#10 x 3/4"
wood screw
3/4"
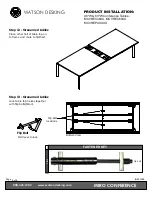
Step 10
Align table top with assembled
frame making sure corners of
table surface are square with
frame. Fasten table surface to
assembled frame using #10 x
3/4" wood screws (FIG-2).
#10 x 3/4"
wood screw
Step 11
Insert dowels into holes on
table seam edge.
dowel
48"W & 60"W Conference Tables -
MCVREC48XX, MCVREC60XX,
MCVREPXXXXX
Do not tighten screws yet.
Summary of Contents for Miro Conference MCVSQR Series
Page 1: ......


