background image

3.

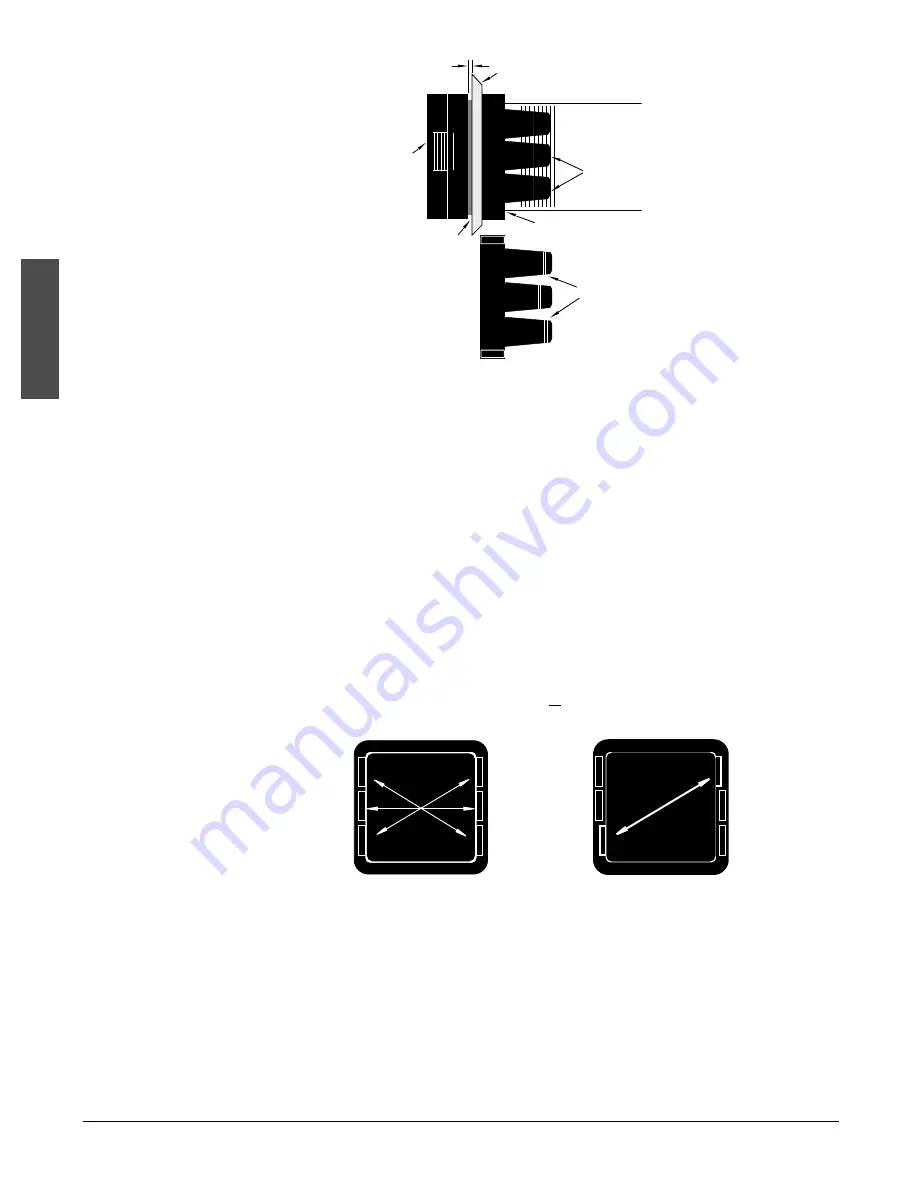
While pressing the front of the case firmly against the panel, slide the
mounting collar over the back of the control. The tabs on the collar must line
up with the mounting ridges on the case for secure installation. See Figure 2
a. Slide the collar firmly against the back of the panel getting it as tight as
possible.

To ensure a tight seal, use your thumb to lock the tabs into place while press-
ing the case from side to side. Don’t be afraid to apply enough pressure to
install the control. The tabs on each side of the collar have teeth which latch
into the ridges. See Figure 2b. Each tooth is staggered at a different height,
so only one of the tabs on each side are ever locked into the ridges at any
time.  

As depicted in Figure 2.2c, confirm that the tabs on one side of the collar cor-
respond with those on the opposite side. Make sure the two corresponding
tabs are the only ones locked in the ridges at the same time.

If the corresponding tabs are not supporting the case at the same
time and the space between the panel and the case bezel is greater
than .019", you will will not have a NEMA 4X seal. This applies to
units with models designated 94B. 

However, all units should be mounted

in this fashion to guarantee integrity of the mounting system.

2 . 2  

I n s t a l l   a n d   W i r e

W a t l o w   S e r i e s   9 4

Install and Wire

Figure 2.2a - 

Mounting Case Side
View. 

Figure 2.2b - 

Mounting Collar
Cross Section with
offset teeth.

Figure 2.2c - 

Case Rear View and
NEMA 4X Seal
Example.

0 to 0.019 space
(0 to 0.483 mm)

Bezel

Panel

External Gasket

Mounting Collar

Ridges

Teeth

Tabs

4.

Insert the control chassis into its case and press the bezel to seat it. Make
sure the inside gasket is also seated properly and not twisted. The hardware
installation is complete. Proceed to the wiring section from here.

Removing the Series 94 Controller

When removing the mounting collar, we suggest using a thin tool such as a
putty knife or screwdriver to pry gently under each of the six tabs to disen-
gage the teeth. Then rock the collar back and forth until it can be easily
pulled off the case.

NEMA 4X Seal Example.

Make sure that the two corresponding tabs

are locked in the ridges at the same time

.

ç

CAUTION: Follow the
installation procedure
exactly to guarantee a
proper NEMA 4X seal.
Make sure the gasket
between the panel
and the rim of the
case is not twisted
and is seated proper-
ly. Failure to do so
could result in dam-
age to equipment.

Summary of Contents for Series 94

Page 1: ...June 2002 10 00 Supersedes 0600 0024 0000 Rev B User s Manual 1241 Bundy Blvd P O Box 5580 Winona Minnesota USA 55987 5580 Phone 507 454 5300 Fax 507 452 4507 http www watlow com Registered Company W...

Page 2: ...review all of your configuration information for each step of the setup to verify that your selections are consistent with your applications If the problem persists after checking all the steps you ca...

Page 3: ...Glossary A 7 Specifications A 9 Model Number Information A 10 Index A 11 Declaration of Conformity A 12 Quick Reference A 13 Figures Page Series 94 Input Output Overview 1 1 Multiple Panel Cutout Dime...

Page 4: ...Watlow Series 94 Notes...

Page 5: ...quipment or cause large product scrap costs The limit output is latching An optional process alarm output can be config ured as latching or non latching with high and low alarm set points Special 94 f...

Page 6: ...Overview 1 2 Overview Watlow Series 94 Notes...

Page 7: ...a panel cutout using the dimensions in Figure 1a 2 If your controller model number begins with 94B make sure the rounded side of the external case gasket is facing the panel sur face Check to see that...

Page 8: ...seal This applies to units with models designated 94B However all units should be mounted in this fashion to guarantee integrity of the mounting system 2 2 Install and Wire Watlow Series 94 Install a...

Page 9: ...w Voltage 12 24V ac dc 94_ _ 1_ _ 1 00_ _ Figure 2 3 Power wiring L1 L2 11 12 LIMIT 94 RESET Watlow Series 94 Install and Wire 2 3 Install and Wire WARNING To avoid electric shock use National Electri...

Page 10: ...d to the RTD element resistance will result in erroneous input to the instrument To overcome this problem use a 3 wire RTD sensor which compensates for lead length resistance When extension wire is us...

Page 11: ...oose a sensor Chapter Two and Appendix Install and wire the controller Chapter Two Configure the con troller Chapters Three Four and Five NOTE 1 Switching inductive loads relay coils solenoids etc wit...

Page 12: ...tive loads relay coils solenoids etc with the mechanical relay solid state relay output options requires use of an R C suppres sor Watlow carries the R C suppressor Quencharc brand name which is a tra...

Page 13: ...1 12 9 3 10 2 3 4 6 5 Install and Wire NOTE Successful installation requires four steps Choose the controller s hardware configuration and model number Appendix Choose a sensor Chapter Two and Appendi...

Page 14: ...iring Notes Sketch in your application on this page or a copy of it See the wiring example in this chapter Figure 2 8 Wiring notes L1 L2 power 9 8 Install and Wire 2 8 Install and Wire Watlow Series 9...

Page 15: ...ndicate actual temperature alarm low alarm high limit low set point value limit high set point value operating parameter values or an open sensor When powering up the upper display will be blank for f...

Page 16: ...3 2 Keys and Displays Watlow Series 94 Keys and Displays Notes...

Page 17: ...rol located on the left viewed from the bot tom To set the DIP switch remove the control chassis from the case Holding each side of the bezel press in firmly on the side grips until the tabs release Y...

Page 18: ...s 94 The Setup Menu displays the parameters that configure the Series 94 s features to your application Enter the Setup Menu by pressing the Up arrow and Down arrow keys simultaneously for 3 seconds T...

Page 19: ...wn arrow keys to access the LOC prompt in the Setup Menu which can be viewed and changed Input Selects the sensor input type The internal DIP switch must also match the In Input parameter See Figure 4...

Page 20: ...e cleared by pressing the Reset Key Selecting non latching will automatically reset the alarm output when the condition clears Appears only if Ot2 is set to PrA or Pr Range LAt or nLA Default nLA Sile...

Page 21: ...Pr or PrA and LOC is set to 0 rtd JIS or din din In is set to rtd or r d and LOC is set to 0 UP no no display shown Pro LOC is set to 0 Pro Process LoL Low limit set point HiL High limit set point Lo...

Page 22: ...O Range rL to LHI or rH if LHI is not active High Limit Set Point Sets the high limit set point Active if Ot1 is set to H_L or HI Range LLO to rH or rL if LLO is not active Alarm Low Represents the lo...

Page 23: ...alarm limits and satisfies the alarm hysteresis HSA If the alarm is non latching The alarm clears itself automatically as soon as the process temperature is inside the alarm limits and satisfies the...

Page 24: ...An open or reversed polarity sensor is the most likely cause Check the sensor if the connection is good and the sensor func tions properly call the factory The A D overrange voltage is too high to con...

Page 25: ...oss other wiring at 90 angles whenev er crossing lines is unavoidable Look at the system layout identify and locate electrical noise sources such as solenoids relay contacts motors etc Route the wire...

Page 26: ...load L2 return lead has the same switched signal and could couple unwanted noise into a control cir cuit Tie all ground terminals together with one lead usually green wire tied to ground at one point...

Page 27: ...CAL Calibration Offset parameter appears in the lower display with no in the upper display Any inadvertent change in the displayed data when pressing the Up arrow Down arrow keys is ignored Calibratio...

Page 28: ...lower display Continue holding the Up arrow Down arrow keys simultaneously for three seconds until the lower display reads CAL 2 Press the Up arrow key until YES appears in the upper display 3 Advanc...

Page 29: ...pensator or thermocouple calibrator to Terminal 5 Negative and Terminal 3 Positive on the Series 94 terminal strip If using a compensator turn on and short the input wires If using J calibrator set to...

Page 30: ...A 6 Appendix Watlow Series 94 Appendix Notes...

Page 31: ...e process increases above the set point the output increases D E default parameters The programmed instructions that are permanently stored in the microprocessor software direct action An output contr...

Page 32: ...et point intended alarm limit etc corresponding to temperature prompt A symbol or message displayed by the con troller that requests input from the user R reference junction See junction resistance te...

Page 33: ...uppression Off state output impedance is 31M Alarm output can be latching or non latching with separate high and low values Alarm silencing inhibit on power up Output Configurations Output 1 Limit out...

Page 34: ...er RR Red Red AA Red Red without Watlow logo RG Red Green AB Red Green without Watlow logo GR Green Red AC Green Red without Watlow logo GG Green Green AD Green Green without Watlow logo 1 To effect I...

Page 35: ...stallation procedure 2 1 2 2 J K Keys 3 1 L ladder wiring diagram 2 7 Latching 4 4 5 1 Lock Parameter 4 3 Low Limit Set Point 4 6 low voltage wiring 2 3 Lower Display 3 1 4 4 M mechanical relay 5 Amp...

Page 36: ...hreibung Serie 94 Modellnummer n 9 4 A oder B B 1 D A C D oder K 0 oder 1 4 beliebige Buchstaben oder Ziffern Klassifikation Sicherheitskomponente Temperaturregelsystem Installationskategorie II Emiss...

Page 37: ...ke sure the In Input parameter Setup Menu and the DIP switch settings both match your sensor Refer to the table below for the appropriate input type and range Er4 Configuration error The controller s...

Page 38: ...LOC is set to 0 SIL On or OFF OFF Ot2 is set to Pr or PrA and LOC is set to 0 rtd JIS or din din In is set to rtd or r d and LOC is set to 0 UP no no display shown Pro LOC is set to 0 Pro Process LoL...

Page 39: ...oducts include electric heaters sensors controls and switching devices The Winona operation has been designing solid state electronic control devices since 1962 and has earned the reputation as an exc...

Page 40: ...months after delivery to the first purchaser for use providing that the units have not been misapplied Since Watlow has no control over their use and sometimes misuse we cannot guarantee against fail...

Reviews: