background image

Setup, Chapter 4

14

WATLOW Series 965 User's Manual

Setup

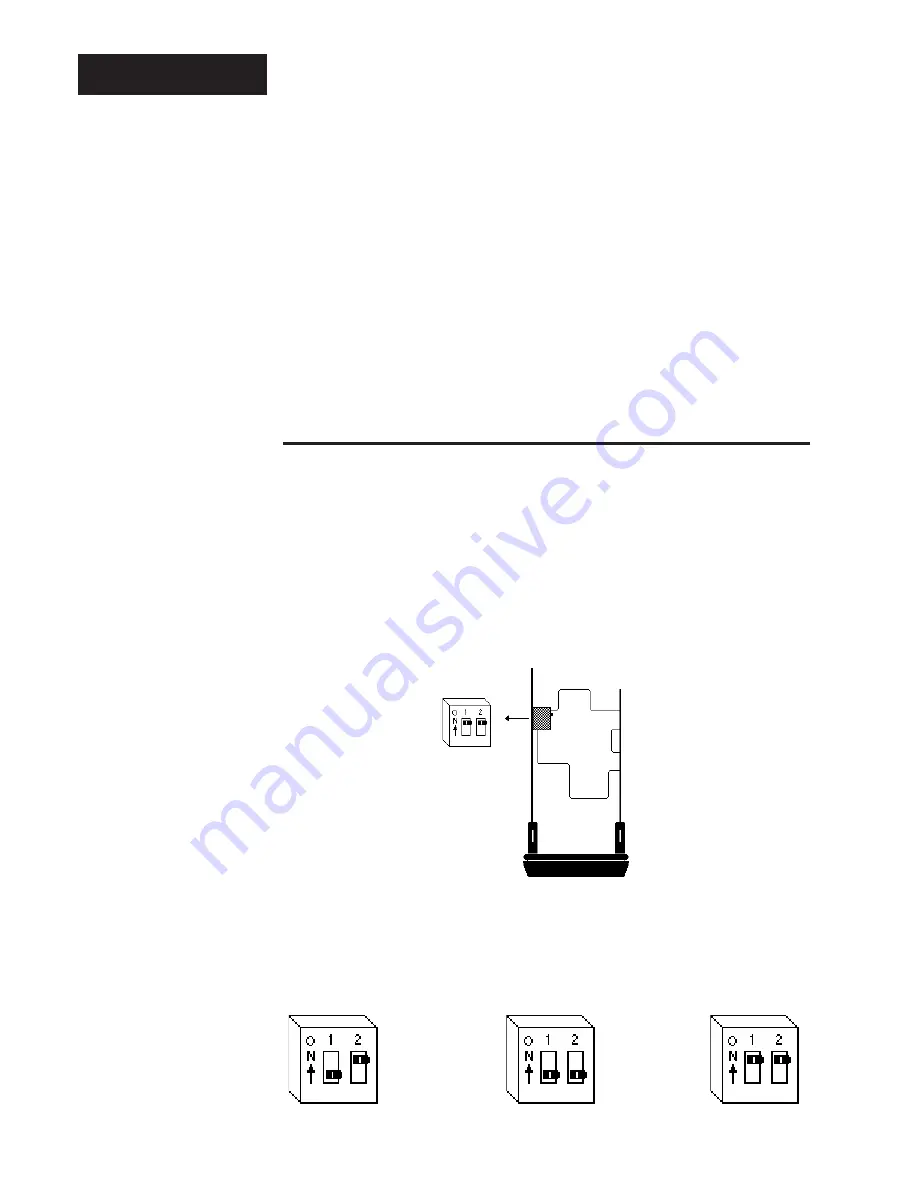
Figure 21 -
DIP Switch Location
and Orientation

Control Chassis -

Bottom View

Input Types

Thermocouple

RTD

Process

Chapter 4

How To Set Up The Series 965

Setting up the Series 965 is a simple process.  First set the DIP switches to
match your input type.  Refer to the orientation below and Page 16 for the In
parameter.  Next, configure the 965's features to your application in the Setup
Menu, then enter values in the Operating Menu.  Both tasks use the MODE key
to move through the menus and the Up-arrow/Down-arrow keys to select data.

Before entering information in the Setup menu, set the dFL parameter.
If selected as US:  

°

F, proportion band in degrees, reset rate are the defaults.

If selected as SI:  

°

C, proportional band in % of span, derivative and integral

are the defaults.  Changing the dFL prompt will set parameters to their
factory default.  Document all current parameter settings first.  
See
Appendix 2 in the calibration section to change this parameter.

How to Set the Input Type DIP Switch

The Series 965 input type can be user selectable at any time via a Dual In-line
Package (DIP) switch inside the control, located on the left (viewed from the
bottom).  To set the DIP switch, remove the control chassis from the case.
Holding each side of the bezel, press in firmly on the side grips until the tabs
release.  You may need to rock the bezel back and forth several times to
release the chassis.

The locations of the board and switches appear in Figure 21.  Refer to the input
types below for DIP switch orientation.  DIP switch selection must match the
sensor selected under the In parameter in the Setup Menu.  Set the software
selection for the input type to match.  See Page 16.

Ó

WARNING:
Remove power from
the control before
removing the
chassis from the
case or changing
the DIP switches.

Summary of Contents for 965 Series

Page 1: ...n the U S A Printed on Recycled Paper Watlow Controls 1241 Bundy Blvd P O Box 5580 Winona MN 55987 5580 Phone 507 454 5300 Fax 507 452 4507 WatlowControls 1 16 DIN Microprocessor Based Auto tuning Con...

Page 2: ...tion for each step of the setup to verify that your selections are consistent with your applications If the problem persists after checking all the steps call for technical assistance Watlow Controls...

Page 3: ...d Returns 38 Specifications 39 Model Number Information 40 Declaration of Conformity 41 Quick Reference Figures Tables Page Figure Item 4 Series 965 Input Output Overview 1 5 Multiple Panel Cutout Dim...

Page 4: ...er the HSC parameter Special 965 features include the NEMA 4X rating dual four digit displays in either red or green optional low volt power supply auto tuning for both heat and cool outputs ramp to s...

Page 5: ...rounded side of the external case gasket is facing the panel surface Check to see that the gasket is not twisted and is seated within the case bezel flush with the panel Place the case in the cutout y...

Page 6: ...rmly against the back of the panel getting it as tight as possible Make sure you cannot move the case within the cutout if you can you do not have a NEMA 4X seal Now let s make sure we have a tight se...

Page 7: ...and compare your model number to those shown here and also the model number breakdown in the Appendix of this manual All outputs are referenced to a de energized state The final wiring figure is a ty...

Page 8: ...tion in your process or system where it reads an average temperature Put the sensor as near as possible to the material or space you want to control Air flow past this sensor should be moderate The se...

Page 9: ...hen using a 2 wire RTD That resistance when added to the RTD element resis tance will result in erroneous input to the instrument To overcome this prob lem use a 3 wire RTD sensor which compensates fo...

Page 10: ...65A 3 F 00 NOTE Switching inductive loads relay coils solenoids etc with the mechanical relay switched dc or solid state relay output options requires using an R C suppressor Watlow carries the R C su...

Page 11: ...echanical Relay Wiring Figure 18 0 5 Amp Solid state Relay Without Contact Suppres sion Wiring External Load 7 SS2 SS2 1 Fuse L1 L2 Custommer Supplied Quencharc Customer Supplied Quencharc NOTE Output...

Page 12: ...6 Not Used 7 Not Used 8 Not Used 9 DC 1 10 DC 1 11 L1 12 L2 1 120V VAC L1 L2 2 3 5 4 5 1 2 1 2 3 11 18 12 13 14 15 2 1CR 16 High Temperature Light 1 2 3 4 8 9 10 11 12 R SSR 240 10A DC1 DC Input Soli...

Page 13: ...cent power is in the lower dis play Up arrow Down arrow Keys When pressed simultaneously for three seconds the Setup Menu appears displaying the LOC parameter Continue to press the Up arrow Down arrow...

Page 14: ...efaults Changing the dFL prompt will set parameters to their factory default Document all current parameter settings first See Appendix 2 in the calibration section to change this parameter How to Set...

Page 15: ...the Setup Menu all outputs are off Entering the Setup Menu The Setup Menu displays the parameters that configure the Series 965 s features to your application Enter the Setup Menu by pressing the Up...

Page 16: ...oint is not adjustable in this level of lock out Manual operation is not permitted Bumpless transfer is defeated and outputs are disabled on sensor break Input Selects the sensor input type The intern...

Page 17: ...19 for the Pb1 parameter Range 1 to 9999 0 1 to 999 9 0 01 to 99 99 1 to 5555 0 1 to 555 5 0 01 to 55 5 Default 3 0 3 0 03 2 0 2 0 02 Latching Selects whether the alarm is latching or non latching La...

Page 18: ...to set point at all times OFF None rt 0 to 9999 100 hr rP OFF P L 0 to 100 100 dSP nor normal nor SEt Set Point lower only Pro Process upper only Table 2 Setup Menu Prompts and Descriptions Setup Menu...

Page 19: ...0 Pb2 3 0 Reset Integral 1 2 An integral control action for Output 1 or 2 that auto matically eliminates offset or droop between set point and actual process temperature rE1 It1 Will not appear if Pb...

Page 20: ...Units 25 F 0 99 9 F 0 55 5 C 0 99 9 Units 2 5 F 0 ON OFF control HSC switch diff If dFL SI 0 0 to 999 9 of span 3 rE1 0 00 to 9 99 repeats minute 0 00 repeats minute 0 00 No Reset Won t appear if Pb1...

Page 21: ...he established set point The displayed set point remains unchanged Once the control finishes learning the system it returns to a standard PID control with the PID values automatically set as a result...

Page 22: ...une the Series 965 to your thermal system The tuning settings here are for a broad spectrum of applications your system may have somewhat different requirements NOTE This is a slow procedure taking fr...

Page 23: ...heating power The 965 allows a negative output value only with a Cl Cool selection on either Ot1 or Ot2 Con Auto matic operation provides closed loop on off or PID control When the operator transfers...

Page 24: ...C as the high limit and 5 F 3 C as the low limit the high alarm trips at 107 F 41 6 C and the low alarm at 95 F 35 C If you change the set point to 130 F 54 4 C the alarms follow the set point and tr...

Page 25: ...ange error only applies to RTD units The sensor input generated a value lower than the allowable signal range or the A D circuitry malfunctioned Enter a valid input Make sure the In parameter selected...

Page 26: ...te at those levels on a power basis If output values were not stable the control outputs go to 0 power OFF If operator access is LOC 3 or 4 The control remains in auto operation and the outputs go off...

Page 27: ...nes Cross other wiring at 90 angles whenever crossing lines is unavoidable Look at the system layout identify and locate electrical noise sources such as solenoids relay contacts motors etc Route the...

Page 28: ...n uses L1 power lead to switch a load L2 return lead has the same switched signal and could couple unwanted noise into a control circuit Tie all ground terminals together with one lead usually green w...

Page 29: ...n pressing the Up arrow Down arrow keys is ignored Calibration values won t be retained unless you are in the manual mode Press the Up arrow Down arrow key to change the upper display to YES Press MOD...

Page 30: ...e upper display 3 MODE through the calibration menu until rSt appears in the lower display 4 Press the Up arrow key until YES appears in the upper display 5 Press the MODE key and the 965 advances to...

Page 31: ...and connect the reference compensator or T C calibrator to Terminal 5 Negative and Terminal 3 Positive on the Series 965 terminal strip If using a compensator turn on and short the input wires If usin...

Page 32: ...0mA Input Field Calibration Procedure Equipment Required Precision current source 0 20mA minimum range with 0 01mA resolution Setup and Calibration 1 Connect the AC line voltage L1 and L2 to the prope...

Page 33: ...the multimeter should read approximately 4mA Allow at least 10 seconds to stabilize 6 Use the Up arrow Down arrow keys reverse acting to adjust the reading on the multimeter for 3 85mA 0 10mA Press th...

Page 34: ...software to provide a data base DIN Deutsche Industrial Norms a widely recog nized German standard for engineering units Display capability In a digital indicating instru ment the entire possible span...

Page 35: ...splaying resistance versus temperature characteristics Displays positive temperature coefficient Set point Intended value of the process variable Switching sensitivity In on off control the temperatur...

Page 36: ...w Voltage Wiring 7 Lower Display 13 M M N Key 13 Manual Operation 13 23 Manual Tuning 22 Mechanical Relay 5 Amp Output 1 Wiring 10 Output 2 Wiring 11 MODE key 13 Model Number 39 N Noise Eliminating 28...

Page 37: ...ber is on the outside of the carton and on all paperwork returned Ship on a Freight Prepaid basis 3 After we receive your return we will examine it and determine the cause for your action 4 In cases o...

Page 38: ...ated resistive load 5A 30V dc 3 Switched dc signal provides a non isolated minimum turn on voltage of 3V dc into a minimum 500 load maximum on voltage not greater than 12V dc into an infinite load Sol...

Page 39: ...age Power 0 100 240V ac nominal high voltage 1 12 24V ac nominal or 12 24V dc low voltage Display Upper Display Lower Display 00 Red Red RG Red Green GR Green Red GG Green Green Model No Series 965 Mo...

Page 40: ...40 WATLOW Series 965 User s Manual Appendix Conformity Put Declaration of Conformity on this page...

Page 41: ...ensor input generated a value lower than the allowable signal range or the A D circuitry malfunctioned Enter a valid input Make sure the In parameter matches your sensor and DIP switch setting Refer t...

Page 42: ...iguration and model number Do not enter any values here make photocopies instead Setup Menu Parameters Value Range Factory Default Appears If Pb1 0 to 999 F 0 to 555 C 0 to 999 Units 25 F dFL US 0 to...

Page 43: ...2 WATLOW Series 985 User s Manual Appendix Watlow Series 965 User s Manual Watlow Controls 1241 Bundy Blvd P O Box 5580 Winona MN 55987 5580 Phone 507 454 5300 Fax 507 452 4507...

Reviews: