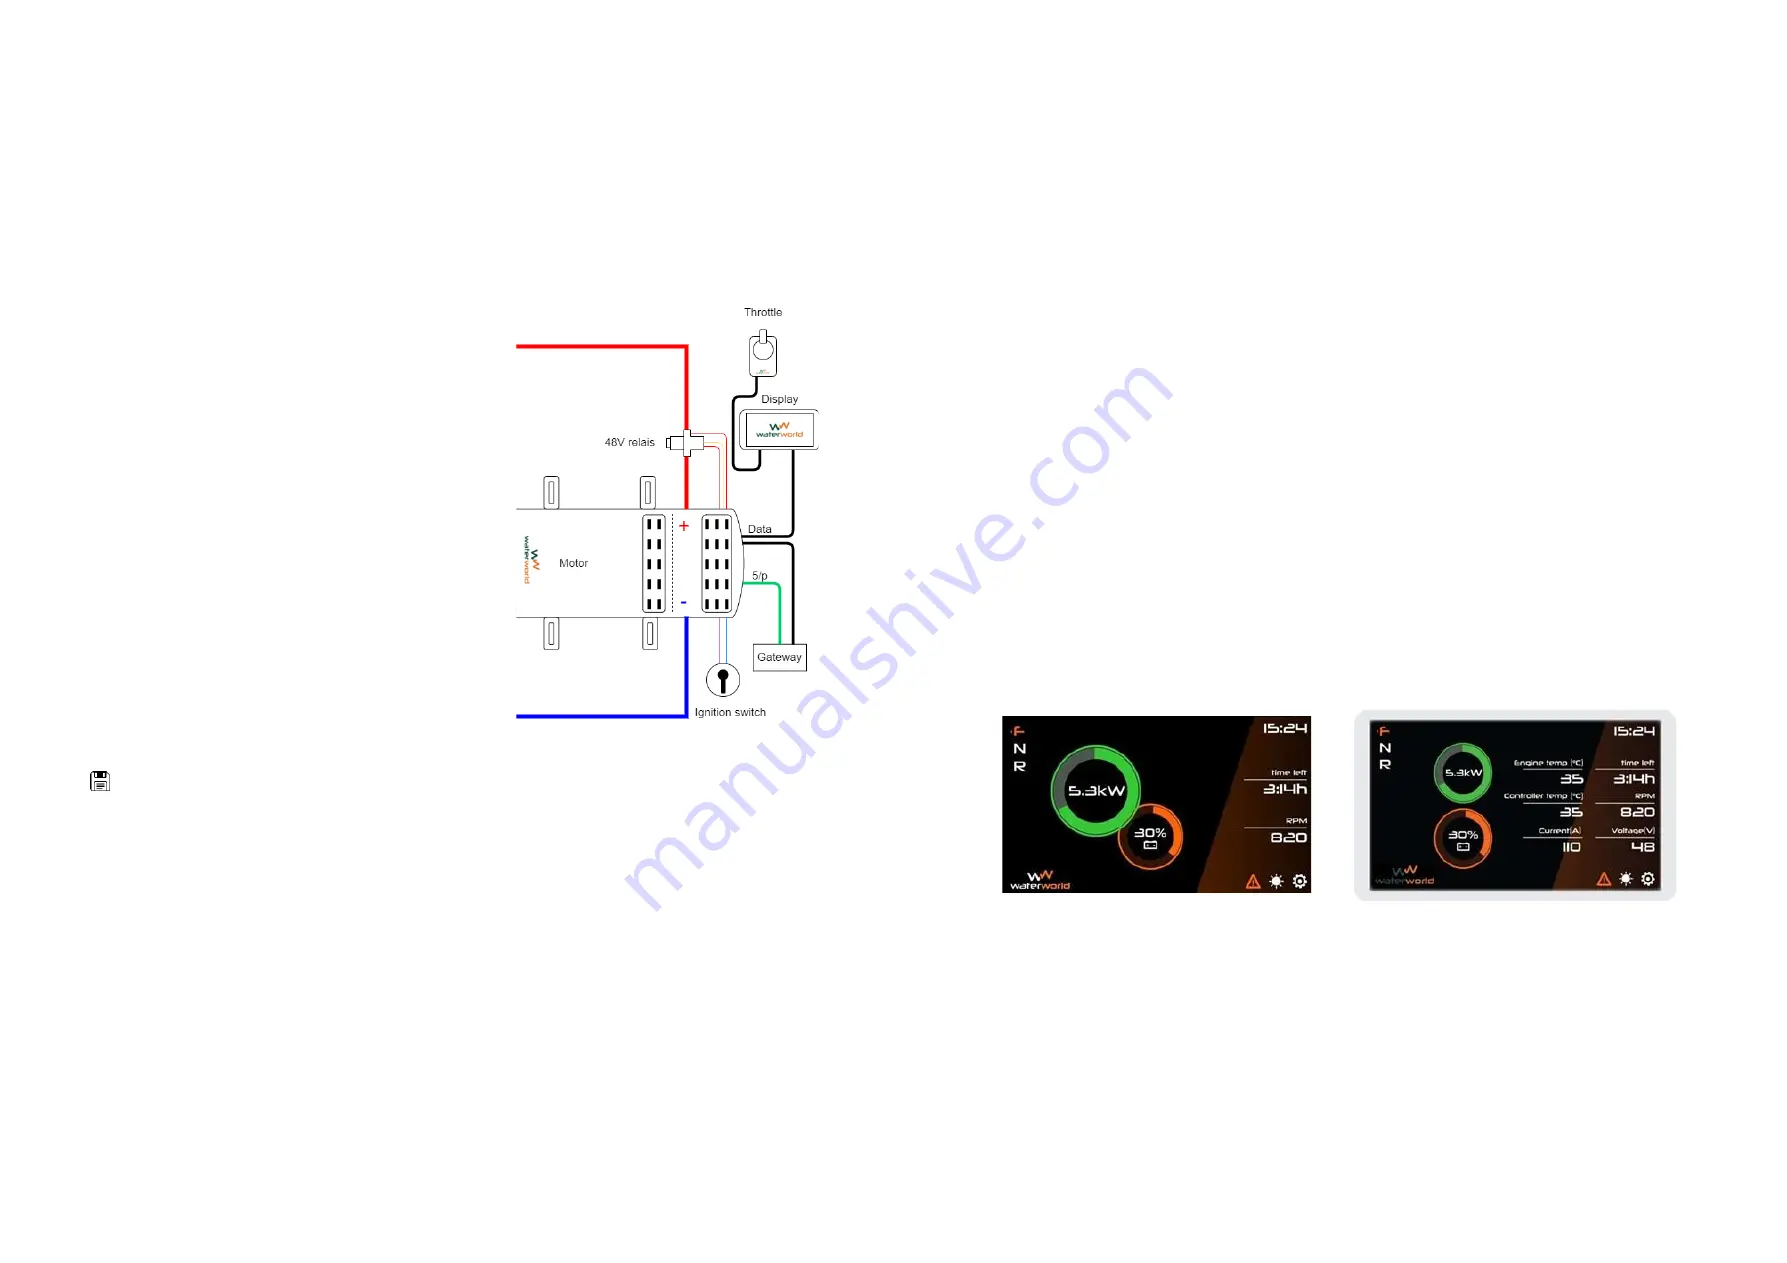
Display
1.
Mount the display in the appropriate place. It should be clearly visible to the driver of the boat.
2.
Mount the Gateway close to the display, but in an indoor area, e.g. on the inside of a console.
Ignition switch
Mount the ignition lock in the appropriate place, well accessible to the driver, for example next to the display
or under the throttle.
Connecting throttle, display and ignition switch
1.
Connect an RJ45 cable from the throttle to
the controller.
2.
Connect a RJ45 cable from the display to the
controller.
3.
Connect the round 5-pole cable from the
gateway to the cable harness on the motor
controller.
4.
Connect an RJ45 cable from the display to the
Gateway.
5.
Connect the plug of the ignition switch to the
controller.
Control
Mounting side:
1. Right-handed pro right-hand throttle = do not adjust anything
2. Right-handed pro left-hand throttle = display s change phase cable
3. Left-handed pro right-hand throttle = change phase cable
4. Left-handed pro left-hand throttle = display setting
Reduce power warning
Here you can set the maximum power for a number of minutes. This is useful, for example, if you want to reduce
the power after a few minutes to save the batteries. It can also be used with the WW 15.0, which can temporarily
deliver up to 20 kW of power, if the battery pack allows it. Consult your supplier if necessary.
Display
Main screen
The screen default setting is "Basic". Here you can see all information needed for standard operation. For
"Basic" display see image below left.
The screen "advanced" mode, you can see more information that is not required for standard operation. For
“Advanged” display see
image below right.
Display time
Here you set the time and time zone. CAUTION: first set the date and then the time. Under the heading
display you can determine whether the time is visible. Changing from summer time to winter time and vice
versa is automatic.
System information
Here you can see the software version of the display, the controller and the serial number of the display. If CAN
communicating batteries are connected, the customer ID is also displayed here..
Setting the display
To get started, tap the settings icon in the lower right corner of the screen. NB: after completing each step, press
to save the values! Then scroll through the different settings:
Battery
Mode:
Select:
“
stand alone
”
(in most situations) or
“
can bus
”
for some brands of lithium batteries
(contact your supplier for this).
Low voltage:
Set the voltage at which you want the message drive slowly; for lead-acid batteries (AGM) this is
usually 44V. Consult your supplier on this if required
High voltage:
Enter the voltage of a 100% charged battery; see battery specifications. Quality: Enter the
percentage of aging. This can be taken from the battery's specification, which states an aging rate per year,
or from a test by your dealer
.
C value:
Fill in the C values of the battery according to specifications; complete them all!
For lead-acid batteries: Does your battery manufacturer only give a C20 and C5 value? Then at C10 fill in the
average of C5 and C20 and at C1 fill in half the C5 value.
.
Example:
C20 = 400 Ah
C10 = 350 Ah (between C20 and C5) C 5 = 300
Ah C 1 = 150Ah (50% of C5 value)
For lithium batteries: all values equal to the C1 value.
Basic screen
Advanced screen
ATTENTION!
The display has its own battery, which must be replaced every 5 years
30
31


