background image

T-360

Page 20 of 35

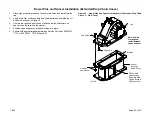
Dowel Pins and Spacer Installation (Extended Drop Chain Cases)

1.

Place high pressure grease on the dowel pin holes and install into the
cap.

2.

Apply a thin film of silicone inside bolt hole pattern and outside the oil
port hole as shown in Figure 30.

3.

If shims are required, apply bead of silicone inside bolt pattern on
spacer, then lay shims on the spacer.

4.

Position cap on spacer and tap dowel pins into place.

5.

Secure with appropriated hardware (see Service Parts List SPL82747 -
TC10 or SPL82821 - TC10 Eclipse ES).

Figure 30.  Dowel Pins and Spacer Installation (for Extended Drop Chain
Cases - C, D & E Drop)

Cap

Cap Screw

Hex Nut
and Washer

Silicone

Spacer
(not used
with B Drop)

Oil Port Hole,
Transmission
Built After 2009,
Apply Silicone to
Outside of Hole

IL3158

Note: If shims
are required,
install between
cap and spacer.

Dowel Pin

Summary of Contents for TC10

Page 1: ...ion 20 Reassembly of the Shift Assembly Pneumatic or Electric 21 Reassembly of the Cap and Mid Section 23 Reassembly of the Drive Shaft and Drive Shaft Housing 24 Installing the Chain 26 Reassembly of...

Page 2: ...hift Unit Remove the pneumatic or electric shift unit from the power take off by removing the two hex nuts and washers Note that the adjusting screw retaining springs are exposed when the shift unit i...

Page 3: ...T 360 Page 2 of 35 Figure 1 Eclipse ES CAFSystemt Removal Figure 2 Eclipse ES Air Clutch Assembly Side View...

Page 4: ...ort it on suitable supports on the underside of the flange of the mid section first remov ing the flange bolts at the support areas see Figure 3 Figure 3 Transmission Supports IL2153 Removal of End Yo...

Page 5: ...ms Lock Washer Hex Hd Screw Jacking Screw Holes 2 Coupling Shaft Housing Removing the Bottom Section 1 Invert the case as shown in Figure 3 2 Remove lower cap screws connecting the driveshaft housing...

Page 6: ...and connecting rocker out of the chain links Disengage the chain from the drive and driven sprocket and remove from the case Figure 8 Chain Removal Driven Sprocket Drive Sprocket Chain Removal of Dri...

Page 7: ...Reposition mid and cap section assembly on the supports so that the cap portion is on top or set the assembly on a bench 5 Remove spirol pin attaching the shift arm to the shift shaft Figure 10b if n...

Page 8: ...hims and spacers depends on PTO model and ratio Disassembly of Driven Shaft Assembly Front Facing End Yoke 1 Remove the four cap screws that fasten the bearing cover and oil seal housing to the cap Re...

Page 9: ...crew Lock Washer Lock Washer Bearing Cover O ring O ring Oil Seal Housing Front Rear Front Facing Hydraulic Pump Provision 1 Remove the four cap screws that fasten the hydraulic pump adapter and beari...

Page 10: ...asher Wave Spring Oil Seal IL2540 Cap Screw Cap Screw Lock Washer Lock Washer O ring O ring Front Rear Hydraulic Pump Adapter Bearing Cover Front Facing End Yoke Rear Facing Hydraulic Pump Provision 1...

Page 11: ...ring Hydraulic Pump Adapter Front Rear Oil Seal Housing Eclipse Mounted CAFS 1 Remove the four cap screws that fasten the bearing cover and oil seal housing to the cap Remove cover housing and yoke sp...

Page 12: ...Shaft Disassembly Coupling Shaft Ball Bearing Shaft Spacer Ball Bearing Access Hole 2 Pilot Bearing Disassembly of Drive Shaft Assembly 1 Slide shift collar from teeth on the drive shaft NOTE If the t...

Page 13: ...r Figure 22 Needle Bearing Removal from Sprocket Needle Bearing Needle Bearing Drive Sprocket IL2526 Inspection and Repair Check the following Bent shift forks Bent shift shaft Worn shifter shoes Loos...

Page 14: ...coat the driven shaft 2 Press the bearing to the shoulder on the yoke end of the driven shaft 3 Tap the key into place 4 Place high pressure grease in the rear bore of the cap 5 Tap the bearing into...

Page 15: ...ball bearing lining up the key in the shaft with the keyway in the sprocket 9 Tap into place until the shaft seats 10 Install O ring and oil seal in the oil seal housing 11 Install the oil seal housin...

Page 16: ...l bearing lining up the key in the shaft with the keyway in the sprocket 9 Tap into place until the shaft seats 10 Install O ring and oil seal in the hydraulic pump adapter 11 Install the hydraulic pu...

Page 17: ...bearing lining up the key in the shaft with the keyway in the sprocket 9 Tap into place until the shaft seats 10 Install O ring and oil seal in the hydraulic pump adapter 11 Install the hydraulic pum...

Page 18: ...through the bore in the cap into the bore of the driven sprocket spacer and ball bearing lining up the key in the shaft with the keyway in the sprocket 9 Tap into place until the shaft seats 10 Instal...

Page 19: ...cap slide the shaft through the bore in the cap into the bore of the driven sprocket spacer and ball bearing lining up the key in the shaft with the keyway in the sprocket 9 Tap into place until the...

Page 20: ...l bearing lining up the key in the shaft with the keyway in the sprocket 9 Tap into place until the shaft seats 10 Install the oil seal in the oil seal housing 11 Install the shim and oil seal housing...

Page 21: ...e bolt pattern on spacer then lay shims on the spacer 4 Position cap on spacer and tap dowel pins into place 5 Secure with appropriated hardware see Service Parts List SPL82747 TC10 or SPL82821 TC10 E...

Page 22: ...tall it into the shift shaft bore Make sure there is a 1 8 gap between the bushing and bearing 4 Apply a small amount of grease on the O ring and install between the bushing and bearing 5 Install spir...

Page 23: ...s the shift lock spring into the housing Line up the holes in the shift lever sector gear and install shoulder screw and locking nut 11 Install the locking arm onto the pivot pin see Figure 33 and mes...

Page 24: ...id section Apply a bead of silicone inside the bolt hole pattern on top of shims Figure 34 Mid Section Assembly Cap Screw Dowel Pin Spacer C D E F Drops or Cap B Drop Silicone Mid Section IL3157 Hex N...

Page 25: ...ring Drive Sprocket IL2526 4 Install pilot bearing on end of drive shaft 5 Use high pressure grease on the drive shaft and press into the drive sprocket assembly 6 Check the shift collar not shown for...

Page 26: ...l Seal Shift Collar Shift Fork Drive Shaft Housing Assembly Installation 1 Apply grease to stud on the shift shoes for temporary installation Then install the drive shaft assembly into the mid section...

Page 27: ...shed all the way through the joining ends of the chain insert the spirol pin into the open hole at the end of the connecting pin assembly see Figure 43 Make sure the spirol pin overlaps the connecting...

Page 28: ...gure 42 Connecting Pin Set Figure 43 Connecting Pin Orientation Spirol Pin Connecting Rocker Guide Link Joining End of Chain Connecting Pin Set Spirol pin on opposite side must be tapped in to complet...

Page 29: ...Bushing 4 Dowel Pins Sight Plug Bottom Case Magnetic Drain Plug Magnetic Oil Fill Plug 4 Tap back the drive shaft assembly to allow for the bottom section installation 5 Apply silicone around the ins...

Page 30: ...sting screw PUMP mode 2 11 16 inches left adjusting screw Note Locking arm must not rotate beyond 90_ from center position to avoid disengagement of shift shoe See Figure 47 on next page 2 Adjust as n...

Page 31: ...procket Shift Collar Outside Edge of Coupling Shaft Housing Bore Locking Arm in Pump Position Shift Fork Shift Collar Drive Sprocket Assembly IL3164 Sector Gear Locking Arm Pilot Bearing Shift Shoe in...

Page 32: ...Shaft Housing Assembly 1 Coat the seal outer diameter evenly with sealant Be sure that the seal shaft and housing are clean Always install a seal with the seal lip facing in Apply force to the outer e...

Page 33: ...places to assure a uniform gap and add 005 in This will be the total thickness of shims needed to provide the recommended axial float of 005 010 in 3 Remove the coupling shaft assembly from the case...

Page 34: ...elf locking nuts Torque to 275 325 lb ft Figure 51 End Yoke Assembly Coupling and Drive Shaft Yokes Washer Nut 475 525 lb ft Grease Oil Seal Before Installing Yoke Output Shaft Yoke Nut 275 325 lb ft...

Page 35: ...TE Locate clutch assembly to ensure proper interface between set screw and its seating hole 6 Lock air clutch assembly into place for final polychain adjustment using set screw use Loctite 242 7 Insta...

Page 36: ...dling fluid through this opening Any type of automatic transmission fluid ATF can be used Capacity is approximately 12 quarts fill to the bottom of threads of the oil level port 2 Recheck fasteners fo...

Reviews: