background image


ARAMARK Manual 

                                                            Page 36 – Revision 10-31-21 


47 

NA 

JG LLD PE Tube - Blue 

O.D.1/4"John Guest 

P/N PE-08-BI-1000F-B 

PU-4031-A 

Purchas

e from 

John 

Guest 


48 

10-3062 

JG LLDPE Tube - Blue 

8mm John Guest P/N 

PE-0806-100M-B 

PU-4014-A 

Yes 


49 

NA 

5/16” x ¼” Reducing 

Elbow John Guest 

P/N PI211008S 

PU-4007-A 

Purchas

e from 

John 

Guest 


Not 

Shown  10-7040 

Silicon Tube 5/16” for 

Hot Water 

PU-4064 


Yes 


Not 

Shown  10-3007 

Power Cord 120V – 

1840 mm 

EL-5001-B 

Yes 


Summary of Contents for ARAMARK

Page 1: ...every 12 months NOTE When replacing the UV Lamp Assembly the UV Lamp wiring harness must also be replaced NOTE The Glow Starter shown to the right may appear blackened which is normal If the Water Tre...

Page 2: ...and contaminants to ensure proper operation Use a soft non abrasive cloth to clean 4 Inspect the Quartz Sleeve O ring for wear or damage and replace as necessary 5 Ensure there is adequate minimum of...

Page 3: ...r and water to pass into the vent chamber as it is heated Water in the vent chamber is suctioned back through the outlet tube vent hole when water is dispensed Expansion of water as it is heated in th...

Page 4: ...ective metal box on the rear of the Hot Tank As you look through the condenser coils on the rear of the unit you will see the Hot Tank located on the right hand side 5 Reach up behind the Hot Tank and...

Page 5: ...x so it snaps back into its original position on the Hot Tank 8 Replace Panel on unit using Phillips head screws 9 Plug in the Power Cord 10 Make sure the Hot and Cold Tanks are filled with water BEFO...

Page 6: ...Hot Tank is made from stainless steel Ensure descaling solution is compatible with stainless and always flush the Aramark Countertop or Refresh Center completely Dispose in an environmentally safe ma...

Page 7: ...ING HOT WATER HAZARD The Aramark Countertop and Refresh Centers produce Hot Water up to 86 C 187 F Water above 52 C 125 F can cause severe burns or scalding Hot water should be dispensed carefully int...

Page 8: ...tor External Capacitor New LG CSB035 LJCM Compressor Repair Replacement Parts for are not interchangeable with older other compressors Older version of LG compressor is obsolete and no longer availabl...

Page 9: ...LT Carbon Block 10 CBC 1 Micron Lead and Cyst Reduction Inline Filter Optional FT 0063 Every 6 months or as required Local water conditions will determine proper filter type and maintenance schedule F...

Page 10: ...ARAMARK Manual Page 22 Revision 10 31 21 ARAMARK COUNTERTOP DRAWING AND PARTS LIST Yellow Consumables Green Recommended spare parts...

Page 11: ...commended Spare Parts 2 1 12 1360 Overload with Manual Reset 97 C 206 F Recommend stocking 2 each per every 10 units purchased HT 3012 Yes 2 2 12 1303 Hot Tank Thermostat 87 C 189 F Recommend stocking...

Page 12: ...42 CN Yes 10 12 3130 Drip Tray Charcoal with Aramark Logo Recommend stocking 4 each per every 10 units purchased PL 1237 CN Yes Not Shown 10 3048 Faucet Nipple Blue with Screen Recommend stocking 2 ea...

Page 13: ...No 15 12 3110 2L UV Cold Tank Assembly CT 2060 Yes 16 12 3185 Side Panel Silver ST 8241 Yes 17 12 3120 Front Upper Drip Tray Insert Panel when purchasing also request Hot Water Caution Label KB 11 to...

Page 14: ...22A 1 CO 0020 L00 00 LG Compressor 120V R134A CSB035LJCM CO 0020 L00 00 Yes 22A 2 CO 0019 L00 00 Compressor Capacitor CO 0019 L00 00 Yes 22A 3 ST 0216 L00 00 Capacitor Bracket ST 0216 L00 00 Yes 22A...

Page 15: ...noid Bracket ST 8244 Yes 29 Purchase from John Guest JG Equal Tee Connector P10208S PU 4011 No 30 Purchase from John Guest JG Reducing Elbow Connector 5 16 PI211008S PU 4007 No 31 Purchase from John G...

Page 16: ...1101 Cold Tank Thermostat CT 2016 Yes 37 1 PL 0326 Cold Thermostat Cover Label PL 0326 L00 00 Yes 38 12 8061 Silver Back Panel ST 8216 Yes 39 12 3117 Power Transformer 120V EL 5003 A Yes Not Shown Pur...

Page 17: ...ARAMARK Manual Page 29 Revision 10 31 21 ARAMARK REFRESH CENTERS DRAWING AND PARTS LIST Yellow Consumables Green Recommended spare parts Wetted Drawing...

Page 18: ...yst Reduction Inline Filter Optional FT 0063 IL WLT X X X Yes FT 0053 Sediment Block 10 Sediment 20 Micron Inline Filter Optional FT 0053 IL WLT X X X Yes Recommended Spare Parts 2 1 12 1360 Overload...

Page 19: ...0 2600 White Silicon Faucet O Ring Recommend stocking 2 each per every 10 units ordered CT 2007 X X X Yes 10 12 8057 Button Label Hot and Cold Recommend stocking 2 each per every 10 units ordered LP 7...

Page 20: ...2 8615 PCB for Cold Water EN 6086 X Yes 15 1 10 3017 PCB Stand off Pin EN 6059 X X X Yes 16 12 3125 Front Upper Panel PL 1236 L00 SI X X X Yes 17 12 3220 Silver Side Panel ST 8192 CN X X X Yes 18 12 8...

Page 21: ...NA Rubber O Ring for Filter Bracket PL 1208CN X X X No Verify compressor in machine before ordering parts as the Compressor P N CO 0020 L00 00 and 10 2200 CO 0001A and related parts are not interchan...

Page 22: ...nsor 0 5mm ST 8207 CN X X X Yes 30 NA Leak Tray PL 1294 A X X X No 31 12 8004 Bottom Tray ST 8137 X X X Yes 32 10 3083 Unit Control Rubber Feet ST 8167CN X X X Yes 33 NA Back Panel Silver ST 8247 X X...

Page 23: ...former UV 120V 60Hz EL 5003 A X X X Yes 41 12 1210 UV Lamp Retaining Threaded Nut PL 1128 X X X Yes 42 12 5245 PCB Fixing Bracket ST 8165 CN X X X Yes 43 12 8510 3 Minutes UV Timer PCB Hot and Cold AK...

Page 24: ...as e from John Guest 48 10 3062 JG LLDPE Tube Blue 8mm John Guest P N PE 0806 100M B PU 4014 A X X X Yes 49 NA 5 16 x Reducing Elbow John Guest P N PI211008S PU 4007 A X X X Purchas e from John Guest...

Page 25: ...would install into a desk or piece of furniture 1 Align Rails on the machine into the grooves on the underside of the top Slide the Top toward the rear of the unit until you hear it click into place 2...

Page 26: ...ated on the underside of the unit UL requires all areas of access to wiring and high voltage components to be protected such that access requires the use of a tool When you install the Refresh Center...

Page 27: ...tanks are filled with water 3 To fill the Hot and Cold Tanks depress the Water Dispensing Button until water flows from the Faucet requires about 60 seconds to fill the cold tank Once the Cold Tank is...

Page 28: ...nstalled prior to connecting the unit to water Mounting the Cabinet 1 Inside the Cabinet locate the Hardware bag and Keys 2 To remove the Lower Panel lean the unit back and remove the two Philips head...

Page 29: ...evision 10 31 21 3 Using the hardware supplied bolt the cabinet to the cooler Six total bolts washers and nuts are needed for this step however mounting of the back middle bolt and nut can be omitted...

Page 30: ...urniture 1 Align rails on the machine into the grooves on the underside of the top Slide the top toward the rear of the unit until you hear it click into place 2 Once the top is installed and slid all...

Page 31: ...quires all areas of access to wiring and high voltage components to be protected such that access requires the use of a tool When you install the Aramark Refresh Center in a customer location be sure...

Page 32: ...the tanks are filled with water 3 To fill the Hot and Cold Tanks Depress the Dispensing Button until water flows from the faucet requires about 60 seconds to fill the Cold Tank Once the Cold Tank is...

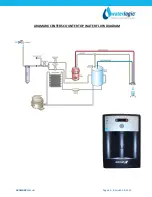
Page 33: ...ARAMARK Manual Page 45 Revision 10 31 21 ARAMARK CENTERS COUNTER TOP WATER FLOW DIAGRAM...

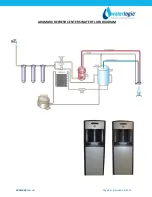
Page 34: ...ARAMARK Manual Page 46 Revision 10 31 21 ARAMARK REFRESH CENTERS WATER FLOW DIAGRAM...

Page 35: ...ew under the decal at the rear of the unit Remove the red portion of the Cold Tank Temperature label to access the adjustment screw The factory set point is 41 F and is indicated by the dot on sheet m...

Page 36: ...ision 10 31 21 ARAMARK COUNTERTOP AND REFRESH CENTERS ELECTRICAL DIAGRAM DANGER HIGH VOLTAGE ELECTRICAL HAZARD PCB Printed Circuit Board contains High Voltage Only trained and qualified technicians sh...

Reviews: