


4
hd
USER MANUAL
WATER WOLF UWC1.0
www.waterwolfhd.com
/waterwolfhd
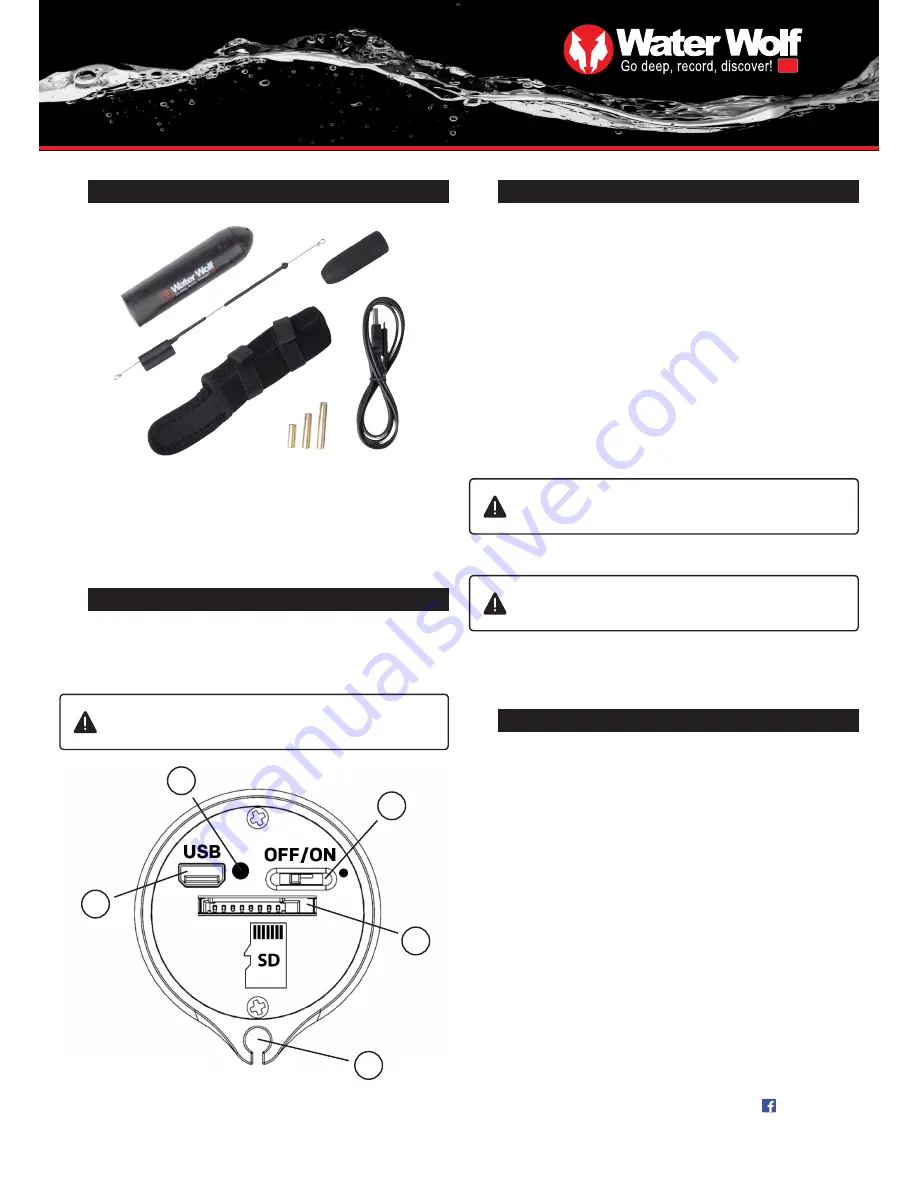
USER INTERFACE
2
The camera’s user interface is found by removing the camera house cap.
This is done by pushing a piece of string through the cap hole and pulling it.
Or wiggle the cap back and forth by hand, and pull it. With a bit of practice this
becomes easy.
EQUIPMENT – WHAT’S IN THE BOX?
1
1. Camera house
2. Line tube
3. Float
4. Cap
5. Charger cable
6. Neoprene sleeve
7. Brass weights 3 psc.
Do not try to pull off the cap by using tools such as screw
drivers or knifes.
2
3
4
5
1.
On/off light
2.
Micro USB-port
3.
On/off button
4.
Micro SD-card slot
5.
Guide for line tube
1
1.
2.
3.
6.
7.
5.
4.
Before using the camera the first time:
2.
Place the Micro SD-card or Micro SDHD-card (preferably Class 10) in the
Micro SD-slot (4). The label should face down and the small end of the card
should face forward in the camera.
3.
Take the cap off the camera and switch the on/off button (3) to on. After
approximately 5 seconds, the camera’s on/off light (2) will light up red while the
SD-card is being loaded. When the on/off light
(1) starts flashing red the camera
is recording. The cap can now be put back on and the camera is ready to enter
the water.
RECORD – HOW TO GET STARTED
3
1.
The batteries must be charged using the supplied charger cable. This
should be inserted into the USB mini port (2) on the camera house and con-
nected with a USB power source (i.e. a computer or a USB charger unit). The
camera’s on/off light (1) will light up blue when charging, and when it turns off,
the camera is fully charged.
The battery doesn’t suffer from being used when it isn’t fully charged!
The camera doesn’t record until the red on/off light (1) starts
flashing. It takes about 5 seconds before the camera is turned on.
4.
When you’re done recording, turn the on/off button (3) to off.
Wait for the on/off light (1) to stop glowing before removing the
SD-card. Otherwise, the files on it could be damaged.
Remember!
The logo must face upwards (towards the water surface), when
the camera is recording.
THE ON/OFF LIGHT
4
The camera’s on/off light
has 4 different light indications:
BLUE
- The camera is charging
RED
- The camera is reading from or writing on the SD-card
SLOW FLASHING RED
- The camera is recording
FAST FLASHING RED
-
The SD-card is full and the camera will turn off after
10 seconds. Or the camera has run out of battery and will turn off after 3 seconds.


