background image

2.OSD MENU OPERATION

2.OSD MENU OPERATION

2.OSD MENU OPERATION

2.OSD MENU OPERATION

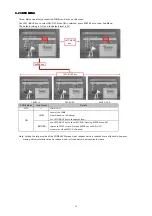
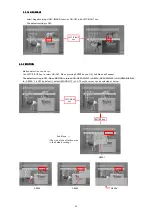
The functions and parameter settings of WAT-910HX can be changed by OSD(On Screen Display).

When operating OSD, Jog Switch is used.

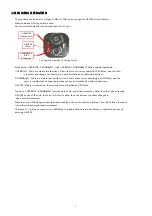
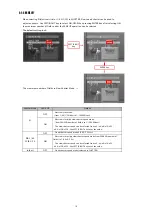
See the picuture below for the detailed function of 3 keys.

The operation portion of the Jog Switch

When using 1)UP&RIGHT/2)DOWN&LEFT, slide 1)UP&RIGHT/2)DOWN&LEFT button upward/downward.

1)UP&RIGHT : There are mainly two functions. One is to move the cursor upward on OSD Menu, and the other

             is to adjust and change  the functions on each list (defined as rightward direction).

2)DOWN&LEFT : There are mainly two functions. One is to move the cursor downward on OSD Menu, and the

              other is to adjust and change the functions on each list (defined as leftward direction).

3)ENTER : Mainly to execute/set the selected list and function on OSD Menu.

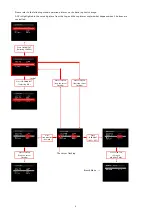
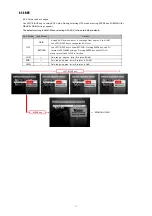
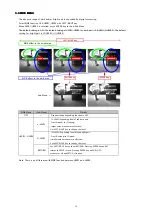
Typically, 1)UP&RIGHT/2)DOWN&LEFT function work as up-and-down movement. Other than that, when pressing

3)ENTER on one of the lists, the cursor will start to blink, then, the buttons' functions changes to

 right-and-left movement.

When pressing 3)ENTER again under the above condition, the cursor will stop blinking. Then, the buttons' functions 

return to work as up-and-down movement.

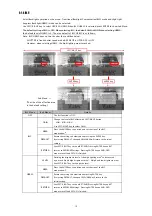
The symbol "

" will be on some lists on OSD Menu to indicate that there are Sub Menus or selectable options by

pressing 3)ENTER.

2)DOWN&LEFT

(Slide

downward)

1)UP&RIGHT

(Slide upward)

3)ENTER

(Push)

5

Summary of Contents for WAT-910HX

Page 1: ...January 23 2013 WAT 910HX WAT 910HX WAT 910HX WAT 910HX OSD USER MANUAL OSD USER MANUAL OSD USER MANUAL OSD USER MANUAL Rev 1 00 Watec Co Ltd Watec Co Ltd Watec Co Ltd Watec Co Ltd 1...

Page 2: ...Change History Change History Change History Change History 2013 01 23 Rev No Date Changes 1 00 Remarks Initial Release 2...

Page 3: ...10 3 1 3 AGC 11 3 1 4 BLC 12 3DNR MENU 14 WDR MENU 15 ADJUST MENU 16 3 4 1 SHARPNESS 16 3 4 2 GAMMA 17 3 4 3 SETUP LEVEL 17 FUNCTIONS MENU 18 3 5 1 EFFECT 18 3 5 1 1 FREEZE 18 3 5 1 2 FLIP 18 3 5 1 3...

Page 4: ...according to the WAT 910HX user manual check to see that the operation and the effects of the changes made to the camera are acceptable The WAT 910HX user manual is subject to change by design and th...

Page 5: ...e mainly two functions One is to move the cursor downward on OSD Menu and the other is to adjust and change the functions on each list defined as leftward direction 3 ENTER Mainly to execute set the s...

Page 6: ...lain what happens when 3 buttons are controlled Initial The cursor flashing Branch Menu Press 2 DOWN LEFT AGC MID Press 1 UP RIGHT AGC OFF Press 3 ENTER Start the cursor flashing Press 2 DOWN LEFT Sel...

Page 7: ...ten as UP key and 2 DOWN LEFT is written as DOWN key When the keys are used for up and down movement In addition 1 UP RIGHT is written as RIGHT key and 2 DOWN LEFT is written as LEFT key When the keys...

Page 8: ...the screen 3 1 EXPOSURE MENU 3 1 EXPOSURE MENU 3 1 EXPOSURE MENU 3 1 EXPOSURE MENU When adjusting EXPOSURE settings move the cursor to EXPOSURE and press ENTER key Press UP DOWN button to choose one...

Page 9: ...00000 sec which depends on brightness of a camera object and maintains a proper exposure state x16 fixed shutter speed x8 x4 x2 The High speed shutter is defined as the selected Shutter Speed FL is th...

Page 10: ...e Shutter Mode SENS UP Details The slow shutter speed can be selected from x2 x4 x8 x16 x32 Electronic Iris with slow shutter speed mode other OFF Fixed shutter speed mode selected in SHUTTER EIA 1 60...

Page 11: ...NUAL GAIN AGC Mode Sub Menu Details OFF GAIN A fixed AGC level can be set It can range from approx 6 to 41 dB Use LEFT RIGHT key to change the AGC level RETURN Use LEFT RIGHT key to show RET END Press...

Page 12: ...ton LOW MID HIGH Use LEFT RIGHT key to select GAIN ENTER key BLC Mode Sub Menu Details The size of the effective area is the default setting area window2 2 2 2 DEFAULT Return the setting to default wh...

Page 13: ...key HINT When positioning the window align the top left corner to the desired window position s top left corner as the SIZE Setting references this corner 2 SIZE Setting The size of the effective BLC...

Page 14: ...EL means that random noise is reduced more effectively however moving object resolution may be reduced and or fixed pattern noises may increase Details LEFT RIGHT key ENTER key Use LEFT RIGHT key to c...

Page 15: ...etween USER1 and USER2 WDR effect in the bright area LEFT RIGHT key WDR Mode Sub Menu Details WDR effect in the dark area ENTER key ENTER key OFF Dynamic range expanding function is OFF USER1 USER2 L...

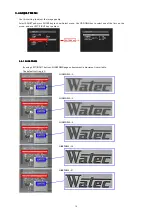
Page 16: ...how Adjust menu Use UP DOWN key to select one of the lists on the menu and use LEFT RIGHT key to adjust 3 4 1 SHARPNESS 3 4 1 SHARPNESS 3 4 1 SHARPNESS 3 4 1 SHARPNESS By using LEFT RIGHT buttons SHAR...

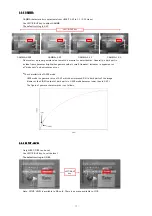
Page 17: ...oises may occur 3 3 3 3 The characteristic of USER mode However the VIDEO output of dark parts in USER mode becomes lower than in 0 45 The figure of gamma characteristics is as follows 3 4 3 SETUP LEV...

Page 18: ...FREEZE 3 5 1 1 FREEZE 3 5 1 1 FREEZE 3 5 1 1 FREEZE Select ON OFF state by using LEFT RIGHT buttons When the FREEZE function is turned ON the video output signal will be a repeat of the same frame pi...

Page 19: ...Details ON ZOOM Set up the magnification of digital zoom By using LEFT RIGHT buttons it can be set to a maximum magnification of 32 times PAN Horizontal PAN position is specified invalid when ZOOM is...

Page 20: ...on can be set Use LEFT RIGHT key to select ON OFF When pressing ENTER key on ON Sub Menu will appear The default setting is OFF When MOTION is turned ON AREA SELECT is AREA1 AREA DISPLAY is ON AREA DI...

Page 21: ...t press ENTER key 3 RET AGAIN Setting Use UP RIGHT DOWN LEFT key to select RET AGAIN MOTION Sub Menu Details OFF Motion detection is OFF ON AREA SELECT The present detection area can be selected Selec...

Page 22: ...lts Return to the BPC menu automatically after the end of detection and compensation exceed the maximum compensations points of 64 points ENTER key detection unit in fields Smaller white pixels can be...

Page 23: ...ENTER key and RESET menu is displayed Pressing ENTER key on OK in RESET menu will return the camera settings to the original factory settings 3 7 EXIT 3 7 EXIT 3 7 EXIT 3 7 EXIT MENU MENU MENU MENU S...

Page 24: ...4 Save settings All settings are saved when executing below When pressing ENTER key on EXIT in the SET UP Menu or on END in all Sub Menus Saved settings are kept even after the camera is powered off...

Page 25: ...GH LEVEL AREA DEFAULT 0 8 POSITION POSITION OFF LOW MID HIGH 6 41 ON OFF x2 x4 x8 x16 x32 x64 x128 x256 SIZE SIZE SETUP EXPOSURE 3DNR WDR ADJUST FUNCTIONS RESET EXIT x256 x128 x64 x32 x16 x8 x4 x2 EI...

Page 26: ...ETUP LEVEL OFF USER1 USER2 ON OFF 0IRE 7 5IRE EIA only USER 0 05 1 00 0 05steps 0 31 L LEVEL H LEVEL 0 15 0 15 L LEVEL H LEVEL 0 15 0 15 0 100 LEVEL default 50 default ON default OFF default 9 default...

Page 27: ...RT x4 x8 x16 x32 x64 1 6 AREA DISPLAY SENSITIVITY 0 40 ON OFF POSITION SIZE AREA2 AREA3 AREA4 AREA DISPLAY SENSITIVITY 0 40 ON OFF POSITION SIZE AREA DISPLAY SENSITIVITY 0 40 ON OFF POSITION SIZE defa...

Page 28: ...RESET MENU EXIT RESET RESET OK EXIT 28...

Reviews: