background image


Page 

16

 of 

36


351 Ferrier Street • Markham, ON • L3R 5Z2 

PHONE: 416-410-6865 TOLL FREE: 1-866-331-3341 • FAX: 905-752-0186 

www.watchnetaccess.com / [email protected]


2.

 Place the card in the sensor area. The system will enter the next interface after a 

beeping sound. 


3.1. 2 Delete Personnel 

1.


Press the Menu button to enter the manage menu when WAB BEM FCK-S is idle. In 
the following steps, 

Esc

 works as 

cancel

 while 

Enter

 works as confirm.  


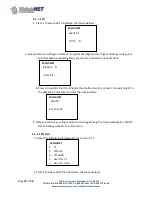
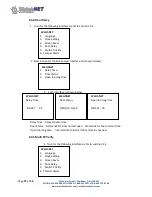
2.  Press 1 to enter User interface. (As shown below) 


3


Press 2 to enter the Delete interface. 


4


Input the User ID which is to be deleted, then press Enter to confirm.  


WatchNET  

Add Card 


Place your card 


 WatchNET  

1. User 
2. Network 
3. Option 
4. Device 
5. Terminal Info 


WatchNET  

1

 Add 

2

 Delete 

3

 Modify 

4

 Add Admin 

5

 Delete All 


 WatchNET  

User ID [DEL] 
 
-------------- 

Summary of Contents for WAB P FCKS

Page 1: ...Ferrier Street Markham ON L3R 5Z2 PHONE 416 410 6865 TOLL FREE 1 866 331 3341 FAX 905 752 0186 www watchnetaccess com info watchnetinc com WatchNET Access Integrated Security Management Software WAB P...

Page 2: ...2 of 36 351 Ferrier Street Markham ON L3R 5Z2 PHONE 416 410 6865 TOLL FREE 1 866 331 3341 FAX 905 752 0186 www watchnetaccess com info watchnetinc com User Manual WAB P FCKS Biometric Standalone Contr...

Page 3: ...te Personnel 16 3 1 3 Modify 17 3 1 4 Add Admin 17 3 1 5 Delete All 18 3 2 Network Configuration 19 3 2 1 Terminal ID 19 3 2 2 Net Configure 20 3 2 3 IP Address 20 3 2 4 Subnet Mask 21 3 2 5 Gateway 2...

Page 4: ...rmation This system greatly improves the T A simplicity and offer s a cost saving on traditional tags When the WAB BEM FCK S is used as an access controller the traditional key is no longer needed The...

Page 5: ...self checking function High speed fingerprint matching 3000 fingerprints within 1 second Multithreaded code that takes full advantage of multi core CPU 500dpi optical biometric sensor scratch resista...

Page 6: ...K S Indoor external reader outdoor WAB BEM FCK S Chapter2 Wiring Diagram 2 1 WAB BEM FCK S Appearance LED Blue LED Power indicator Green LED Sensor indicator Relay on indicator Keypad NO Key Descripti...

Page 7: ...n Definition Icon NO Connecti on Definition J1 1 GND Power supply Door contact Rex Button Auxiliary output J3 13 D1_Out Reader signal input output 2 12V 14 D0_ Out 3 SEN 15 12V 4 BUT 16 GND 5 GND 17 D...

Page 8: ...n customized lock model and power requirement J3 Reader signal input output D1_Out Wiegand signal output D0_ Out Wiegand signal output 12V DC 12V Positive GND Ground D1_In Wiegand signal input D0_In W...

Page 9: ...Page 9 of 36 351 Ferrier Street Markham ON L3R 5Z2 PHONE 416 410 6865 TOLL FREE 1 866 331 3341 FAX 905 752 0186 www watchnetaccess com info watchnetinc com Figure 2 6 lock Fail secure...

Page 10: ...5Z2 PHONE 416 410 6865 TOLL FREE 1 866 331 3341 FAX 905 752 0186 www watchnetaccess com info watchnetinc com Chapter3 Instructions User Management PIN management Work mode and Time set are configured...

Page 11: ...S is idle In the following steps the Esc works as cancel while Enter works as confirm 2 Press 1 to enter User interface As shown below 3 Press 1 again to enter Add interface As shown below 4 Input th...

Page 12: ...r the next interface 3 Press 0 to confirm that the FP is attached to the User ID or press 1 for searching FP in the database Press Enter to enter the next interface 4 Place and remove your finger twic...

Page 13: ...accuracy but will slow down responding time press Enter to enter the next interface 4 Press 0 to confirm that the FP is attached to the User ID or press 1 for searching FP in the database Press Enter...

Page 14: ...elect a level according to customer s requirement High level for high matching accuracy but will slow down responding time press Enter to enter the next interface 4 Place and remove your finger twice...

Page 15: ...ill slow down responding time press Enter to enter the next interface 3 Place and remove your finger twice to finish registering The screen will display Add FP OK and then go back to the main menu 3 1...

Page 16: ...Press the Menu button to enter the manage menu when WAB BEM FCK S is idle In the following steps Esc works as cancel while Enter works as confirm 2 Press 1 to enter User interface As shown below 3 Pr...

Page 17: ...to enter the Modify interface 4 Input the User ID which is to be modified the customer can change configuration like level 1 1 or replace FP or card 3 1 4 Add Admin 1 Press the Menu button to enter t...

Page 18: ...ction 3 1 1 3 1 5 Delete All 1 Press the Menu button to enter manage menu when WAB BEM FCK S is idle In the following steps Esc works as cancel while Enter works as confirm 2 Press 1 to enter User int...

Page 19: ...he Menu button to enter the manage menu WAB BEM FCK S is idle In the following steps Esc works as cancel while Enter works as confirm 2 Press 2 to enter the Network interface As shown below 3 Press 1...

Page 20: ...work interface As shown below 3 Press 2 to enter the Net Configuration interface stands for the delete button stands for the symbolic button 4 Select a configuration and input the corresponding number...

Page 21: ...put the IP address and press Enter to confirm 3 2 4 Subnet Mask 1 Press the Menu button to enter the manage menu WAB BEM FCK S is idle In the following steps Esc works as cancel while Enter works as c...

Page 22: ...3 2 5 Gateway 1 Press the Menu button to enter the manage menu WAB BEM FCK S is idle In the following steps Esc works as cancel while Enter works as confirm 2 Press 2 to enter the Network interface As...

Page 23: ...3 2 6 Host IP 1 Press the Menu button to enter the manage menu WAB BEM FCK S is idle In the following steps Esc works as cancel while Enter works as confirm 2 Press 2 to enter the Network interface As...

Page 24: ...the following steps Esc works as cancel while Enter works as confirm 2 Press 2 to enter the Network interface As shown below 3 Press 7 to enter the Host Port interface Stands for the delete button st...

Page 25: ...el while Enter works as confirm 2 Press 3 to enter the Option interface As shown below 3 Press 1 to enter the Language interface As shown below 4 Press the corresponding number 0 English 1 Chinese and...

Page 26: ...to confirm 3 3 3 Screensaver 1 To enter the following interfaces refer to section 3 3 1 2 Press 3 to enter the Screensaver interface As shown below 3 Input the interval time and press Enter to confirm...

Page 27: ...NO stands for Door normal open NC stands for door normal close Open too long time Interval time to alarm if door remains opened 3 3 5 Multi FP Verify 1 To enter the following interfaces refer to sect...

Page 28: ...rm 1 To enter the following interfaces refer to section 3 3 1 2 Press 6 to enter the Tamper Alarm interface As shown below 3 0 stands for not enabling Tamper Alarm while 1 stands for affirmative Press...

Page 29: ...onding letter to enter each interface as shown Level 1 1 Verify FP with all the registered FP high level for high matching accuracy but will slow down responding time WatchNET 1 User 2 Network 3 Optio...

Page 30: ...ting 1 To enter the following interfaces refer to section 3 4 1 2 Press 2 to enter the WG Setting interface As shown below 3 Press the corresponding key to enter each interface as shown WG Out Type Se...

Page 31: ...cting Card Number Mode 3 4 4 Display Mode 1 To enter the following interfaces refer to section 3 4 1 2 Press 4 to enter the Display Mode interface As shown below WatchNET 1 FP Module 2 WG Setting 3 Ca...

Page 32: ...er each interface as shown Init Parameter Initialize all parameters Delete All Log Delete all personnel data FP and attendance Log Initial Terminal Set terminal to defaulted status Note Initial Termin...

Page 33: ...then the WAB BEM FCK S will beep three times and display Please try again door remains closed Note Only the registered personnel can pass verification 2 FP Card Used to open doors with fingerprint or...

Page 34: ...stallation box Standard 86 box single 2 Wiring Pull the wiring between reader and controller 3 Connection Please refer to chapter 2 of the connections 4 Fix base plate Use a M4 30 screw to fix the bot...

Page 35: ...Connection Please refer to chapter 2 of the connections 9 Fix base plate First drill 3 6 deep 40mm holes and put rubber plugs in then place the reader in a vertical position and use a M3 4 screws to f...

Page 36: ...t short relay time in manage menu 3 FP or card information missing Register FP Card in PC Connect to PC first 4 Cannot open door by flashing card or FP Device not powered up WAB BEM FCK S Lock Invalid...

Reviews: