background image

D e t e c t i o n

NEO Photo-ionization detector 

User Manual

D e t e c t i o n

22

7. Computer Interface Using mPower Suite 

The mPower Suite software can be used to 1) download logged data, 2) upload configuration 

parameters to the instrument, and 3) upgrade the instrument firmware.  The mPower Suite can be 

downloaded from https://www.watchgas.nl/downloads.html.

7.1 CONNECTING AND CONFIGURING

1.  Turn on the instrument and press Up from basic User Mode to go into PC comm.

2.  Connect the USB cable to the PC and with the Micro-USB end to the instrument.*

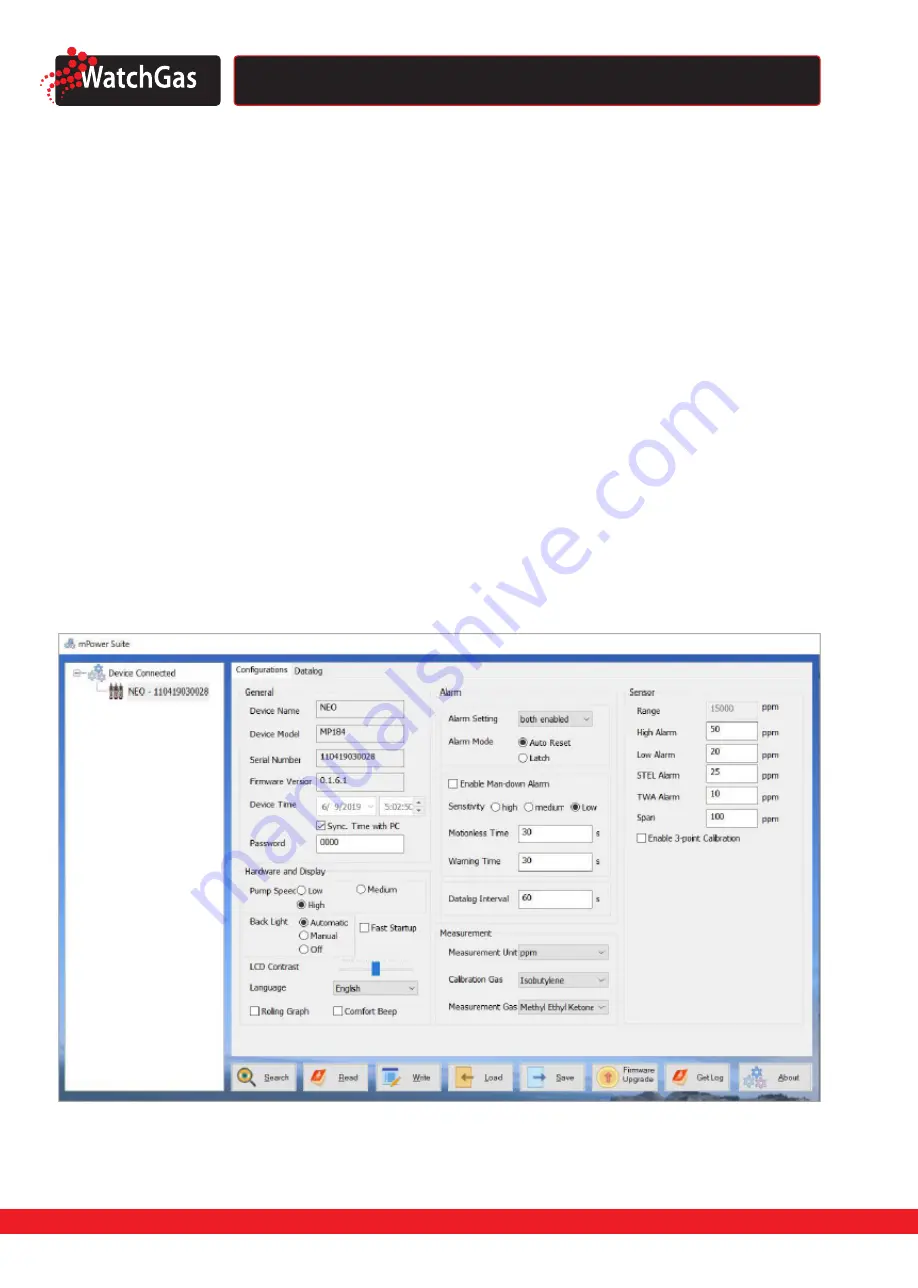
3.  Start mPower Suite on your PC and click the “Search” button to find the instrument.

4.  Find the instrument in the left bar Device Connected list. Click on the S/N to get the configuration    

file from the instrument.

5.  Edit the configuration parameters as desired and click “Write” to upload the configuration to the  

instrument.

6.  “Read” allows downloading the current configuration file from the instrument.

7.  “Save” allows storing the current configuration file to the PC.

8.  “Load” allows calling up a stored configuration file from the PC to mPower Suite.

9.  To update the instrument firmware, select “Firmware Upgrade”.  The firmware must first be    


downloaded to the PC from the WatchGas website www.WatchGas.eu.

*NOTE: Any locally-obtained USB A to Micro B USB cable will work for battery charging, but will not work 

for communication with mPower Suite software. The mPower USB cable P/N M-011-3003-000 is required 

for a PC to recognize the instrument and communicate with mPower Suite.

MPOWER SUITE CONFIGURATION SCREEN 

Summary of Contents for NEO MP181

Page 1: ...www watchgas eu NEO Photo ionization Detector User Manual D e t e c t i o n...

Page 2: ...m Signals 8 5 6 1 Alarm Signal Summary 8 5 6 2 Preset Alarm Limits Calibration 8 5 6 3 Testing the alarms 9 5 7 Backlight 9 5 8 Datalogging 9 5 9 Man Down 9 5 10 Wireless 9 6 Configuration Mode 10 6 1...

Page 3: ...anufacturer s instructions The user should understand how to set the correct parameters and interpret the obtained results Use only WatchGas mPower battery pack M011 3002 000 Substitution of component...

Page 4: ...strument s user interface consists of the LCD display Alarm LEDs an alarm transducer and four keys The keys are Esc Ent OK Esc Ent OK Esc Ent OK Esc Ent OK Left key Right Key Up Key Down Mode Key INLE...

Page 5: ...WatchGas mPower USB cable P N M 011 3003 000 is required for a PC to recognize the instrument and communicate with mPower Suite Item Description Gas information Shows the measurement gas and its corre...

Page 6: ...nt is preset with default alarm limits and the sensor is pre calibrated with standard calibration gas However the instrument should be tested and the calibration verified before the first use After th...

Page 7: ...the startup procedure is complete and a numerical reading screen with icons is displayed the instrument is fully functional and ready for use FLOW CHART FOR BASIC USER MODE 5 4 INTEGRATED SAMPLING PU...

Page 8: ...the preset limits the loud buzzer and red flashing LED are activated immediately to warn of the alarm condition In addition the instrument alarms if one of the following conditions occurs battery vol...

Page 9: ...site ID serial number last calibration date and alarm limits All data are retained even after the unit is turned off in non volatile memory so that it can be down loaded at a later time to a PC Stored...

Page 10: ...pressing the Up key Esc Ent OK or Mode key Esc Ent OK Press the Right key Esc Ent OK or the Left key Esc Ent OK to move the cursor After entering the desired numbers press the Right key Esc Ent OK or...

Page 11: ...hlighted Use the Up key Esc Ent OK or Mode key Esc Ent OK to scroll through the menu until the desired item is reached and use the Right key to select it To Exit Config Mode and return to normal opera...

Page 12: ...D e t e c t i o n NEO Photo ionization detector User Manual D e t e c t i o n 12 FLOW CHART FOR FOR CONFIGURATION MODE...

Page 13: ...trument pump Alternatively the span gas can first be filled into a gas bag e g Tedlar bag or delivered through a demand flow regulator to match the pump flow precisely Another alternative is to use a...

Page 14: ...pressing the Right key to enter the submenu The message Please Apply Gas is displayed Start the span calibration by pressing the Up key which begins a 30 second countdown Note To abort the Span calibr...

Page 15: ...es with the instrument setting 6 3 2 MEASUREMENT The sub menus for Measurement are Measurement Unit and Measurement Gas Measurement Unit Standard available measurement units include Measurement Gas Me...

Page 16: ...eft key to move the cursor Move the cursor to after the setting is complete and press Up to save and exit Low STEL and TWA Alarms Set the Low STEL and TWA Alarm limits in the same manner as described...

Page 17: ...ght key to enter Man down alarm menu Man Down Alarm Off On Press Right to make a selection followed by Left to save and exit Motionless Time Motionless Time is the trigger time for Man Down alarm when...

Page 18: ...CAUTION Once the data are cleared they cannot be recovered 1 Press the Right key to clear the datalog The display asks Clear Datalog 2 Press the Left key if you do not want to clear the datalog 3 Pre...

Page 19: ...n move the cursor to and press Up to save and exit Backlight The Backlight can be set as Automatic Manual or Off In Automatic Mode the backlight comes on and stays on in low light conditions In Manual...

Page 20: ...t calibration Zero Span 1 and Span 2 can be enabled for more accuracy particularly in the high concentration range above about 500 ppm where response is less linear Use the Right key to enter 3 Point...

Page 21: ...the lamp ages 2 a dust or oil film accumulates on the lamp window or 3 a change in environmental conditions such as background matrix gas humidity or temperature The default setting of self zeroing is...

Page 22: ...Connected list Click on the S N to get the configuration file from the instrument 5 Edit the configuration parameters as desired and click Write to upload the configuration to the instrument 6 Read a...

Page 23: ...he screen Below is a sample screen of datalog information listing sample point time and instantaneous reading A new Single Datalog file is created each time the instrument is turned on or the configur...

Page 24: ...bed below 3 Use a cotton swab wetted with methanol to clean the flat window surface of the lamp If greasy dirt is hard to remove using methanol the window can be polished using fine alumina powder pol...

Page 25: ...Dirty Filter Replace filter Dirty sensor module Clean or replace sensor module Excessive moisture or water condensation Blow dry the sensor module Incorrect calibration Calibrate the unit Reading abn...

Page 26: ...s remote alarm notification High Low TWA and STEL alarms Over range alarm battery low alarm Man Down alarm with pre alarm and real time re mote wireless notification Datalogging Capacity Standard 12 m...

Page 27: ...ing damage by fire lightening water damage or other hazard voids liability of the manufacturer In the event that a product should fail to perform up to manufacturer specifications during the appli cab...

Reviews: