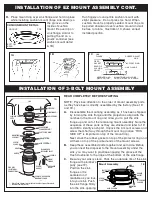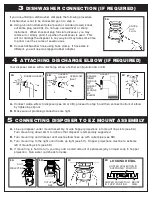
to make a good seal. DO NOT move or rotate
the sink flange once seated or the seal may be
broken.
D.
Take the remaining portion of the mount assembly,
as it was set aside and make sure that the rubber
gasket is on top of the protector ring. From
under the sink, while holding the sink flange
firmly with one hand, line up the notches in
the mount ring with the projections of the sink
flange. Slide the mount assembly up onto the
sink flange, past the projections and give the
mount assembly a 1/4 turn, so that it will hang by
itself (see 1G).
E.
Tighten the 3 mounting screws evenly with a
screwdriver (see 1H). DO NOT OVERTIGHTEN!
Trim off excess putty.
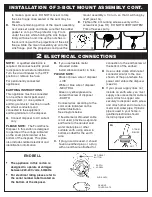
ENDBELL
RED RESET
BUTTON
EARTH
SCREW
WIRE NUTS
REMOVE
COVER PLATE
2
ELECTRICAL CONNECTIONS
INSTALLATION OF 3-BOLT MOUNT ASSEMBLY CONT.
1H
1G
1F
NOTE:
A qualified electrician is
required. Disconnect electric power
to disposer circuit before installation.
Turn the circuit breaker to the OFF
position or remove the fuse.
For permanently connected
appliances:
EARTHING INSTRUCTIONS
This appliance must be connected
to an earthed, metal permanent
wiring system; or an equipment
earthing conductor must be run with
the circuit conductors and
connected to the equipment -
earthing terminal on the disposer.
A.
Connect disposer to AC current
only.
PLEASE NOTE:
The Food Waste
Disposer in this carton is designed
to operate at the voltage indicated
on the cover plate located at the
bottom of the disposer. This plate
also includes related electrical and
identification information.
B.
If you use flexible metal
shrouded cable:
Install cable connector in hole.
PLEASE NOTE:
Black or brown wire of disposer
- LIVE
White or blue wire of disposer
- NEUTRAL
Green or yellow/green wire
and earth screw of disposer
- EARTH
Connect wires according to the
color code indicated on the
endbell illustration.
See diagram below.
If flexible metal shrouded cable
is not used, provide a separate
earth wire to the nearest cold
water metal pipe or other
suitable earth, using screw in
bottom endbell for the earth
wire.
C.
If plug-in cord is used, it should
have an earthed plug or a plug
with an earth wire attached for
connection to the earth screw at
the bottom of the endbell.
D.
Use a cable clamp strain-relief
connector similar to the one
shown, at the point where the
power cord enters the disposer
(see 2A).
E.
If your power supply does not
include an earth wire, you must
supply one unless metal cable is
used. Attach a copper wire
securely to disposer earth screw
and attach other end of wire to a
metal cold water pipe. If plastic
pipe is used in your home, a
qualified electrician should
install a proper earth.
STRAIN
RELIEF
NUT
2A
•
The appliance in this carton is
designed to operate at voltages
between 220-240 volts, 50/60Hz.
•
For electrical rating please refer to
the serial number label located on
the bottom of the disposer.

