background image

Page 6 - 8

Installing Your Floodlight

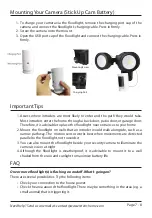
Mounting Your Camera (Ring Spotlight Cam Battery)

1. To charge your camera via the floodlight, remove the charging port cap of the 

camera and connect the floodlight’s charging cable. Press in firmly.

2. Screw the screw converter into the Ring Spotlight Cam Battery.

3. Screw the camera onto the mount.

4. Open the USB port cap of the floodlight and connect the charging cable. Press in 

firmly.

5. Take out the mounting wrench and adjust the Ring Spotlight Cam to your desired 

angle.

Mounting Screw

Charging Port

Need help? Send us an email at: [email protected]

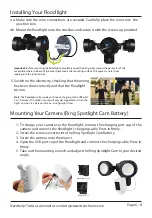
5. Switch on the electricity, checking that the wiring

  has been done correctly and that the floodlight

  turn on.

Important:

 Before mounting the floodlight, completely apply the EVA gasket around the perimeter of the 

cover plate where the back of the cover plate meets the mounting surface. This prevents water from 

seeping into the junction box.

Note: 

The floodlight will provide continuous charging to the USB port 

24/7, however, the motion sensor will only get triggered and turn the 

lights on when it is dark outside (i.e., during night time). 

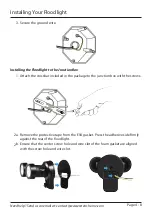
a. Make sure the wire connections are secured. Carefully place the wires into the 

junction box.

4

4b. Mount the floodlight onto the crossbar and secure it with the screw cap provided. 

Summary of Contents for Floodlight with Charger

Page 1: ...ed Mount for Ring Spotlight Cam Battery and Stick Up Cam Battery is an ideal solution to enhance your camera s vision in low light outdoor conditions Floodlight with Charger Compatible with Ring Spotl...

Page 2: ...nts Page 1 8 Package Includes 2 Safety Information 2 Features 2 Installing Your Floodlight 3 Mounting Your Camera 6 Important Tips 7 FAQ 7 Specifications 7 Need help Send us an email at contact wasser...

Page 3: ...ght may not function properly after disassembly Turn the main circuit OFF before installation Do NOT remove the protective LED lens Do NOT look directly at LEDs that are turned on for any length of ti...

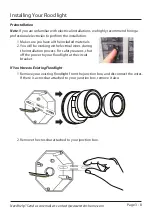
Page 4: ...ve your existing floodlight from the junction box and disconnect the wires If there is a crossbar attached to your junction box remove it also 2 Remove the crossbar attached to your junction box Page...

Page 5: ...on box with the screws 3 Secure the ground wire a Remove the protective tape from the EVA gasket Press the adhesive side firmly against the rear of the floodlight 2 b Ensure that the center screw hole...

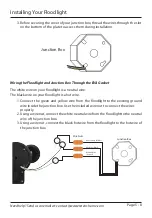
Page 6: ...ct the white neutral wire from the floodlight to the neutral wire of the junction box 3 Using a wire nut connect the black hot wire from the floodlight to the hot wire of the junction box The white wi...

Page 7: ...an email at contact wasserstein home com 5 Switch on the electricity checking that the wiring has been done correctly and that the floodlight turn on Important Before mounting the floodlight completel...

Page 8: ...is weatherproof it is advisable to mount it to a wall shaded from the rain and sunlight to maximize battery life Check your connection to the house power Check the area around the floodlight There ma...

Page 9: ...m Sensor Angle Range 120 Sensor Distance Thresholds 13 to 33 ft 4 to 10 m Max LED Light Intensity 2000 Lumens Color Temperature 5500 6500 K Power AC 120V Ring Spotlight Cam Battery not included Ring S...

Reviews: