background image

- 28 - 


5. Power-on Utilities


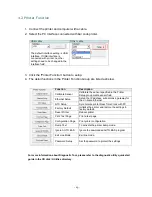
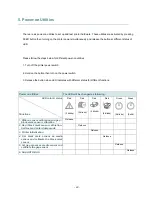
There are six power-on utilities to set up and test printer hardware. These utilities are activated by pressing 

FEED button then turning on the printer power simultaneously and release the button at different status of 

LED. 


Please follow the steps below for different power-on utilities. 


1. Turn off the printer power switch. 


2. Hold on the button then turn on the power switch. 


3. Release the button when LED indicates with different status for different functions. 


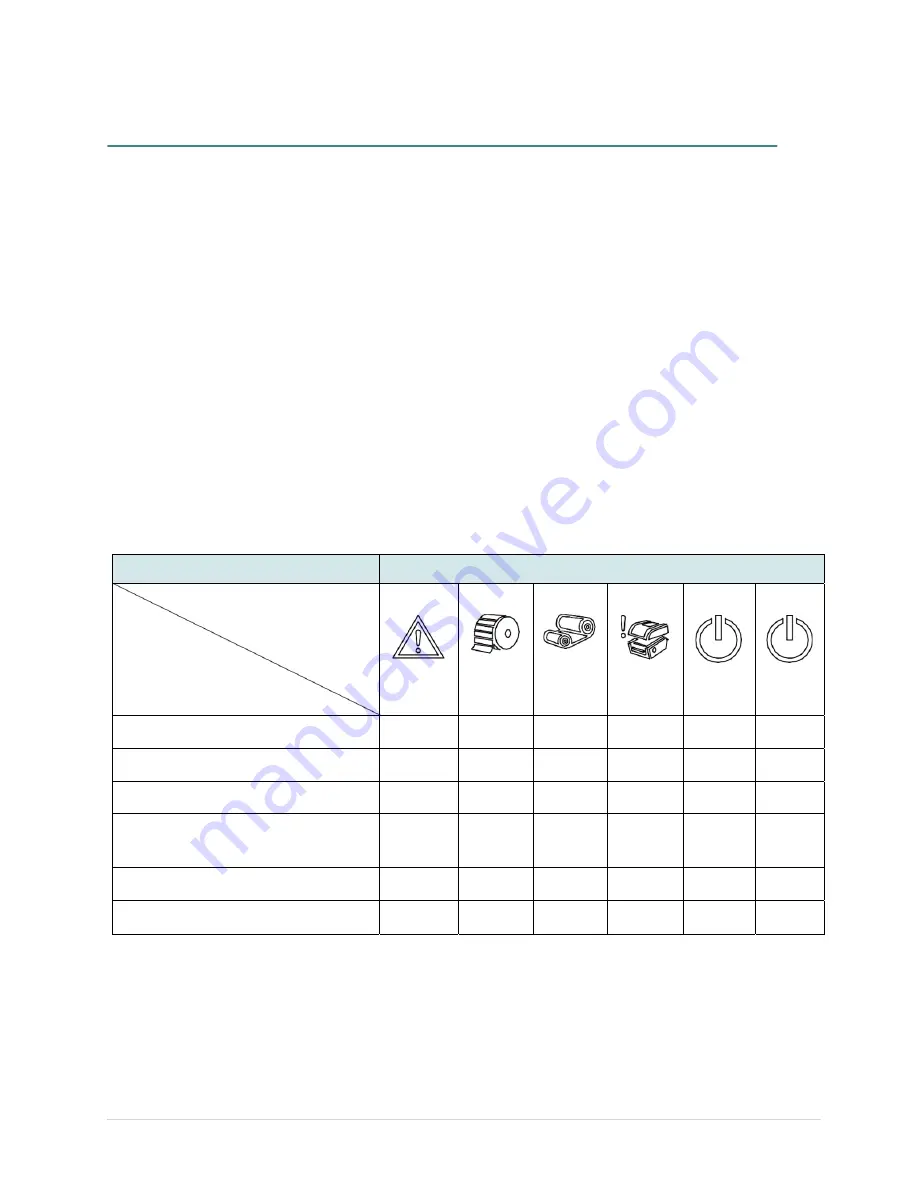
Power on utilities


The LED will be changed as following:


LED color & status


Functions


Red 


(5 blinks) 

Red 


(5 blinks) 

Red 


(5 blinks) 

Red 


(5 blinks) 

Green 


(5 blinks) 

Green 


(Solid) 

1. Ribbon sensor calibration and gap / 

black mark sensor calibration


Release 


2. Gap / black mark sensor calibration, 

Self-test and enter dump mode


Release 


3. Printer initialization


Release 


4. Set black mark sensor as media 

sensor and calibrate the black mark 
sensor


Release 


5. Set gap sensor as media sensor and 

calibrate the gap sensor


Release 


6. Skip AUTO.BAS


Release 

Summary of Contents for WPL308 Series

Page 1: ...WPL308 Series THERMAL TRANSFER DIRECT THERMAL BAR CODE PRINTER USER S MANUAL...

Page 2: ...om the Monotype Corporation Windows is a registered trademark of Microsoft Corporation All other trademarks are the property of their respective owners Information in this document is subject to chang...

Page 3: ...oder Aerosolreiniger Am besten eignet sich ein angefeuchtetes Tuch zurReinigung 4 Die Netzanschlu Steckdose soll nahe dem Ger t angebracht und leicht zug nglichsein 5 Das Ger t ist vor Feuchtigkeit zu...

Page 4: ...r there is no guarantee that interference will not occur in a particular installation If this equipment does cause harmful interference to radio or television reception which can be determined by turn...

Page 5: ...Polybrominated diphenyl ethers PBDE 1 0 1 wt 0 01 wt Note 1 Exceeding 0 1 wt and exceeding 0 01 wt indicate that the percentage content of the restricted substance exceeds the reference percentage val...

Page 6: ...ew 8 2 2 2 Interior view 9 2 2 3 Rear View 10 2 3 Operator Control 11 2 3 1 LED Indication and Key 11 3 Setup 12 3 1 Setting up the printer 12 3 2 Loading the Ribbon 13 3 3 Loading the Media 16 3 3 1...

Page 7: ...6 5 5 Set Gap Sensor as Media Sensor and Calibrate the Gap Sensor 37 5 6 Skip AUTO BAS 38 6 LCD Menu Function 39 6 1 Enter the Menu 39 6 2 Main Menu Overview 40 6 3 WPL2 41 6 4 ZPL2 43 6 5 Sensor 46 6...

Page 8: ...he printer construction features a rugged double wall design that is stronger and more durable than other thermal transfer mechanisms on the market Its strong motor is powerful enough to handle a 300...

Page 9: ...reshold of ribbon low detection The ribbon LED becomes blinking if ribbon supply roll diameter is less than 39 4 mm Head open sensor 128MB Flash memory 128 MB DDR2 DRAM Micro SD card reader for memory...

Page 10: ...e 1254 Turkish Codepage 1255 Hebrew Codepage 1256 Arabic Codepage 1257 Baltic Codepage 1258 Vietnam ISO 8859 1 Latin 1 Western European ISO 8859 2 Latin 2 Central European ISO 8859 3 Latin 3 South Eur...

Page 11: ...in label only Regular cutter full cut guillotine cutter Paper thickness 0 06 0 19 mm Note Except for the linerless cutter all regular heavy duty care label cutters DO NOT cut on media with glue 802 11...

Page 12: ...cations 200 dpi model 300 dpi model 600 dpi model Print head resolution dots per inch mm 203 dots inch 8 dots mm 300 dots inch 12 dots mm 600 dots inch 24 dots mm Printing method Thermal transfer or d...

Page 13: ...Continuous die cut black mark external fan fold notch Media wound type Outside wound Media width 19 mm 112 mm Media thickness 0 055 mm 0 254 mm Label length 3 25 400 mm 0 1 1 000 3 11 430 mm 0 1 450 3...

Page 14: ...ging materials in case you need to reship the printer Unpacking the printer the following items are included in the carton If any parts are missing please contact the Customer Service Department of yo...

Page 15: ...8 2 2 Printer Overview 2 2 1 Front View 2 1 3 4 5 1 LED indicators 2 Feed Pause button 3 Paper exit chute 4 Top cover open lever 5 Power switch...

Page 16: ...ibbon access cover 5 Ribbon rewind hub 6 Print head 7 Ribbon supply hub 8 Media cover 9 Media holder locking switch 10 Media guides 11 Platen roller 12 Black mark sensor 13 Media guide adjustment butt...

Page 17: ...d spec SD card capacity Approved SD card manufacturer Micro SD V2 0 Class 4 4G Transcend V2 0 Class 4 8G Transcend V3 0 Class 10 UHS I 16G Transcend V3 0 Class 10 UHS I 32G Transcend V3 0 Class 10 16G...

Page 18: ...on to pause a print job When the printer is paused the power LED will blink green Press the button again to continue the printing job LED Status Indication On Other errors On Out of paper Blinking Pap...

Page 19: ...off 3 Connect the printer to the computer with the provided USB cable 4 Plug the power cord into the AC power cord socket at the rear of the printer and then plug the power cord into a properly groun...

Page 20: ...nter s top cover by pulling the top cover open levers located on each side of the printer and lifting the top cover to the maximum open angle 2 Open the ribbon access cover and the media cover 3 Inser...

Page 21: ...ind hub first then align the notches on the left side and mount onto the spokes 5 Insert the ribbon spindle into the ribbon core Note The yellow part of spindle is in left side 6 Install the ribbon ri...

Page 22: ...Stick the ribbon onto the ribbon rewind paper core 8 Turn the ribbon rewind gear until the ribbon plastic leader is thoroughly wound Close the ribbon access cover and the top cover Loading path for r...

Page 23: ...the printer top cover by pulling the tabs located on each side towards the front of the printer then lift the top cover to the maximum open angle 2 Separate and hold open the media holders 3 Place th...

Page 24: ...dia guide adjustment button PUSH 6 Close the top cover gently 7 Use Diagnostic Tool to set the media sensor type and calibrate the selected sensor Start the Diagnostic tool Select the Printer Configur...

Page 25: ...18 Loading path for media...

Page 26: ...per guide and pass over the platen 2 Lead the paper through the cutter paper opening PUSH 3 Move the media guides to fit the label width by pushing the media guide adjustment button 4 Close the top co...

Page 27: ...width by pushing the media guide adjustment button 3 Close the top cover gently Use Diagnostic Tool to set the media sensor type calibrate the selected sensor and set the post print action to PEEL Not...

Page 28: ...21 6 Close the peel off cover and printer cover Printer is ready for peel off mode 7 Print a label for test...

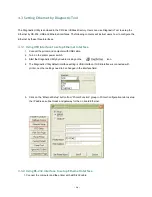
Page 29: ...mmands to a printer With the aid of this powerful tool you can review printer status and setting in an instant which makes it much easier to troubleshoot problems and other issues 4 1 Start the Diagno...

Page 30: ...in the Printer Setup group media sensor field Ethernet Setup Setup the IP address subnet mask gateway for the on board Ethernet RTC Setup Synchronize printer Real Time Clock with PC Factory Default In...

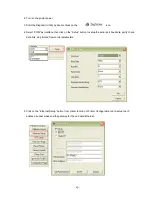
Page 31: ...and computer with USB cable 2 Turn on the printer power switch 3 Start the Diagnostic Utility by double clicking on the icon 4 The Diagnostic Utility default interface setting is USB interface If USB...

Page 32: ...as interface then click on the Setup button to setup the serial port baud rate parity check data bits stop bit and flow control parameters 5 Click on the Ethernet Setup button from printer function of...

Page 33: ...interface then click on the Setup button to setup the IP address subnet mask and gateway for the on board Ethernet 5 Click the Discover Device button to explore the printers that exist on the network...

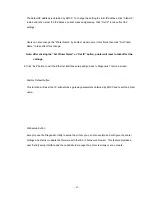
Page 34: ...n printer will reset to take effect the settings 8 Click Exit button to exit the Ethernet interface setup and go back to Diagnostic Tool mainscreen Factory Default button This function will reset the...

Page 35: ...ease the button when LED indicates with different status for different functions Power on utilities The LED will be changed as following LED color status Functions Red 5 blinks Red 5 blinks Red 5 blin...

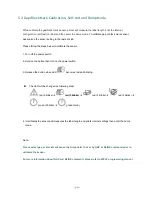
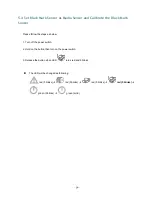
Page 36: ...ch 2 Hold on the button then turn on the power switch 3 Release the button when LED becomes red and blinking It will calibrate the ribbon sensor and gap black mark sensorsensitivity The LED will be ch...

Page 37: ...off the power switch 2 Hold on the button then turn on the power switch 3 Release the button when LED becomes red and blinking The LED will be changed as following order red 5 blinks red 5 blinks red...

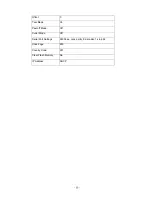
Page 38: ...n Firmware checksum Printer S N Configuration file System date System time Printed mileage meter Cutting counter Print speed inch sec Print darkness Label size inch Gap distance inch Gap black mark se...

Page 39: ...32 Numbers of download files Total available memory space Print head check pattern...

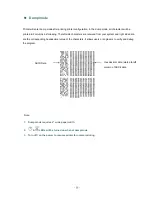
Page 40: ...e received from your system and right side data are the corresponding hexadecimal value of the characters It allows users or engineers to verify and debug the program Note ASCII Data Hex decimal data...

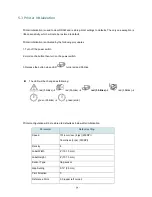
Page 41: ...n turn on the power switch 3 Release the button when LED turns red and 5 blinks The LED will be changed as following red 5 blinks red 5 blinks red 5 blinks red 5 blinks green 5 blinks green solid Prin...

Page 42: ...35 Offset 0 Tear Mode On Peel off Mode Off Cutter Mode Off Serial Port Settings 9600 bps none parity 8 data bits 1 stop bit Code Page 850 Country Code 001 Clear Flash Memory No IP Address DHCP...

Page 43: ...Please follow the steps as below 1 Turn off the power switch 2 Hold on the button then turn on the power switch 3 Release the button when LED turns red and 5 blinks The LED will be changed as followi...

Page 44: ...follow the steps as below 1 Turn off the power switch 2 Hold on the button then turn on the power switch 3 Release the button when LED turns green and 5 blinks The LED will be changed as following red...

Page 45: ...rrupted without running the program by the power on utility Please follow the procedures below to skip an AUTO BAS program 1 Turn off printer power 2 Press the FEED button and then turn on power 3 Rel...

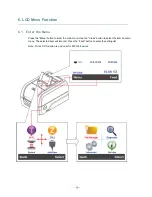
Page 46: ...Menu Press the Menu button to enter the main menu Use the Cross button to select the item on main menu The selected item will turn red Press the Feed button to enter the setting list Note This LCD fu...

Page 47: ...Off Print Mode Print Width List Fonts List Images List Formats List Setup Control Prefix Format Prefix Delimiter Char Media Power Up Head Close Label Top Left Position Reprint Mode Format Convert Sens...

Page 48: ...0 to 15 and the step is 1 You may need to adjust your density based on selected media 8 Direction The direction setting value is either 1 or 0 Use this item to setup the printout direction 0 Print mo...

Page 49: ...value is from to or 0 to 9 000 Shift Y 000 Reference X This item is used to set the origin of printer coordinate system horizontally and vertically Available setting value is from 0 to 9 000 Referenc...

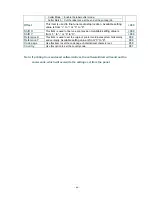
Page 50: ...ar Media Power Up Head Close Label Top Left Position Reprint Mode Format Convert Tear Off Peeler Off Cutter Feed Calibration Length No Motion Feed Calibration Length No Motion Enabled Disabled None 15...

Page 51: ...guration to the label N A Control Prefix This feature is used to set control prefix character N A Format Prefix This feature is used to set format prefix character N A Delimiter Char This feature is u...

Page 52: ...last label printer by pressing UP button on printer s control panel Disabled Format Convert Selects the bitmap scaling factor The first number is the original dots per inch dpi value the second the dp...

Page 53: ...rinter will feed 2 to 3 gap labels to calibrate the sensor sensitivity automatically N A Manual Setup In case Auto calibration cannot apply to the media please use Manual setup function to calibrate t...

Page 54: ...face Serial Baud Rate Parity Data Bits Stop Bit s 1200 bps 2400 bps 4800 bps 9600 bps 19200 bps 38400 bps 57600 bps 115200 bps None Odd Even 7 8 1 2 Item Description Default Baud Rate This item is use...

Page 55: ...e Menu Interface Ethernet Status Configure DHCP Static IP Item Description Default Status Use this menu to check the Ethernet IP address and MAC setting status N A DHCP This item is used to ON or OFF...

Page 56: ...Interface Wi Fi Operating Mode Scan AP DHCP Item Description Default Operating This item is used to set the operating mode of wireless local area networks to connect devices to the networks Note Infra...

Page 57: ...e Manager FLASH CARD Item Description DRAM Use this menu to show delete and run BAS the files saved in the printer DRAM memory FLASH Use this menu to show delete and run BAS the files saved in the pri...

Page 58: ...rint head test pattern which is useful for checking if there is any dot damage on the print head heater element Menu Diagnostics Print Config Self test printout Model name F W version Firmware checksu...

Page 59: ...x Format prefix Delimiter prefix Printer power up motion Printer head close motion Note ZPL is emulating for Zebra language RS232 serial port configuration Numbers of download files Total available me...

Page 60: ...C S DOWNLO 53 0D 0A 44 4F 57 4E 4C 4F AD F TES 41 44 20 46 2C 22 54 45 53 T4 DAT 5 54 34 2E 44 41 54 22 2C 35 CLS DOW 2C 43 4C 53 0D 0A 44 4F 57 NLOAD TE 4E 4C 4F 41 44 20 22 54 45 ST2 DAT 53 54 32 2E...

Page 61: ...ead s temperature resistance and bad dots Menu Diagnostics Print Head 6 8 4 Display This feature is used to check LCD s color state Menu Diagnostics Display 6 8 5 Sensor This feature is used to check...

Page 62: ...Display Brightness Menu Advanced Date Time Language Item Description Display Brightness This item is used to setup the brightness for display Date Time This item is used to setup the date and time on...

Page 63: ...nter Information Contact Us Item Description Initialization This feature is used to restore printer settings to defaults Printer Information This feature is used to check the printer s serial number p...

Page 64: ...label roll Calibrate the gap black mark sensor LED Blinking Paper jam Gap black mark sensor is not set properly Make sure label size is set properly Labels may be stuck inside the printer mechanism Ca...

Page 65: ...d Run printer self test and check the print head test pattern if there is dot missing in the pattern Change proper ribbon or proper label media The release lever does not latch the print head properly...

Page 66: ...the GAP Black mark sensor by blower Wrinkle Problem Printhead pressure is incorrect Ribbon installation is incorrect Media installation is incorrect Print density is incorrect Media feeding is incorre...

Page 67: ...ce Clean the print head when changing a new label roll Platen Roller 1 Turn the power off 2 Rotate the platen roller and wipe it thoroughly with water Clean the platen roller when changing a new label...

Page 68: ...n encoder sensor info Camille 2015 10 21 Modify section 2 2 3 Recommended SD card specification Camille 2016 5 5 Add section 6 8 5 Sensor Camille 2016 7 5 Add note for peel off module on chapter 1 2 2...

Page 69: ...Wasp Barcode Technologies Corporate Headquarters 1400 10th St Plano TX 75074 TEL 214 547 4100 Website www waspbarcode com E mail support waspbarcode com...

Reviews: