


2024730_d•en•2020-01-01
We reserve the right to make technical modifications
6
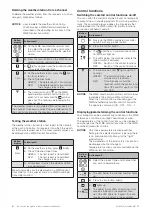
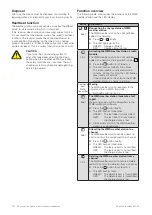
Deleting the weather station from a channel
To delete the weather station from the receivers of a chan-
nel again, proceed as follows:
OTICE
N
How to delete the weather station from a
channel using a WMS Central transmitter is
described in the operating instructions of the
WMS Central transmitter.
Button/
display
Action/result
On the WMS hand-held transmitter com-
fort, select the product type and channel
to which you wish to allocate the weather
station.
Press the learn button on the WMS hand-
held transmitter comfort briefly.
lights up green and the product button
and selected channel flash.
> 5 s
On the weather station, press the
but-
ton for at least 5 s.
The LED flashes twice
GREEN: The delete report is transmitted
RED:
The delete report is transmitted,
the charge status is low
The transmission LED
on the WMS
hand-held transmitter comfort lights up
green for 2 seconds and the
symbol
goes out. The receivers belonging to the
channel wave.
The weather station is now deleted from all receivers of
the channel. If necessary, adjust the parameterisation of
the control functions for the receivers of this channel.
Testing the weather station
The weather station transmits a test report to the network
at the push of a button. All receivers into which the weath-
er station was learned wave. The measurement values can
be displayed on a WMS Central transmitter.
Button/
display
Action/result
Brief
On the weather station, press
briefly.
The LED flashes three times.
GREEN: The test report is transmitted
RED:
The test report is transmitted,
the charge status is low
All receivers to which the weather station
is assigned wave.
Measuring values can be displayed on a WMS central
transmitter or in the special menu of a WMS hand-held
transmitter comfort.
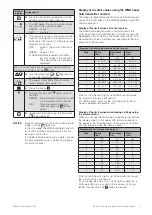
Control functions
Switching the comfort control functions on/off
You can switch the comfort controls off and on temporarily
to prevent the sun shading products from moving automat-
ically. The command always applies to all receivers that
were learned into the WMS transmitter. Safety functions
cannot be switched on and off.
Button/
display
Action/result
Wake up the WMS hand-held transmitter
comfort with any product button
Press the control button.
+
The
and the sun and dawn/dusk con-
trol symbols light up.
The LEDs below the symbols indicate the
type of switch command:
GREEN: Switch on the control functions
RED:
Switch off the control functions
The transmission LED
lights up for 2
seconds
GREEN: The control functions were
switched in all receivers
RED:
Not all receivers could be
reached; switch the control func-
tions OFF and ON again (or ON
and OFF).
OTICE
N
The WMS hand-held transmitter comfort always
remembers the command transmitted last.
When the control button is pressed again, the
WMS hand-held transmitter comfort transmits
the opposite command (ON - OFF - ON - ...).
Displaying/parameterising the control functions
Your products can be automatically controlled in the WMS
network as a function of sunlight, dawn/dusk or wind.
The parameters of the control functions can be displayed
and changed via the WMS central transmitter or the WMS
hand-held transmitter comfort.
OTICE
N
Only those parameters are displayed that
belong to the selected product type (e.g. there
is no precipitation monitoring for the "light"
product type).
The parameters of the wind safety function can
be displayed but not changed.
Temperature functions are only available via the
WMS central transmitter.
Button/
display
Action/result
Select the product type and channel that
you wish to parameterise.
e.g.
The LED below the channel number lights
up.
Press the info button briefly.
+
e.g.
lights up
The upper row of LEDs shows how many
receivers belong to the selected chan-
nel. One LED lights up in green for each
receiver (one receiver in the example).