background image

19

GB

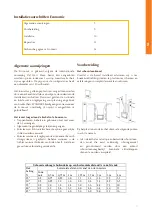
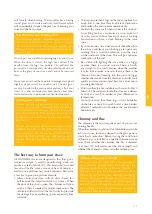
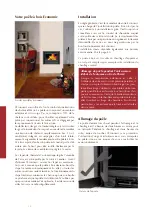
Your Economic stove at a single glance

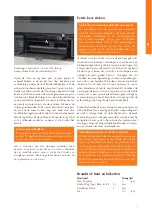
One of the Economic models

The Economic hearth is a combination of comfort and 
efficient heat output. The stove has an outer cover and 
an interior chamber which ensures the radiation of 70% 
heat output through convection to the room, while the 
remaining 30% of the heat is released through radiation 
via the glass area. The integrated flue gas deflector makes 
the flue gases circulate through the interior chamber 
to increase the heat output of your stove. Though not 
without sound, the 1 or 2 integrated ventilators draw in 
cold air from underneath the stove and lead the air up via 
the backside and blow it out again via the front side. The 
velocity of the ventilators can be manually adjusted.

The hearth is equipped with an automatic thermostat 
valve which regulates the air intake to your woodstove 
via the ash pan.  Open the valve completely when 
lighting the stove. Once the stove has heated up, the 
valve will close automatically to minimize the chance 
of overheating provided that the other air inlets remain 
closed. Please don’t forget to clean the ash pan regularly 
to ensure optimum air supply.

Installation

It is common practice for the dealer where you purchased 
your Economic stove to also take care of installing it. If 
this is not the case, please ensure that the installation 
is done by a certified installer. A certified installer can 

Usage early in autumn or late in winter

When the external and internal temperatures do 
not differ much, a proper chimney draught is a real 
challenge. You can help chimney draught get started 
by burning some wood while keeping all air inlets 
maximally open. An abundant air supply speeds up 
quick heating which in turn increases the draught 
in the chimney. Lighting up the stove with only a 
little wood prevents smoke from streaming into the 
room.

also give you the right advice about the flue tube to 
which the stove must be connected. Connecting wood-
burning stoves by unqualified persons is prohibited, in 
which case we cannot give any guarantee about proper 
functioning of your Economic stove. Please bear the fire 
safety in mind when installing the stove. See also page 
24.

The wood-burning stove is suitable as an extra heat 
source and does not replace your principal heating 
device. 

Lighting the stove

The stove will become very hot when you light it and 
will need at least two hours to cool off. Don’t touch the 
stove without protection during firing and for two hours 
after. Handle the stove always with a glove to avoid 
getting serious burns.

Open the door

Summary of Contents for ECONOMIC

Page 1: ...allatievoorschriften Economic 2 GB Users guide and installation manual for the Economic 16 FR Mode d emploi et instructions d installation le Economic 31 D Gebrauchsanweisung und Montage Vorschriften...

Page 2: ...Voor de constructie zijn alleen de beste materialen gebruikt die voldoen aan de Europees geldende normen Zo garanderen wij u een lange levensduur en optimaal stookplezier In het eerste deel van deze...

Page 3: ...gopslag 4 Installatie 4 Aansteken van de kachel 4 Eerste keer stoken 5 Brandstof hout en briketten 5 De optimale stookwijze 6 Schoorsteen en rookkanaal 6 Onderhoud 7 Veiligheid 7 Garantie 7 Installati...

Page 4: ...uchttoevoer Installatie Over het algemeen zorgt de dealer waar u de Economic heeft aangeschaft ook voor de plaatsing Is dat niet het geval verzeker u er dan van dat de plaatsing wordt uitgevoerd door...

Page 5: ...n met niet te veel brandstof Ventileer de ruimte goed terwijl u stookt Zorg ervoor dat in dezelfde ruimte als u een open keuken heeft geen afzuigkap aanstaat terwijl de haard brandt Een afzuigkap trek...

Page 6: ...an nodig voor een goede verbanding De relatief koude lucht koelt het vuur af Tevens voorkomt u brandschade door mogelijk uitspattende vuurdeeltjes met name van naaldhout Legnietmeerdan3houtblokkenof4b...

Page 7: ...e brandveiligheid begint bij een correcte installatie en een goed werkend rookgasafvoerkanaal Uw installateur dient zich daartoe te houden aan de installatievoorschriften zoals omschreven op pagina 9...

Page 8: ...en bij wisseling van eigenaar De garantie vervalt ook bij gebruik van een verkeerde brandstof Voor de volgende onderdelen geldt een garantietermijn van 1 jaar alle gietijzeren en vermiculite onderdel...

Page 9: ...riften Daarnaast gelden de nationale en lokale wet en regelgeving voor plaatsing en gebruik van houtkachels WANDERS biedt geen garantie wanneer de Economic onvolledig of onjuist is aangesloten of ge n...

Page 10: ...uit brand vrije materialen bestaan of moet ermee ge soleerd worden Het te gebruiken isolatiemateriaal dient een temperatuur van 700 graden Celcius te weer staan en een dichtheid van 80 kg m3 te hebben...

Page 11: ...len smelten en daardoor kunnen onveilige situaties ontstaan U dient de haard te allen tijde op een wandcontact doos voorzien van randaarde aan te sluiten Het toestel moet ook tijdens eventuele service...

Page 12: ...in de deur Vervangen van het glas in de deur Open de deur van de haard Verwijder de vier schroeven zie guur 5 Verwijder de glasstrips Let op het glas is scherp Figuur 6 Vervangen van de zijruit Verva...

Page 13: ...13 NL...

Page 14: ...van 0 12 mbar Brandstof houtblokken 30 x 10 cm Bruinkoolbriketten Max opleg hoeveelheid 3 stuks 4 stuks Primaire luchtklep max max Secundaire luchtopening max max Brandtijd brandstof ongeveer 1 uur o...

Page 15: ...0 cm X X X X X isolatie achterkant 8 cm zijkant 8 cm onderkant 6 cm convectie mantel X X X X X Tabel geeft aan welke isolatiedikte gekozen moet worden bij welke muurdikte ter bescherming van inbouwwan...

Page 16: ...16 User s Guide and Installation Manual Economic GB...

Page 17: ...ter part handmade Only the best materials are used for the construction and comply with current international standards This will guarantee that your woodstove has a long life The rst part of this use...

Page 18: ...Installation 19 Lighting the stove 19 Lighting the stove for the rst time 20 Fuel wood and browncoal 20 The best way to burn your stove 21 Chimney and ue 21 Maintenance 22 Safety 22 Guarantee 22 Insta...

Page 19: ...actice for the dealer where you purchased your Economic stove to also take care of installing it If this is not the case please ensure that the installation is done by a certi ed installer A certi ed...

Page 20: ...after the stove has cooled down You can also use some cleansing agent for ceramic rings Please make sure you do not leave any nger marks on the clean glass Finger marks burn into the glass and cannot...

Page 21: ...revent the lower logs from being in contact with water Do not put more than 3 logs on the re at one time Too much fuel at one time thwarts ef cient combustion and burdens the environment unnecessarily...

Page 22: ...50 cm measured from the replace on the front side of the door 30 cm measured from the replace on all sides from the door 5 Do not place any combustible materials such as curtains wooden objects cupbo...

Page 23: ...23 GB the purchase receipt with purchase date Any repairs do not entitle you to extend the guarantee term All consequential damages or loss are excluded...

Page 24: ...himney ue Install ventilation grills to avoid cracks and discoloration in plasterwork Before placing the stove you must observe the following points If the stove is connected to an existing chimney yo...

Page 25: ...the replace must consist of or be insulated with re proof materials The insulation material to be used must resist a temperature of 700 C and have a density of 80 kg m3 Please see page 29 for insulat...

Page 26: ...a diameter of 150 mm Fit this pipe to the stove 5 Remove the pipe collar from the hearth see illus tration 1 6 Place the hearth in the opening and mind any pow er cables Illustration 1 Remove the pipe...

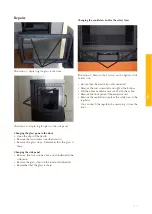
Page 27: ...eath the side pane Remove the glass strips on the inside of the hearth Remember that the glass is sharp Changing the ventilators and or the safety fuses Illustration 7 Remove the 2 screws on the right...

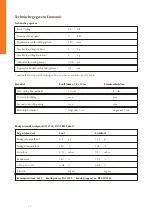
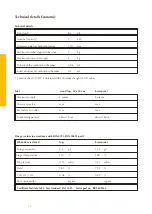
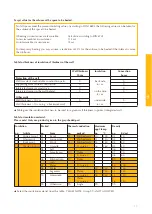
Page 28: ...y draught of 0 12 mbar Fuel wood logs 30 x 10 cm brown coal Maximum supply 3 pieces 4 pieces Primary air valve max max Secondary air outlet max max Fuel burning period about 1 hour about 1 hour Flue g...

Page 29: ...of combustable construction parts Supporting walls in steel construction Intergrated pieces against stove Intergrated pieces in the wall behind Other walls Wall thickness 10 cm Wall thickness 10 cm e...

Page 30: ...30...

Page 31: ...31 FR Mode d emploi et instructions d installation Economic FR...

Page 32: ...en conformit avec les normes europ ennes en vigueur Vous b n cierez ainsi de la garantie d une longue dur e de vie pour ce po le La premi re partie de ce mode d emploi est consacr e aux conseils pour...

Page 33: ...ion 34 Allumage du po le 34 Premier chauffage 35 Combustible le bois et briquettes 36 La fa on optimale de chauffer le po le 36 Chemin e et conduit de chemin e 37 Entretien 37 S curit 37 Garantie 38 I...

Page 34: ...n rale c est le revendeur de votre Economic qui se charge de l installation du po le Si ce n est pas le cas con ez la un installateur agr C est lui qui vous conseillera aussi sur le conduit de chemin...

Page 35: ...duire que quelques b ches et de faire br ler le po le pendant au moins 6 heures Assurez vous que la ventilation de la pi ce soit ad quate N utilisez pas une hotte aspirante quand le po le br le car el...

Page 36: ...ien ferm e le rendement du chauffage en sera 8 10 fois plus grand Si la porte est ouverte la chemin e aspire plus d air que n cessaire pour une bonne combustion et l air relativement frais refroidit l...

Page 37: ...du sel absorbant dans le po le s il se trouve dans une pi ce humide Graissez la partie de chauffe en fonte nettoy e au moyen d une vaseline neutre Entretien annuel Tous les ans pour la s curit incend...

Page 38: ...la pose de l appareil vous devrez v ri er si le po le ne pr sente pas des dommages visibles Dans ce cas il ne faut pas accepter l appareil en prendre contact avec votre fournisseur La garantie ne couv...

Page 39: ...arche ou qui sont quip s d un syst me de tirage m canique sauf dans le cas o l arriv e de l air provient directement de l ext rieur ce qui assure une combustion sans danger Pr paration Le conduit de c...

Page 40: ...ux r sistants au feu 4 Entre le po le et les l ments de la charpente en acier il doit y avoir une distance de 50 centim tres au moins toutes directions 5 Si le tuyau d vacuation des gaz de fum e trave...

Page 41: ...sur ou par la chemin e Les l ments lectriques pourront fondre par l mission de la chaleur du po le et entra ner ainsi des situations dangereuses Le po le doit toujours tre raccord un socle avec prise...

Page 42: ...nal tique par celle de la langue souhait e gure 4 Assurez vous que le l lectrique ne subit pas de ruptures pendant l installation Le po le doit toujours tre raccord une prise de courant mise la terre...

Page 43: ...en bas gauche et droite Ecartez le bloc ventilateurs en entier Faites attention au c ble Enlevez le devant du bloc ventilateurs Ecartez le ventilateur ou remplacez le fusible du r gulateur de vitesse...

Page 44: ...mbar Combustible b ches 30 x 10 cm briquettes Chargement maximal 3 b ches 4 pi ces Clapet d air primaire max max Trou d air secondaire max max Dur e de consommation combustible 1 heure environ 1 heure...

Page 45: ...ur de paroi 10 cm X 6 cm X Epaisseur de paroi 10 cm peut tre un mur de ma onnerie Tableau indiquant quelle paisseur de l isolation est choisir par quelle paisseur de mur pour la protection des parois...

Page 46: ...46 Gebrauchsanweisung und Installationsvor schriften Economic DE...

Page 47: ...Produktion wurden nur die besten Materiale die den europ ischen Normen entsprechen eingesetzt Damit gew hrleisten wir eine lange Lebensdauer dieses Holzofens Im ersten Teil dieser Gebrauchsanweisung g...

Page 48: ...tage 49 Den Ofen anmachen 49 Das erste mal Heizen 50 Heizmaterial Holz und Braunkohle 50 Die optimale Art zu Heizen 51 Schornstein und Rauchkanal 51 Wartung 52 Brandschutz 52 Garantie 52 Montagevorsch...

Page 49: ...t sich der H ndler wo Sie den Ofen gekauft haben auch um die Installation Wenn das nicht der Fall ist beachten Sie dass die Installation von einem anerkannten Installateur gemacht wird Ein anerkannter...

Page 50: ...Heizens muss gut gel ftet werden Vermeiden sie dass w hrend sie heizen im selben Raum eine Abzughaube an ist Eine Abzugshaube zieht Verbrennungsluft die der Ofen braucht weg W hrend des Einbrennens ka...

Page 51: ...t f r die Kohle durch die untere Seite gef hrt Hierdurch ensteht eine optimale Verfeuerung der Kohle Legen sie nie mehr als 3 Holzscheite auf das Feuer Viel Heizmaterial verhindert eine ef ziente Verb...

Page 52: ...ne Kinder oder hilfsbed rftige Personen in die N he des Ofens kommen und lassen Sie sie nicht allein wenn der Ofen brennt Gebrauchen Sie eventuell einen Kaminvorsatz 3 Giessen oder legen Sie keine bre...

Page 53: ...izmaterial ben tzt wurde F r folgendes Zubeh r gilt eine Garantiefrist von 1 Jahr alle gusseisernen und vermiculit Teile das elektrische Zubeh r und der Lack Wanders ist nicht verantwortlich f r event...

Page 54: ...det au er dann wenn die Luftzufuhr direkt von au en geholt wird sodass die Verbrennung ohne Gefahr geschehen kann Vorbereitung Der Rauchabzugskanal Bevor Sie den Ofen installieren raten wir Ihnen die...

Page 55: ...e innerhalb des 80 cm Be reichs des Ofens sind m ssen mit feuerfestem Ma terial verkleidet werden 4 Wenn der Rauchgasabzug durch die Decke und oder das Dach f hrt welche aus brennbarem Mate rial beste...

Page 56: ...h den Kamin keine elektrische Leitungen gelegt sind Durch die W rmeabgabe vom Ofen k nnen Elektroteile schmelzen und dadurch k nnen gef hrliche Situationen entstehen Sie m ssen den Ofen immer an eine...

Page 57: ...tion ungesch digt bleibt Der Ofen darf ausschliesslich an eine Schutzkontaktscteckdose angeschlossen werden Reparaturen Figur 5 Die Glasscheibe der T r ersetzen Ersetzen der Glasscheibe der Ofent r ff...

Page 58: ...d mit einem Schornsteinzug von 0 12 mbar Heizmaterial Holzscheite 30 x 10 cm Braunkohl Max Einlegen 3 St ck 4 St ck Prim re Luftklappe max max Sekund re L ftungs ffnung max max Brennzeit Heizmaterial...

Page 59: ...anddicke 10 cm X 6 cm X Wanddicke 10 cm kann gemauerte Wand sein Die Tabelle zeigt an welche Isolationsdicke gew hlt werden muss bei welcher Wanddicke um vor Einbau fen zu sch tzen Tabelle Isolationsm...

Page 60: ...60 Technische tekeningen Technical drawings Dessins techniques Technische Zeichnungen...

Page 61: ...Technische tekeningen Technical drawings Dessins techniques Technische Zeichnungen 61...

Page 62: ...62...

Page 63: ......

Reviews: