Assembly
The Mortice Lock is Reversible
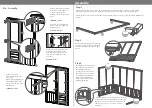
Pre - Assemby
Before following the assembly
instructions, attatch the door
to the door gable using
7x30mm Screws for each long
hinge.
To attatch the small hinge to
the door and door gable use
8x30mm Screws.
Fit the mortice lock into the recess
and fix in place with the screws
provided. Fit the key plate to the
opposite door using the screws
provided.
14x30mm Screws
8x30mm Screws
4x30mm Screws
16
15
8
3
20
18
Fix the vertical and
horizontal beading to the
door gable.
Ensure that the beading sits
flush with the back of the
door gable as shown in the
detailed vew.
11x30mm Screws
10
13
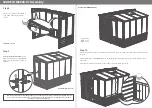
Step 1
Lay the panel joists down as shown in the diagram on a firm and level base, ensure base has suitable
drainage free from areas where standing water can collect (see front page on base requirements).
Ensure the base is square and fix together with 2 x 70mm screws per corner - pre drill to avoid splitting the
timber.
12
11
12
70mm
screw
Step 2
Remove transportation blocks from the
bottom of each panel before beginning
assembly. Each Panel should have two
blocks.
Step 3
Position the rear panel on the
base, the frame sits onto the
base with the cladding
overlapping. Locate the side
and rear panel frame to frame
as in diagram and fix with 3 x
70mm screws using fixing
method A, pre drill to avoid
splitting the timber.
*
Fix the building to the panel joists after the roof
has been fitted, ensure the building is square and
that the doors open and close correctly. Fix with
50mm screws per panel as shown in fixing
method B.
70mm
screw
50mm
screw
50mm
70mm
50mm


