

Do Not Glue
54
52
51
50
49
56
57
58
55
48
53
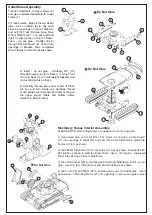
4) Glue Arm Braces (2x 54) to inset area at front of Roof. Thread ends of Hangar Arms (2x 47) through openings in Arm
Braces at front and over pins on outside of Hanger Braces at rear as shown and glue in place.
5) Glue Spotlight (52) to opening at front left and Muffler (53) to openings at left rear on Roof.
6) Glue Glass (2x 49) from inside to openings in Machinery House (50). Glue completed Roof (51) to opening at top of
Machinery House.
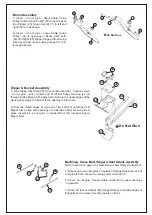
Rigging
PLEASE NOTE: We suggest simply setting the Machinery House in place on the deck for easier access to the drums and
cables during this step. Cables should be temporarily attached to the drums so they can be adjusted as needed. Once you
are satisfied with the operation, the cables and Machinery House may be glued in place if desired. Work slowly and study
the drawings before starting.
A) Dipper Rigging - Short Cable #1 14" (40cm) Long
1) Insert one end of the Short Cable into the opening of the Cable Drums (17) and tie in in place.
2) Run cable over End Pulley (30) on boom. Make a loop over the Lift Bar Pulley (48). Run remaining cable down left side
of End Pulley and Small Guide Pulley.
3) Thread cable over each groove of Large Cable Guide Pulley (32).
4) Thread remaining cable back to Drums (17), wrap excess cable on drum and secure in place.
5) Insert - do not glue - pins on Lift Bar Pulley* (48) to openings in Lift Bar Pulley Housing, and Dipper Arms* to Hinges* on
Boom as shown.
B) Boom Rigging - Long Cable #2 20" (52cm) Long
1) Insert one end of the Long Cable into the opening on the left side of part #20 on the Boom Drum (part #20) and secure
in place.
2) Thread Cable through opening in Roof (51) and over top left of Hanger Cable Guide (43).
3) Run cable over left pulley of Small Cable Guide Pulley (29), back over right Hanger Cable
Guide, back through right pulley on #29,back to bottom of Hanger Guide and secure in place.
The cable drums can be turned using the small flat bladed screwdriver (S) raising and lowering
the Boom and/or Dipper Arm as needed.
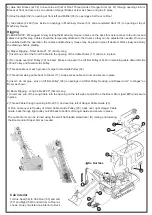
Cab Interior
1) Glue Seat (56) to Cab Floor (55) and Left
(57) and Right (58) Control Arms to Floor as
shown. Glue completed cab interior to Deck.