


8
9
EN
Instruction Manual
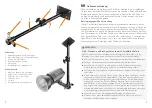
With the Walimex pro Ceiling-mounted Lamp Support 34 – 54 cm you acqui-
red a sturdy wall-mounted lamp support of the highest quality. Mount lights,
flashes or other studio equipment on the ceiling and save space on the
ground. The high-grade workmanship and product quality will convince you
and give you many years of satisfaction.
Intended use
This ceiling mount, consisting of an extendable boom, which can be rotated
freely, is ideal for use in studios and must be firmly attached to a ceiling
before use. It is used to mount equipment such as lamps or flashes for photo
and film work. Constructed for use in photo and film shoots in private studios
and households as well as in industrial or commercial photo and film studios.
For indoor use. Specially designed to meet the requirements of photo-
graphic and video work.
Not suitable for mounting or guiding cameras.
WARNING
Risk of impact, pinching and fire, also due to falling parts.
Danger of physical injuries by falling equipment or parts thereof in case of
improper mounting.
■
Make sure to attach the ceiling stand firmly and securely.
■
Make sure that no one can trip over cables connected to a mounted unit.
■
Ensure that no one stands under the unit during use or when it is not
in use.
■
The maximum load capacity of the ceiling stand of 6 kg must not be
exceeded.
■
Please ensure that the ceiling to which you attach the support is of
sufficient
structural stability and offers the appropriate load-bearing
capacity. Only use the enclosed heavy-duty anchors or comparable
ones. Only solid ceilings, beams or trusses made of load-bearing mate-
rial such as concrete, metal, natural stone or solid wood are suitable for
fastening. Suspended ceilings and similar are unsuitable. Ideally, consult
a specialist before installation. Advice should also be sought in the case
of listed buildings or buildings worthy of preservation as well as art.
■
Ensure that the base plate is mounted strictly level.
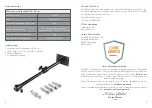
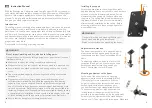
Installing the support
Attach the base plate to the ceiling with suitable
and load-bearing heavy-duty anchors. Use 4 anchors
with one of the two diameters indicated. For the
diameters of the openings in the base plate, see
the picture. The ceiling stand is delivered comple-
tely assembled and is ready for use immediately
after successful installation on the ceiling. Before
mounting, make sure to leave enough space for
mounted devices.
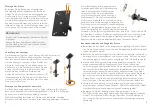
Adjustment of extension
The boom is extendable. Hold mounted equip-
ment securely when opening and adjusting
the extension so that it does not suddenly sink
down.
To adjust the extension, open the lock for the
extension (4) and pull it out as far as you need.
Rotate the extension into the position you
need. Then tighten the lock (4) again.
Mounting equipment on the boom
At the end of the boom there is a mounting
adapter (2) which can hold a standard 5/8 inch
(16 mm) spigot in two orientations. With the
help of this adapter, equipment such as studio
flashes, lights, softboxes, microphones, etc.
can be mounted using a standardised bracket.
To attach your equipment, slightly unscrew the
locking screw of the equipment holder of the
accessory to be attached and guide the equipment
holder of your equipment onto the stand adapter
from above (1). Then tighten the screw again. Make sure
8 mm
5 mm
WARNING
Danger of pinching and crushing! Watch your
hands when adjusting the lamp stand.
Watch for obstacles when extending the boom.
Summary of Contents for Walimex Pro 16444
Page 8: ...14 15 Notes ...


