


Tune Switch (Continued)
•
Tone
: Set the switch to the Tone position and use the Tune knob to adjust the overall tone of the
effect. Set lower for darker, more muted sounds and higher for brighter, full-frequency tones.
•
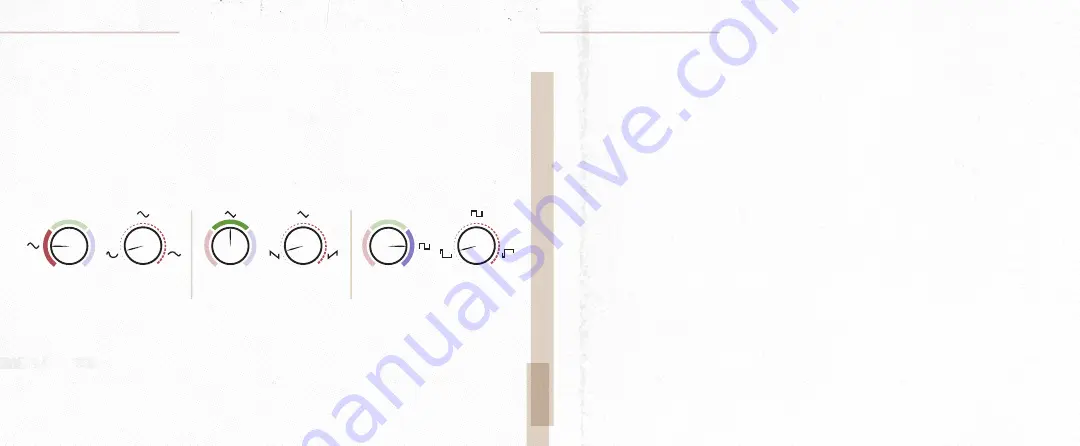
Symmetry (Sym)
: Set the switch to the Sym position and use the Tune knob to adjust the
symmetry of the main LFO shape you have selected on the Tweak knob. Setting the Tune knob
at noon will yield traditional LFO shapes corresponding to the selected shape. As you move this
control away from noon, the LFO wave shape will asymmetrically deform toward the beginning
of the wave below noon and toward the end of the wave above noon. For example, selecting the
triangle shape and setting the symmetry knob to minimum would produce a traditional sawtooth
wave. See below for other examples of wave shapes at min and max settings with the symmetry
knob. Explore the areas in between to create unique, non-traditional LFO waves.
•
X
: The X parameter controls a different effect depending on which program you are using. To edit
the X parameter, set the switch to the X position and use the Tune knob to adjust. See the program
overview section to learn what the X knob does in each program.
CONTROLS
A | B | C Switch
- The M1 offers three banks for storing presets. Each bank holds three presets for a
total of nine that you can access without using MIDI. The Bank switch selects which bank of presets
the pedal will access. Bank A is presets 0-2, Bank B is 3-5, and Bank C is 6-8. The presets in each bank
correspond to the Red, Green, and Blue preset LED. The first preset in each bank is Red, the second is
Green and the third is Blue.
Bypass/Lo-Fi Switch
- Used to turn the pedal on and off and to access the lo-fi parameters.
• Click to turn the pedal on and click again to turn the pedal off.
• When the pedal is on, press and hold while turning the Tweak or Tune to knobs to adjust the
desired lo-fi parameters.
Bypass LED
- Indicates if the pedal is on or off by illuminating solid when on, and off when the pedal
is off.
Tap/Skip Switch
- Used to tap the desired LFO rate, which is scaled by the selected tap division. The
Tap/Skip switch also allows you to momentarily engage a “skipping” effect like a needle skipping on
a record player. Press and hold to engage the effect to automatically repeat the last few milliseconds
of audio until the switch is released. The length of audio repeated is determined by the current LFO
rate.
Preset LED
- The Preset LED lights up the color of the selected preset (red, green, or blue) and
indicates the rate of the LFO by blinking at the current rate. When a knob is turned, this LED turns
purple to indicate the preset has been modified. When that knob crosses its saved position, the LED
changes back to the color of the currently selected preset to let you know its last saved position. This
is helpful when you want to tweak a parameter on a preset but cannot remember where a knob was
last saved.
Audio Input and Output
- The Mako M1 offers multiple input and output configurations.
o Mono In / Mono Out - Use the top set of jacks for mono in - mono out.
o Mono In / Stereo Out
o Stereo In / Stereo Out
CONTROLS
SINE WAVE
SINE WAVE
TRIANGLE WAVE
TRIANGLE WAVE
SQUARE WAVE
SQUARE WAVE
TUNE
TWEAK
TUNE
TWEAK
TUNE
TWEAK


