background image

2.     PREPARATION

1.


Never use the engine and machine until you 

have read and completely understand this 

manual, the Engine Operator's Manual and 

each of the Safety Messages found on the 

safety signs on the engine and machine.

2.  Personal pro-

tection equip-

ment including 

hard hat, safety 

glasses, safety 

shoes, and 

gloves are rec-

ommended dur-

ing assembly, 

installation, operation, adjustment, maintain-

ing, repairing, removal, cleaning, or moving 

the unit.  Do not allow long hair, loose fitting 

clothing or jewellery to be around equipment.

3. 

PROLONGED EXPOSURE 

TO LOUD NOISE MAY 

CAUSE PERMANENT 

HEARING LOSS!


Power equipment with or 

without equipment attached 

can often be noisy enough 

to cause permanent, partial 

hearing loss.  We recommend that you wear 

hearing protection on a full-time basis if the 

noise in the Operator's position exceeds 80db.   

Noise over 85db on a long-term basis can 

cause severe hearing loss.  Noise over 90db 

adjacent to the Operator over a long-term ba-

sis may cause permanent, total hearing loss.  

NOTE:

  Hearing loss from loud noise (from 

tractors, chain saws, radios, and other such 

sources close to the ear) is cumulative over a 

lifetime without hope of natural recovery.

4.  Clear working area of stones, branches or 

hidden obstacles that might be hooked or 

snagged, causing injury or damage.

5.  Use only in daylight or good artificial light.

6.  Be sure machine is properly positioned, ad-

justed and in good operating condition.

7.  Ensure that all safety shielding and safety 

signs are properly installed and in good condi-

tion.

2.     MAINTENANCE SAFETY

1.


Good maintenance is your responsibility. Poor 

maintenance is an invitation to trouble.

2.  Follow good shop practices.


-  Keep service  

  area clean and  

  dry.


-  Be sure electrical  

  outlets and tools  

  are properly  

  grounded.


-  Use adequate  

  light for the job at  

  hand.

3.  Make sure there is 

plenty of ventilation.  Never operate the en-

gine of the towing vehicle in a closed building.  

The exhaust fumes may cause asphyxiation.

4.  Before working on this machine, shut off the 

engine and turn fuel valve off.

5.  Never work under equipment unless it is 

blocked securely.

6.  Always use personal protection devices such 

as eye, hand and hearing protectors, when 

performing any service or maintenance work.  

7.  Where replacement parts are necessary for 

periodic maintenance and servicing, genuine 

factory replacement parts must be used to 

restore your equipment to original specifica

-

tions.  The manufacturer will not be responsi-

ble for injuries or damages caused by use of 

unapproved parts and/or accessories.

8.  A fire extinguisher and first aid kit should be 

kept readily 

accessible while 

performing main-

tenance on this 

equipment.

9.  Periodically tighten all bolts, 

nuts and screws and check that all electrical 

and fuel connections are properly secured to 

ensure unit is in a safe condition.

10. When completing a maintenance or service 

function, make sure all safety shields and 

devices are installed before placing unit in 

service.

Summary of Contents for HUF12000E

Page 1: ...ety Operation Maintenance and Trouble Shooting information contained within the Operator s Manual This manual covers the Wallenstein Portable Generator Models HUF12000E and HUF12000EA Use the Table of Contents or Index as a guide to locate required information Keep this manual handy for frequent reference and to pass on to new operators or owners Call your Wallenstein dealer or the Distributer if ...

Page 2: ...9 9283 or Fax 519 699 4146 DANGER Indicates an imminently hazardous situation that if not avoided will result in death or serious injury This signal word is to be limited to the most extreme situations typically for machine components which for func tional purposes cannot be guarded WARNING Indicates a potentially hazardous situation that if not avoided could result in death or serious injury and ...

Page 3: ...the using and maintenance procedures and related SAFETY information contained in this manual This manual will take you step by step through your working day and alerts you to all good safety practices that should be used while using the Portable Genera tor Remember YOU are the key to safety Good safety practices not only protect you but also the people around you Make these practices a work ing pa...

Page 4: ...llowed to work with this equipment Do not allow persons to use or assemble this unit until they have read this manual and have developed a thorough understanding of the safety precautions and of how it works Review the safety instructions with all users annually 6 This equipment is dangerous to children and persons unfamiliar with its operation The operator should be a responsible properly trained...

Page 5: ...n all new personnel and review instruc tions frequently with existing workers Be certain only a properly trained and physically able person will use the machinery A person who has not read and understood all using and safety instructions is not qualified to use the machine An untrained operator exposes himself and bystanders to possible serious in jury or death If the elderly are assisting with th...

Page 6: ...erly positioned ad justed and in good operating condition 7 Ensure that all safety shielding and safety signs are properly installed and in good condi tion 2 6 MAINTENANCE SAFETY 1 Good maintenance is your responsibility Poor maintenance is an invitation to trouble 2 Follow good shop practices Keep service area clean and dry Be sure electrical outlets and tools are properly grounded Use adequate l...

Page 7: ...Never allow children or unauthorized people to operate or be around this machine 13 Keep the working area clean and free of de bris to prevent tripping Operate only on level ground 14 Do not cover the generator while in operation Overheating can result in damaged equip ment 15 For storage do not cover the generator until it has cooled down completely 16 The ambient temperature should not exceed 10...

Page 8: ...gine starts 15 DO NOT strike flywheel with a hard object or metal tool as this may cause flywheel to shatter in operation Use proper tools to service engine 16 DONOToperateenginewithoutamuffler Inspect periodically and replace if necessary If engine is equipped with a muffler deflector inspect pe riodically and replace if necessary with correct deflector 17 DO NOT operate engine with an accumulati...

Page 9: ...yone else to use this generator until such information has been reviewed Annually review this information before the season start up Make these periodic reviews of SAFETY and OPERATION a standard practice for all of your equipment We feel that an untrained operator is unqualified to use this machine A sign off sheet is provided for your record keeping to show that all personnel who will be working...

Page 10: ...ors and shields before starting and operating Do not connect the generator to a commercial power line Do not operate with damaged or defective extension cords or power cords Never operate any electrical equipment with damaged or defective cords Do not operate this generator in areas with poor ventila tion The exhaust fumes contain carbon monoxide a poisonous odorless invisible gas Prolonged exposu...

Page 11: ...available from your authorized dealer The types of safety signs and locations on the equipment are shown in the illustrations that follow Good safety requires that you familiarize yourself with the various safety signs the type of warning and the area or particular function related to that area that requires your SAFETY AWARENESS Think SAFETY Work SAFELY B ...

Page 12: ...embling the machine When the machine is shipped follow this procedure when preparing for the customer 1 Clear the area of bystanders especially small children before starting 2 Move the machine to the assembly area Be sure there is sufficient clearance to access the machine from all sides 3 Remove the lid and lay to the side 4 Use a hoist or a crane to lift the unit out of its crate Fig 1 TYPICAL ...

Page 13: ...n b Bring a battery to the machine c Lay out components d Position battery in its tray e Install the anchor posts and top brackets Snug up tightly f Attach cables to battery posts and tighten to their specified torque Fig 3 BATTERY Typical Shipping Lay Out Battery Posts Bracket Cables ...

Page 14: ...e starting Review safety instructions annually Stop and disable engine remove ignition key and place in your pocket and wait for all mov ing parts to stop before servicing adjusting or repairing To prevent electrical shocks do not operate this generator in the rain or with wet hands It should be grounded in damp or highly conduc tive conditions Close and secure all guards deflectors and shields be...

Page 15: ...s and operation Fig 4 PRINCIPLE COMPONENTS A Engine B Fuel Tank C Battery D Control Panel E Ignition Key F 120 V Outlets G 240 V Outlets H Circuit Breaker J Voltmeter K Idle Relay L Generator M Hour Meter The unit is designed to provide 120 V or 240 V 60 Hz power as a back up power supply at a remote location Each outlet is designed with a circuit breaker to protect against overload The machine is...

Page 16: ...e nance Section 5 4 PRE OPERATION CHECKLIST Efficient and safe operation of the Wallenstein Port able Generator requires that each operator reads and understands the using procedures and all related safety precautions outlined in this section A pre operation checklist is provided for the opera tor It is important for both the personal safety and maintaining good mechanical condition that this chec...

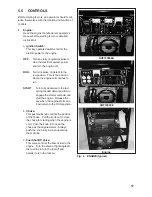
Page 17: ...gine will continue to run START Turn fully clockwise to the last spring loaded detent position to engage the starter solenoid and start the engine Release the key when the engine starts and it will return to the RUN position b Choke This push pull knob controls the position of the choke Pull the knob out to close the choke for starting when the engine is cold Push the knob in to open the choke as ...

Page 18: ...if it is tripped g 50 Amp 120 Volt Circuit Breaker This two position switch controls the setting of the 50Amp circuit breakers Move the switch up to engage the breaker if it was tripped and down to dis engage h Master Breaker This two position switch controls the master breaker for the generator Move the switch up to engage the breaker before starting or when the breaker trips and down to disengag...

Page 19: ...Do not operate with damaged or defective extension cords or power cords Never oper ate any electrical equipment with damaged or defective cords Do not operate this generator in areas with poor ventilation The exhaust fumes contain carbon monoxide a poisonous odorless invisible gas Prolonged exposure can lead to unconscious ness and death Do not refuel the engine while it is in opera tion or still ...

Page 20: ...etting h Turntheapplianceonorplugintheelectrical load 5 Stopping a Turn the appliance off or unplug the electri cal load b Run the engine for approximately three minutes to allow the engine to cool c Turn engine off 6 Emergency Stopping Turn the engine off if an emergency arises Correct the condition before resuming work and re starting the engine 7 Terrain The generator works well in a wide varie...

Page 21: ...ce exceeds the outlet capacity the cir cuit breaker will be tripped Reduce the current draw and reset the breaker before resuming operation 10 Electrical Component Condition Always use electrical components that are in good condition Do not use electrical cords plugs and connectors that are frayed damaged cracked or not in good condition Electrical components that are not in good condition can lea...

Page 22: ...e the engine runs at full throttle before it slows to low idle In an application where the electrical load is intermittent skill saws drills other hand tools etc the idle control maintains the engine at full RPM and the generator at full generating capacity to allow work to continue without interruption Turn the rotary switch to set the length of time at high idle that works best for your applica ...

Page 23: ...Keep the working area neat and clean to pre vent slipping and tripping Prevent accidents at the work site d Always ground the frame to minimize the chance of sparks shocks or shorts This is very important in damp wet or rainy condi tions e Position the generator under cover to protect it from rain or bad weather f Do not operate when the ambient tempera ture exceeds 100 F 39 C to prevent over heat...

Page 24: ...o the frame for moving with an A frame forklift crane or other lifting system 2 Wheel Kit A wheel kit is available to move the generator Place the frame into the wheel kit and move to the new location 3 Transporting When transporting from location to location follow this procedure a Run the engine use the generator until the fuel tank is empty or nearly empty b Turn the fuel line off 5 7 MOVING Fi...

Page 25: ...ve off 5 Touchupallpaintnicksandscratchestoprevent rusting 6 Remove ignition key and store in a secure place 7 Remove the battery and store it in a cool dry area on wooden blocks or a wooden pallet Charge it monthly to maintain an adequate charge 8 It is best to store the machine inside If that is not possible cover with a waterproof tarpaulin and tie down securely 9 Store in an area away from hum...

Page 26: ...ensure unit is in a safe condition When completing a maintenance or service function make sure all safety shields and de vices are installed before placing unit in serv ice 6 SERVICE AND MAINTENANCE 6 1 SERVICE 6 1 1 FLUIDS AND LUBRICANTS 1 Grease Use an SAE multipurpose high temperature grease with extreme pressure EP perform ance Also acceptable is an SAE multipur pose lithium base grease 2 Engi...

Page 27: ...commended is based on normal oper ating conditions Severe or unusual conditions may require more frequent lubrication or oil changes 8 Hours or Daily 1 Check engine oil level 2 Check fuel level Fig 16 FUEL TANK Typical Fig 15 DIP STICK Typical ...

Page 28: ...28 40 Hours or Weekly 1 Clean engine air cleaner 100 Hours or Monthly 1 Change engine oil 2 Change engine oil filter Fig 17 AIR CLEANER Typical Fig 18 DRAIN PLUG Fig 19 OIL FILTER ...

Page 29: ...29 100 Hours or Monthly 3 Replace Fuel Filter 4 Replace engine air cleaner Annually 1 Clean machine Fig 20 INLINE FUEL FILTER Fig 21 AIR CLEANER Typical Fig 22 MACHINE ...

Page 30: ...his page to continue record ACTION CODE CK CHECK CL CLEAN R REPLACE CH CHANGE HOURS SERVICED BY MAINTENANCE 8 Hours or Daily CK Engine Oil Level CK Fuel Level 40 Hours or Weekly CL Air Cleaner 100 Hours or Monthly CH Engine Oil CH Engine Oil Filter R Fuel Filter R Air Cleaner Annually CL Machine ...

Page 31: ...EANER 1 Review the Operator s Manual for the engine 2 Place all controls in neutral stop engine and remove ignition key and place in pocket before maintaining 3 Remove the cover over the air cleaner 4 Remove the filter from the engine 5 Use an air house to blow the dust and debris out of the filter 6 Install filter 7 Install and secure the cover Fig 23 AIR CLEANER ...

Page 32: ...under the drain plug 5 Remove the drain plug and allow the oil to drain for 10 minutes 6 Install and tighten the drain plug 7 Dispose of the used oil in an approved con tainer 8 Remove engine oil filter 9 Apply a light coat of oil to the O ring and in stall the replacement filter Snug up by hand and then tighten 1 2 turn 10 Fill the crankcase with the specified oil 11 Run the engine for 1 2 minute...

Page 33: ...ea of bystanders especially small children 2 Stop engine remove ignition key and wait for all moving parts to stop before servicing or maintaining the machine 3 Turn fuel valve off between tank and filter 4 Remove filter 5 Install replacement filter 6 Wipe away any spilled fuel 7 Open fuel valve Fig 25 FUEL FILTER DANGER Do not smoke when working on fuel system Keep all sparks flames or hot materi...

Page 34: ...000 continuous watts of power at any type of remote location It is a simple and reliable system that requires minimal maintenance In the following section we have listed many of the problems causes and solutions to the problems that you may encounter If you encounter a problem that is difficult to solve even after having read through this trouble shooting section please call your local distributor...

Page 35: ...0 120 240 Fuel Tank Capacity 40 litres 40 litres Run Time 1 2 Load 10 hours 10 hours Full Load 7 hours 7 hours Weight 348 lbs 348 lbs Dimensions 32 L x 22 W x 32 L x 22 W x 29 H 29 H Overload Protection Yes Yes Engine Starting Electric Electric Auto Idle w Idle Delay No Yes Hour Meter Yes Yes GFI Receptacles No Yes Voltage Meter Yes Yes 8 SPECIFICATIONS 8 1 MECHANICAL SPECIFICATIONS SUBJECT TO CHA...

Page 36: ... 72 110 155 215 390 570 850 9 19 33 53 80 115 160 290 420 630 17 36 63 100 155 220 305 540 880 1320 12 27 45 75 115 165 220 400 650 970 8 8 N m lb ft Bolt Torque Bolt Diameter A 10 9 N m lb ft M3 M4 M5 M6 M8 M10 M12 M14 M16 M20 M24 M30 M36 5 3 6 10 25 50 90 140 225 435 750 1495 2600 4 2 2 4 7 18 37 66 103 166 321 553 1103 1917 1 8 4 5 9 15 35 70 125 200 310 610 1050 2100 3675 1 3 3 3 7 11 26 52 92...

Page 37: ...igns 5 Safety Training 5 Sign Off Form 9 Storage Safety 7 Safety Sign Locations 10 Service and Maintenance 26 Maintenance 31 Service 26 Specifications 35 Bolt Torque 36 T Trouble Shooting 34 A Assembly 12 I Index 37 Introduction 1 O Operation 14 Controls 17 Field Operation 19 Machine Break In 16 Machine Components 15 Pre Operation Checklist 16 Moving 24 Storage 25 To the New Operator or Owner 14 ...

Reviews: